Disclosure: This post contains affiliate links, which means we may earn a commission if you purchase through our links at no extra cost to you.
No Carve Pumpkin Decorating Ideas are everywhere this season, an easy way to bring autumn color and cozy charm to porches, mantels, and tabletops. These no carve pumpkin decorating ideas swap knives for paint, fabric, stickers, and natural accents so you can finish a festive look in an afternoon.
They’re popular now because they save time, feel safer for families, and work well for renters or busy hosts.
From kid-friendly projects to chic porch displays, these ideas match a range of budgets and moods — perfect for group activities, student flats, or quick weekend refreshes.
Painted Polka Dot Pumpkins With Bold Colors

Bright polka dot pumpkins are a cheerful no-carve option that instantly lifts fall tables and kid-friendly displays. Use acrylic paint in a palette of pumpkin orange, teal, mustard yellow, and cream for a modern retro vibe. Materials are minimal: small foam brushes, round sponge daubers, and a clear sealant to lock in glossy color. This project suits busy parents, classroom parties, or a weekend session with friends. Arrange mixed sizes on a wooden tray with eucalyptus sprigs and tiny gourds for texture and visual balance.
Quick Tips
- Apply a smooth base coat before dotting.
- Use sponge daubers for even circles.
- Seal with spray varnish to protect paint.
Chalkboard Painted Pumpkin With Seasonal Lettering

Chalkboard-painted pumpkins offer a versatile and reusable no-carve idea for porches and kitchen counters. Paint pumpkins in matte black chalkboard paint and add seasonal lettering like “harvest” or a countdown to a holiday using white chalk pens. The palette is monochrome with warm brown stems and a touch of greenery for contrast. This look feels modern farmhouse and suits hosts who love swapping messages for each gathering or photo ops. Wipe and redraw for new sayings or guest-friendly signs at dinner parties.
Quick Tips
- Sand the surface lightly for a smooth finish.
- Cure chalkboard paint before writing.
- Use a damp cloth to fully erase before new text.
Decoupage Napkin Pumpkins With Floral Motifs

Decoupage napkin pumpkins bring delicate floral patterns to no-carve decorating without carving tools. Use printed paper napkins or tissue in colors like dusty rose, sage green, cream, and soft gold, and adhere with decoupage medium for a layered, textured finish. The vibe ranges from vintage to cottagecore depending on floral scale and ribbon accents. These are great for centerpieces, bridal showers, or a refined mantle vignette. Finish with a satin ribbon at the stem and a soft spritz of matte sealant to protect the paper.
Quick Tips
- Separate napkin plies and use the top printed layer.
- Brush thin decoupage layers to avoid bubbles.
- Add a clear spray coat for durability.
Glitter Dip Ombre Pumpkins For Party Tables

Glitter-dipped ombre pumpkins are sparkle-forward no-carve options that elevate party tables and dessert stations. Blend glitter shades from copper to rose gold over a matte painted base in cream or charcoal for a glam look. Materials include craft glue, wide paintbrushes, and chunky plus fine glitter for texture. The vibe is festive and playful, ideal for evening gatherings, birthdays, or New Year–adjacent autumn events. Display on mirrored trays or candlelit clusters to reflect shine and create warm, twinkling ambiance.
Quick Tips
- Work in sections for smooth ombre transitions.
- Press glitter into wet glue to minimize fallout.
- Use a clear sealant spray to lock glitter in place.
Lace Ribbon Wrapped Vintage-Inspired Pumpkins For Cozy Mantels

Lace and ribbon-wrapped pumpkins give a vintage, romantic no-carve option that suits cozy mantels and intimate gatherings. Choose lace trims, satin ribbons, and neutral palettes of ivory, blush, and antique gold for a soft, elegant vibe. Use hot glue or double-sided tape to secure trims in layered bands around the pumpkin. Add small pearl pins or dried baby’s breath for a bridal shower or soft autumn wedding look. Arrange on stacked books or wooden crates for charming height variation and tactile contrast.
Quick Tips
- Measure trims before gluing for a neat fit.
- Layer textures—lace, ribbon, and twine—for depth.
- Attach tiny floral sprigs at the stem for a finishing touch.
Fabric Wrap Pumpkins Using Scraps And Burlap
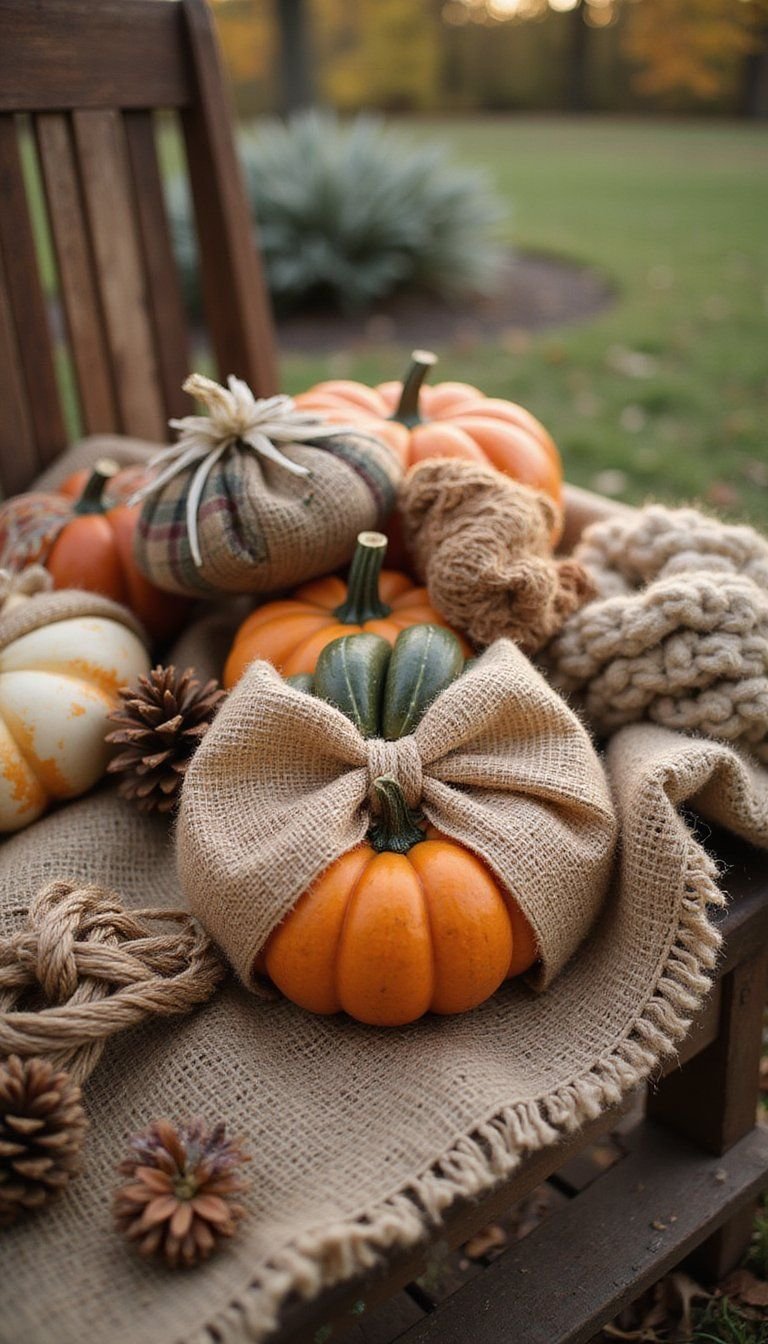
Fabric-wrapped pumpkins are a budget-friendly no-carve approach that turns scrap fabric and burlap into cozy fall accents. Mix textures like chunky knit, plaid flannel, and rustic burlap in colors such as burnt orange, forest green, deep navy, and oatmeal. Secure fabric with hot glue, twine, or decorative pins for farmhouse flair. This method works well for renters and students who want seasonal style without permanent changes. Group mismatched fabrics for a collected, homey vignette that invites touch and layers well with lanterns and pinecones.
Quick Tips
- Use batting or stuffing to smooth bulges beneath fabric.
- Finish seams with twine or ribbon for a polished look.
- Combine patterns and solids to prevent visual clutter.
Photo Transfer Pumpkins For Personalized Displays

Photo transfer pumpkins add a sentimental touch to no-carve seasonal styling by printing family photos or vintage images and transferring them onto pumpkin surfaces. Use gel medium transfers or printable transfer sheets and choose a muted palette—sepia or black-and-white photos look especially striking against white or pale gray pumpkins. These make memorable centerpieces for family dinners, anniversaries, or holiday gatherings. Pair with small votives and evergreen sprigs to frame the images and create an intimate gallery-like display on a dining table or entryway chest.
Quick Tips
- Use matte paint on the pumpkin for better transfer adhesion.
- Trim photo edges for a clean finish before applying medium.
- Seal gently with a clear matte spray to avoid shine on photos.
Monogram Sticker Pumpkins For Front Porch Welcome
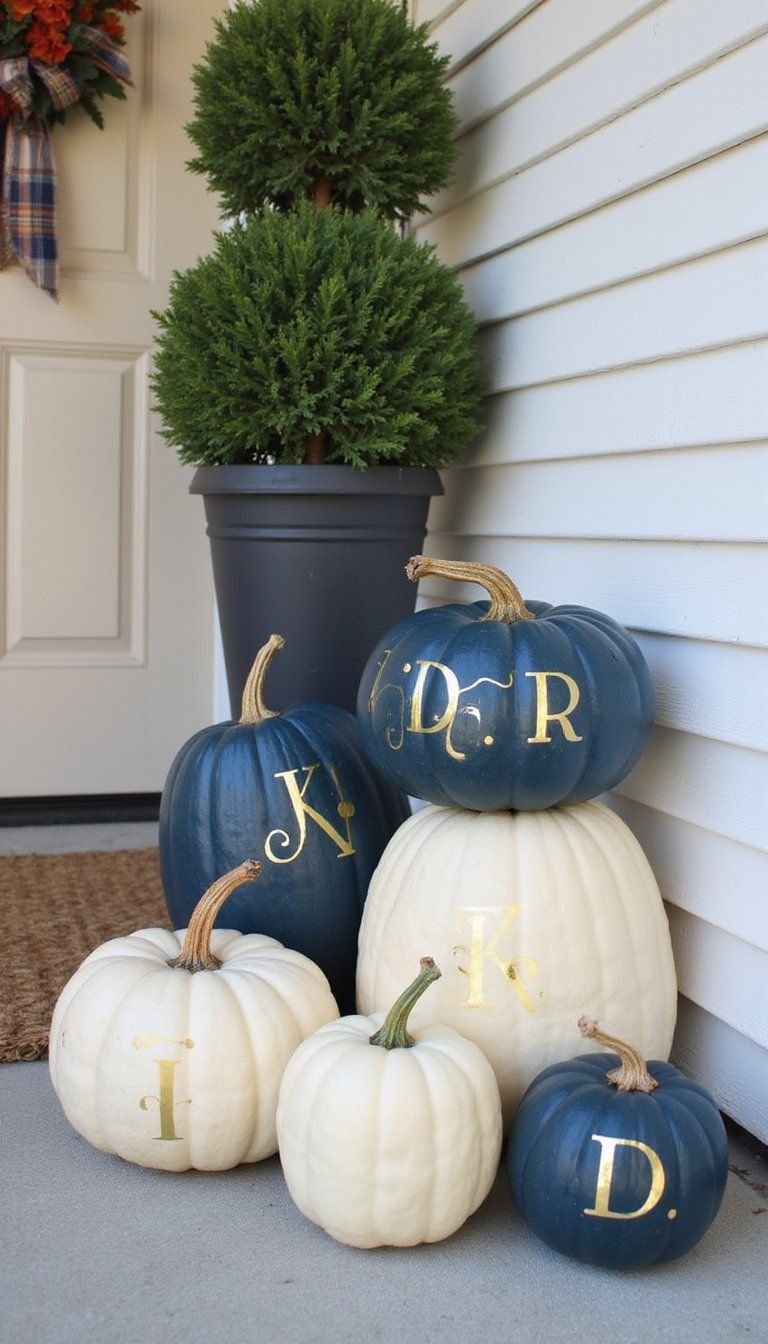
Monogram sticker pumpkins are an easy no-carve idea that makes porches feel welcoming and polished. Use large vinyl letters or adhesive monograms in metallic gold, matte black, or chalk white against a pumpkin painted in navy, hunter green, or cream. Add a coordinating wreath or plaid ribbon to tie the porch theme together. This approach suits hosts who prefer quick seasonal swaps and renters who want damage-free decor. Line several monogram pumpkins along steps or on a bench for a coordinated, photo-ready entryway.
Quick Tips
- Keep lettering bold and centered for readability from a distance.
- Use removable vinyl for an easy change-out.
- Add a small tag with house number for a custom touch.
Gold Leaf Glam Pumpkins For Chic Fall Tables

Gold leaf pumpkins bring a luxe edge to no-carve fall tables and cocktail parties. Apply gold leaf sheets to select pumpkin panels or stems over a base of matte black, deep berry, or charcoal gray for dramatic contrast. The palette reads upscale—black, gold, ivory, and deep jewel tones—and pairs well with crystal votives and dark wood trays. This idea suits hosts planning an elegant dinner or adults-only gathering. Keep tools minimal: adhesive size, soft brushes, and a small glass bowl to catch stray flakes.
Quick Tips
- Work in a low-draft area to keep gold leaf intact.
- Use a soft brush to smooth and burnish edges.
- Combine matte and metallic finishes for depth.
Succulent Planter Pumpkins For Rustic Centerpieces

Turn a hollowed or faux pumpkin into a succulent planter for no-carve table accents with a rustic vibe. Choose succulents in sage, dusty green, and burgundy tones alongside moss, pebbles, and soil-safe lining. Paint pumpkins in soft terracotta or leave natural for farmhouse appeal. These planters brighten brunch buffets, harvest parties, or a nature-themed tablescape. Use faux pumpkins if you want a longer-lasting display. Set planters on rotating wooden rounds or woven chargers and scatter small candles for a relaxed, organic look.
Quick Tips
- Use a plastic liner for fresh plants to prevent leaks.
- Select drought-tolerant succulents for easy care.
- Add decorative stones on top to retain moisture and finish the look.
Washi Tape Geometric Pumpkin Patterns That Pop
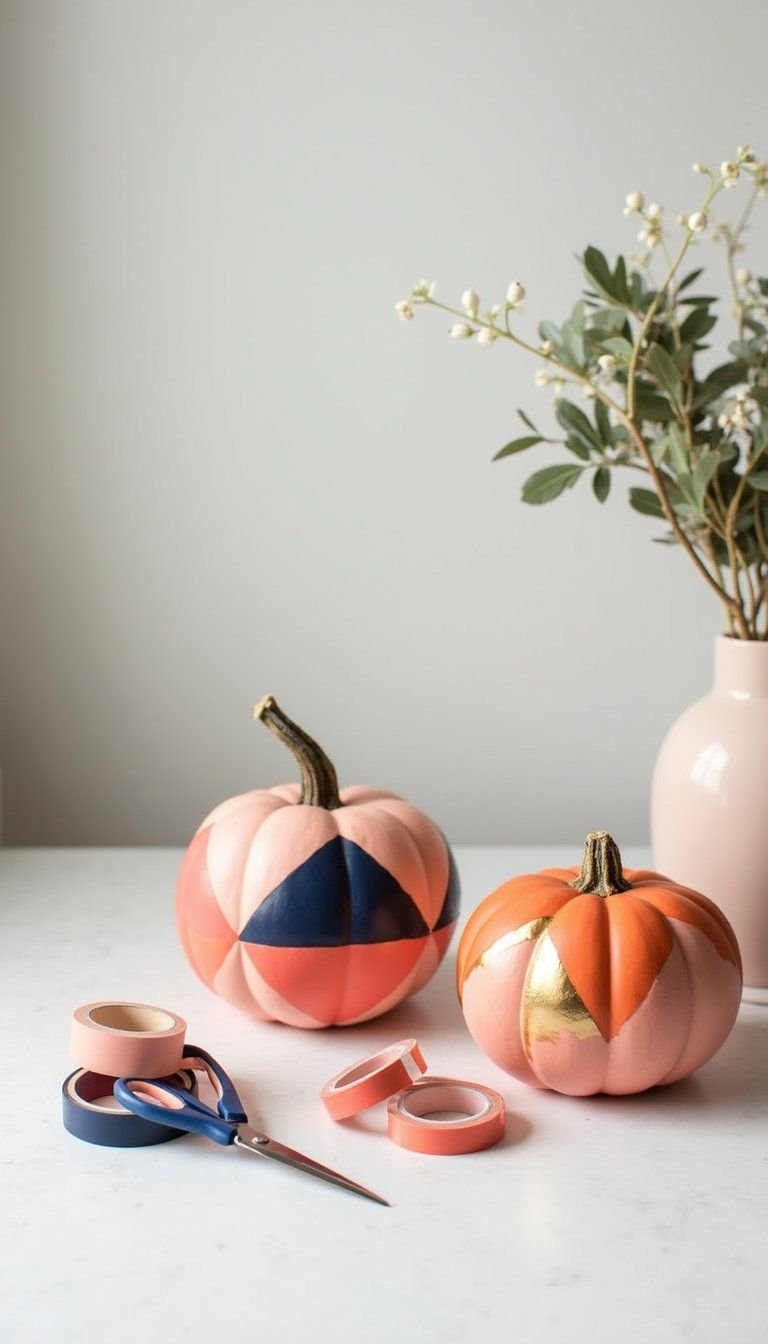
Washi tape creates clean geometric patterns for a quick no-carve makeover with minimal tools. Pick tapes in stripes, metallics, and bold solids in a palette like coral, navy, blush, and gold for a modern, graphic effect. The process is peel-and-stick, so it’s great for renters, students, and last-minute party prep. Combine vertical stripes, chevrons, or block grids across several pumpkins for a coordinated grouping. Finish by trimming edges neatly and layering thin tape for added detail and contrast.
Quick Tips
- Plan your design with pencil marks before applying tape.
- Use a craft knife for sharp tape edges.
- Mix matte and metallic tapes for visual interest.
Oversized Bow Ribbon Pumpkins For Doorsteps
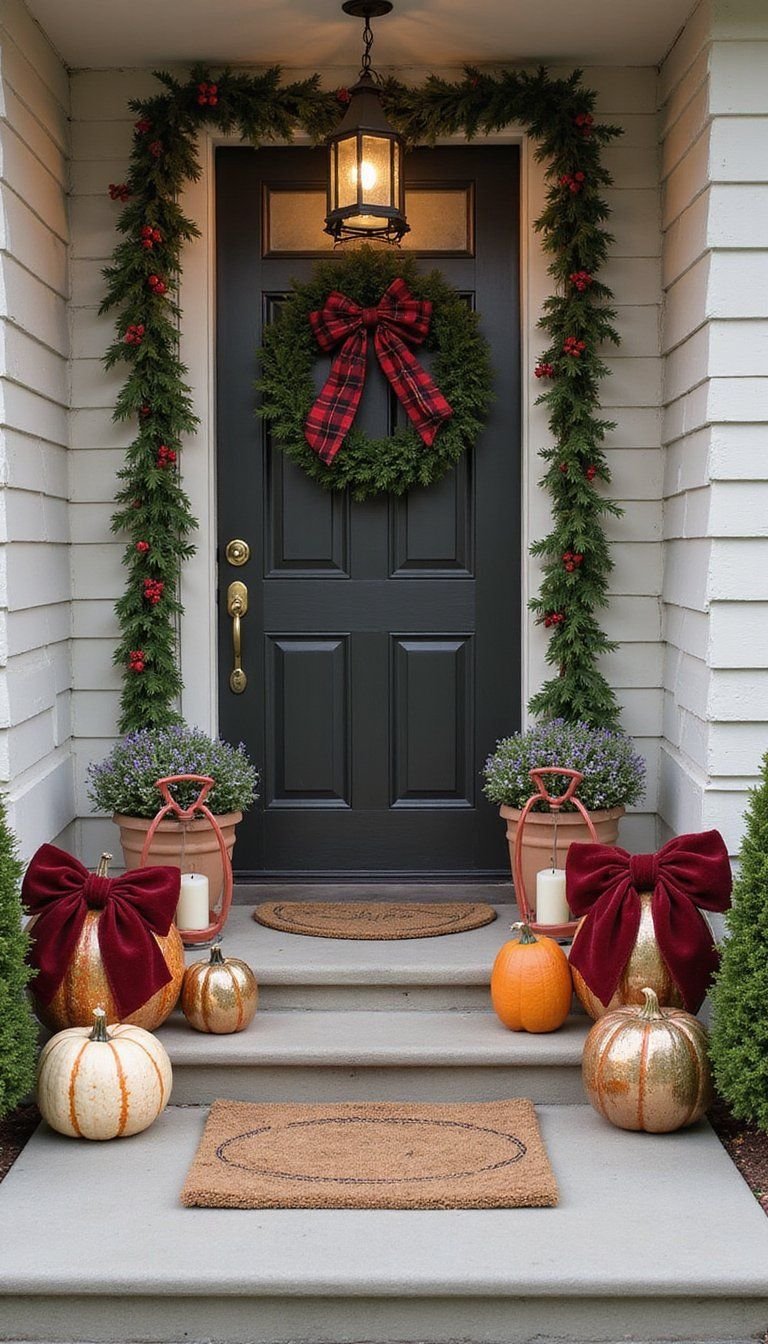
Oversized bow ribbon pumpkins are an easy no-carve upgrade for entryways that read festive and polished. Use wide wired ribbon in plaid, velvet, or metallics tied into dramatic bows in colors like deep red, forest green, or burnt orange. Attach bows to painted or natural pumpkins and anchor with hot glue or a ribbon-wrapped stem. Group on steps with lanterns and a welcome mat for an inviting arrival. This look works well for holiday hosts and gift-season front porches where visual impact matters more than time spent.
Quick Tips
- Use wired ribbon for fuller, long-lasting bows.
- Secure bows with floral wire around the stem.
- Layer ribbons for a richer, dimensional bow.
Pressed Leaf Collage Pumpkins With Natural Finish

Pressed leaf collages turn fall foliage into a rustic no-carve technique perfect for nature-inspired tables. Collect leaves in hues of amber, olive, rust, and gold, press them flat, and adhere with a clear-drying adhesive onto pale or white pumpkins for contrast. The texture reads earthy and handmade, great for outdoor gatherings or eco-minded decor. Pair with twine accents and raw wood chargers to highlight the organic palette. This project is ideal for family outings that collect seasonal materials and then assemble a tactile, fragrant centerpiece.
Quick Tips
- Press leaves between heavy books for 24–48 hours first.
- Use a thin layer of adhesive to avoid wrinkling.
- Seal gently with matte spray to protect leaves.
Sharpie Doodle Pumpkins For Kid-Friendly Fun
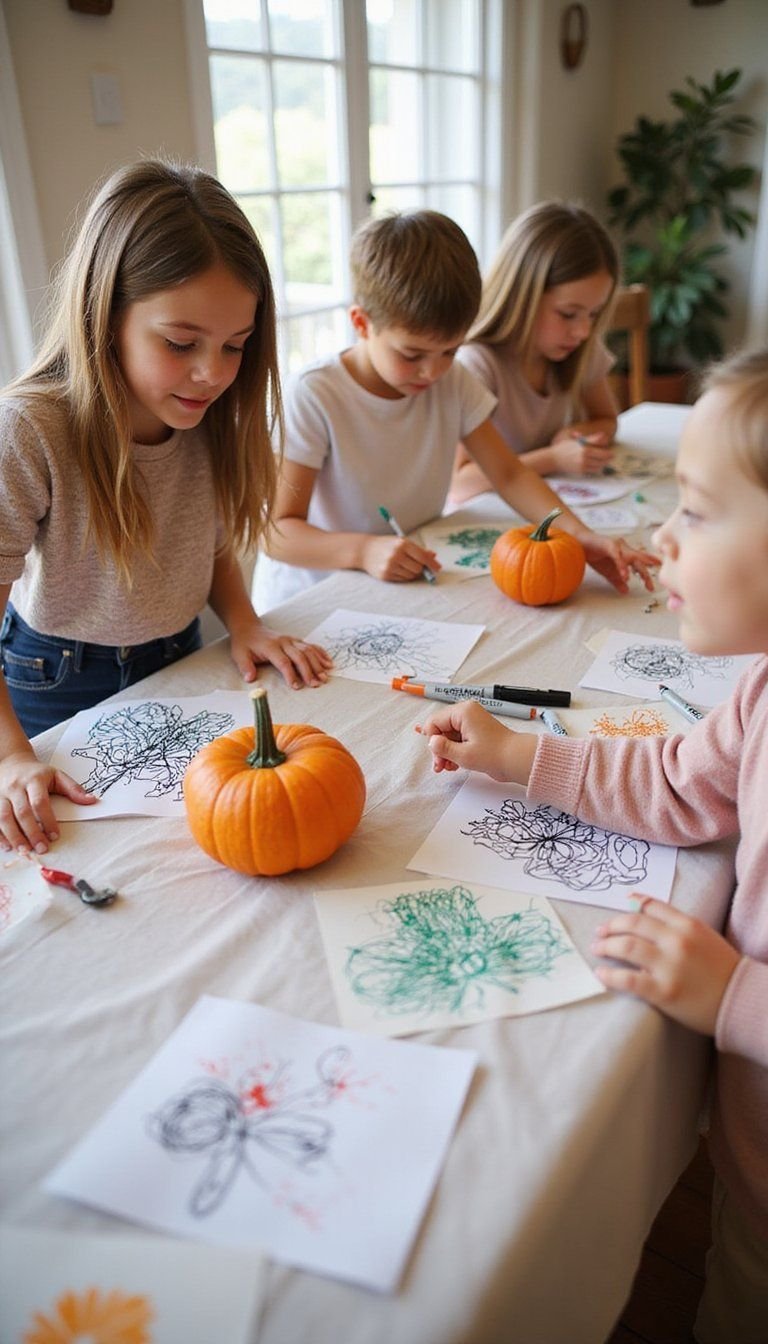
Sharpie-doodled pumpkins offer an easy, mess-light no-carve activity for kids and casual get-togethers. Use fine and bold permanent markers in black or jewel tones to create patterns like stripes, faces, florals, or hand-lettered phrases on white, orange, or pastel-painted pumpkins. The vibe is playful and modern, perfect for school parties, playdates, or rainy-day projects. Combine a set of stencils and freehand designs for mixed skill levels. These pumpkins are lightweight to pack away and make bright accents on shelves or classroom displays.
Quick Tips
- Test marker on a scrap surface to check color.
- Use stencils for crisp shapes and beginner confidence.
- Seal with a clear spray to protect marker lines.
Puffy Paint Polka Dot Pumpkins In Pastels
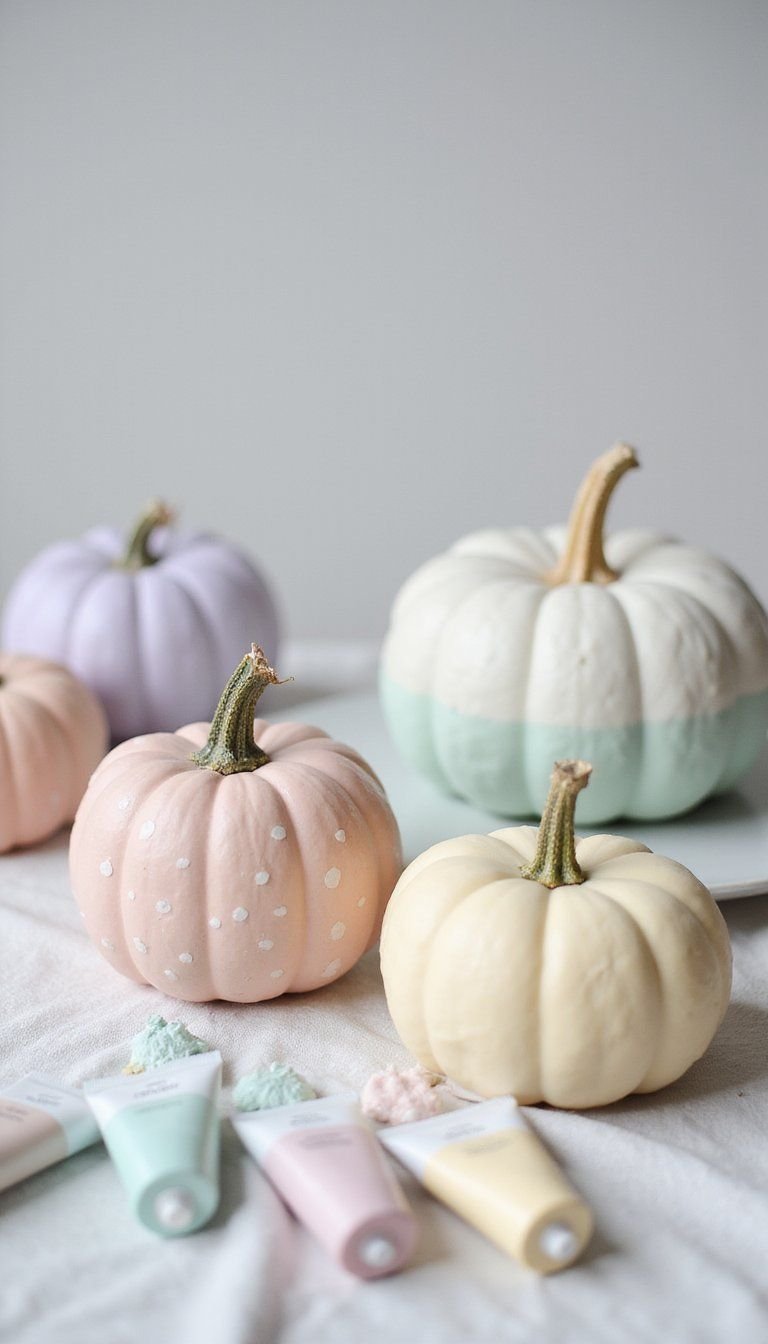
Puffy paint polka dot pumpkins bring tactile interest and soft color to no-carve decorating, great for baby showers or spring-adjacent fall displays. Use fabric puffy paint in pastel shades like mint, blush, lilac, and butter on white or pale gray pumpkins to create raised dots and tiny swirls. The result has a whimsical, nursery-ready vibe that also works for modern galleries of tabletop accents. Allow full drying time to maintain dimensional dots and arrange with soft textiles, plushies, or pastel candles for cohesive styling.
Quick Tips
- Practice dot pressure on paper before applying.
- Allow paint to dry flat to keep round shapes.
- Layer small dots for a textured, handcrafted look.
Yarn Wrapped Cozy Knit-Inspired Pumpkins For Mantels

Yarn-wrapped pumpkins mimic knit textures for warm, no-carve decor that feels like sweater season. Wrap pumpkins with chunky yarn in colors like cocoa brown, cream, deep maroon, and moss green for a layered, tactile mantel display. Incorporate pom-pom toppers or stitched accents for extra charm. This idea suits cold-weather gatherings, cozy reading nooks, and coffee-table styling. Use faux pumpkins for longevity or real ones for a short-term display that pairs beautifully with knit throws and amber glass candle holders for a snug vignette.
Quick Tips
- Use hot glue sparingly to secure yarn ends neatly.
- Wrap tightly for consistent coverage and texture.
- Mix yarn weights for visual interest and depth.
Sequin Ombre Pumpkins For Sparkly Evenings
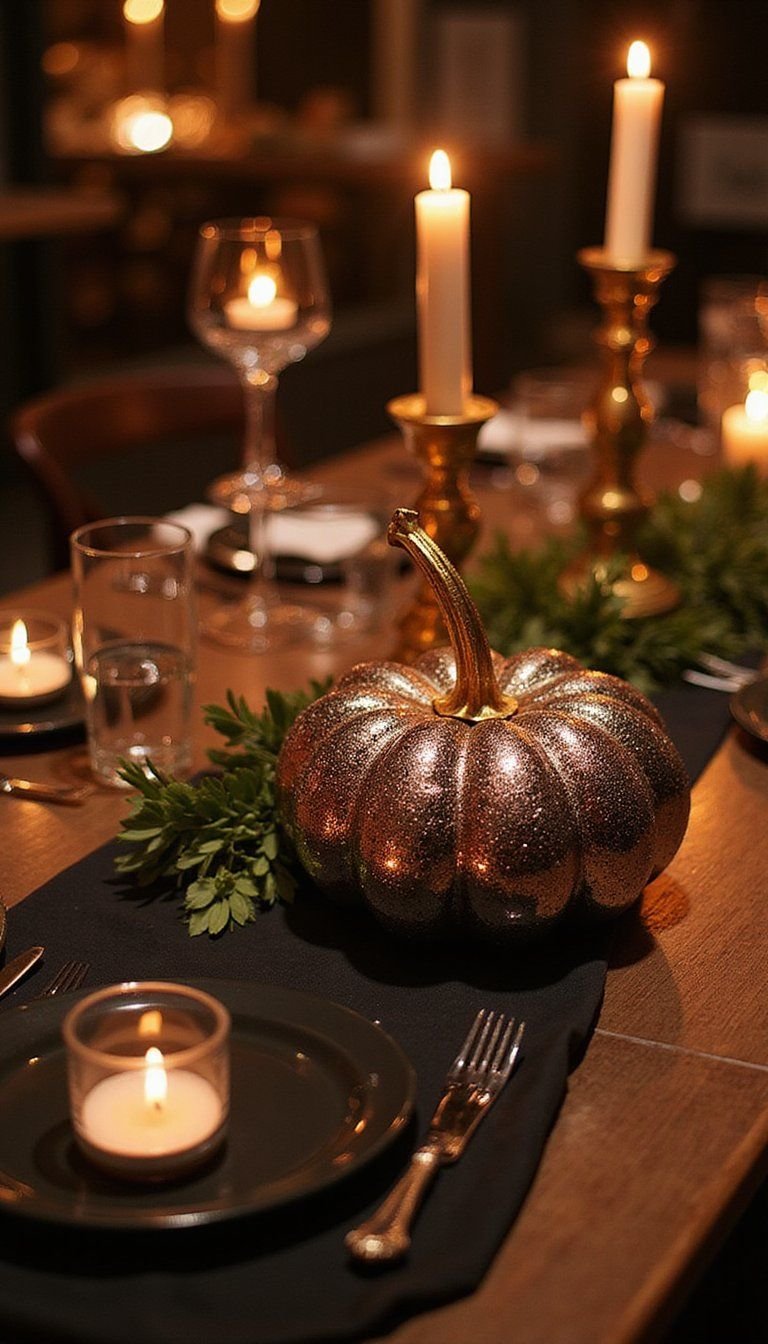
Sequin ombre pumpkins offer maximal shimmer for evening gatherings and cocktail-style fall parties without cutting into the pumpkin. Gradate sequins from dense sparkle at the base to light shimmer at the top in colors like gunmetal to rose gold or emerald to gold. Use a fabric adhesive or a hot-glue approach, working in small sections to keep shine uniform. The result is festive and dramatic, best for tabletops that catch candlelight or city balcony scenes. Pair with black linens and metallic accents to let the sequins pop.
Quick Tips
- Work from bottom up for cleaner ombre blending.
- Use small sequins for smoother transitions.
- Attach a felt base to protect surfaces from glue spots.
Metallic Spray Paint Ombre For Sleek Looks
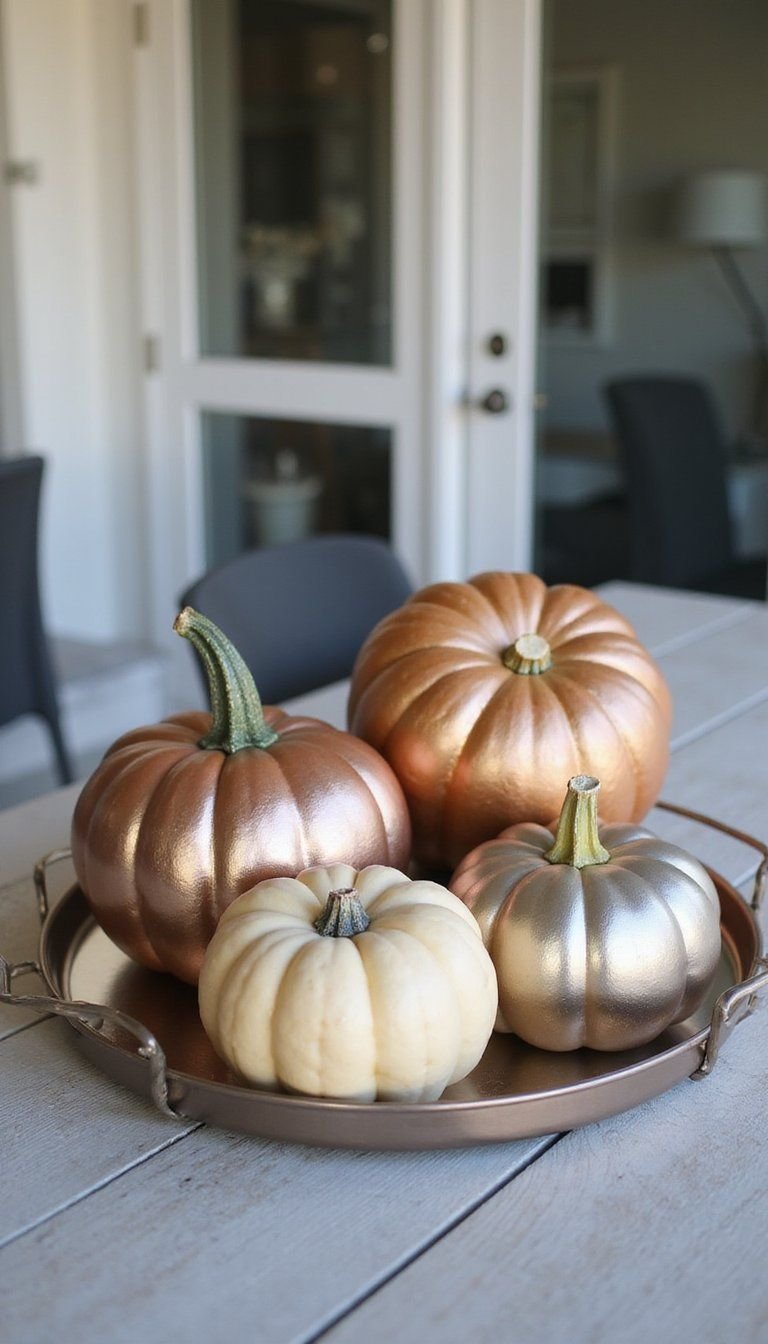
Metallic spray paint ombre pumpkins are a quick no-carve hack for contemporary spaces that want shine with minimal effort. Choose metallic shades like bronze, champagne, and pewter over matte bases in charcoal or ivory for a polished finish. Spray in graduated passes to achieve a soft ombre, and set pumpkins on mirrored or lacquered trays for modern impact. This approach suits apartment decorators, store displays, and hosts seeking a streamlined, luxe aesthetic without elaborate supplies. Keep spray sessions outdoors or well-ventilated for safety and even coverage.
Quick Tips
- Mask off stems or paint them a contrasting color.
- Spray in light, even passes to avoid drips.
- Use disposable gloves and work outdoors for best results.
Button Mosaic Pumpkin With Vintage Color Palette

Button mosaic pumpkins create a nostalgic no-carve look using mismatched buttons in a vintage color story—teal, coral, mustard, and cream—glued into swirling patterns or floral shapes. The tactile surface reads handcrafted and playful, ideal for craft nights, thrift-store makeovers, or retro party themes. Use a mix of sizes and finishes—matte, pearly, and wood—to keep the mosaic lively. Display with antique books and brass candlesticks to emphasize a retro vibe or place near cozy textiles for a collected, homey corner.
Quick Tips
- Sort buttons by color and size before arranging.
- Glue in concentric patterns for a cohesive look.
- Seal edges with clear glue to reduce rattling pieces.
Glow-In-The-Dark Night Porch Pumpkins For Halloween Evenings

Glow-in-the-dark pumpkins add a playful nocturnal effect to porch displays without carving. Paint pumpkins in neon or pale bases and apply glow-in-the-dark paint in patterns like moons, stars, or spooky silhouettes in lime green, aqua, or ghost white. Charge them under daylight or a bright lamp and then bring them out for evening trick-or-treating or autumn block parties. Pair with black lanterns and soft LED candles to create a layered nighttime scene. This option is family-friendly and fun for late-night porch photos and safe outdoor decor.
Quick Tips
- Charge paint in direct light for maximum glow time.
- Combine painted areas with reflective tape for extra visibility.
- Use battery-operated lights nearby to enhance glow effects.
Stamped Fabric Ink Pumpkins With Repeating Motifs
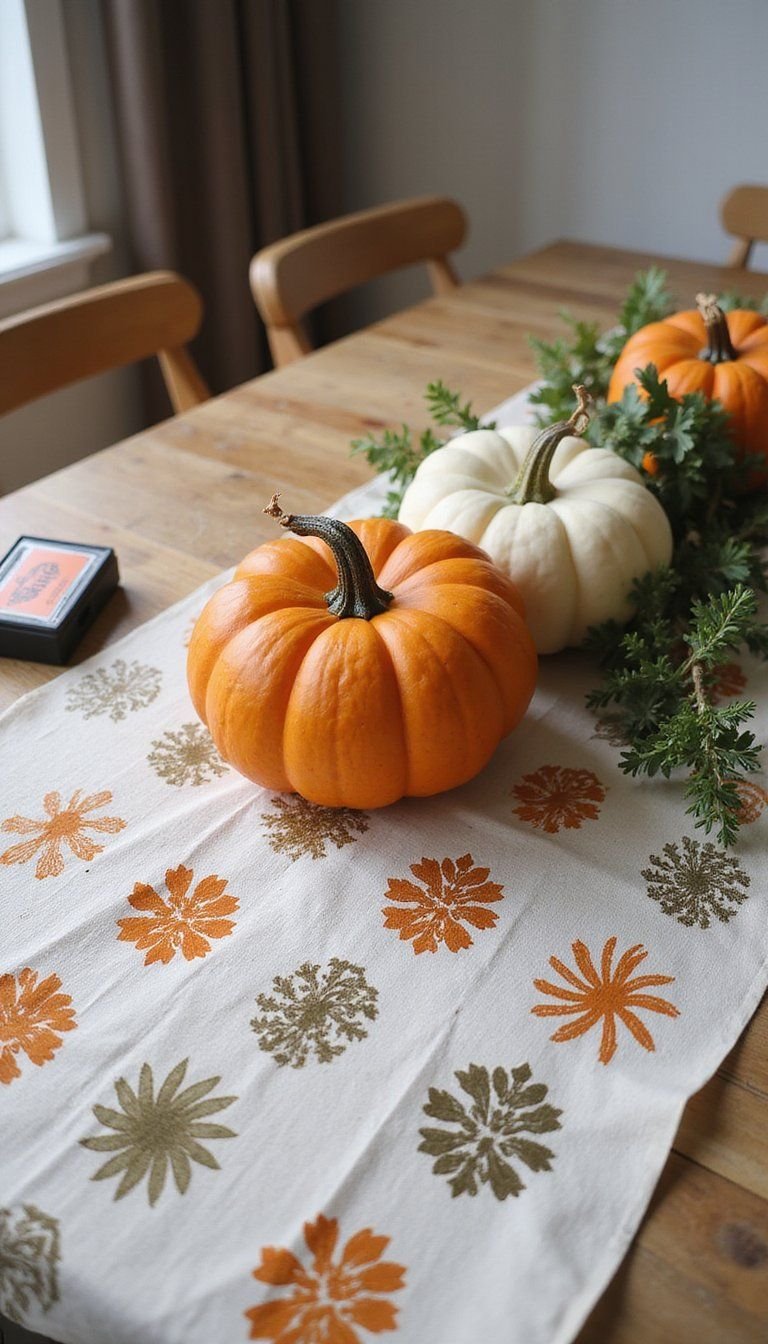
Stamped fabric ink pumpkins use rubber stamps and fabric ink to repeat motifs across a pumpkin for graphic, no-carve decoration. Choose stamps with leaves, geometric shapes, or tiny pumpkins and ink colors like sepia, olive, muted orange, and indigo for a handcrafted, modern folk look. This approach pairs well with linen runners and natural centerpieces for a refined casual table. Use a steady hand and allow ink to dry fully; add a thin coat of matte sealant if you want the design to last a season or two.
Quick Tips
- Practice stamping on paper before moving to the pumpkin.
- Hold the stamp steady and press evenly for clean impressions.
- Seal with a matte spray to protect inked designs.