Disclosure: This post contains affiliate links, which means we may earn a commission if you purchase through our links at no extra cost to you.
Winter always nudges me toward yarn. The quiet rhythm of needles and the pillowy hush of wool have saved more than one grey afternoon; Cozy Winter Yarn Craft Projects became my way to settle, sip something warm, and watch texture grow under my fingers.
Over the years I kept a stack of small patterns that made mornings gentler and rooms softer.
The projects below are the ones I keep returning to when the air bites a little harder or when I want something tangible and comforting to pass the time.
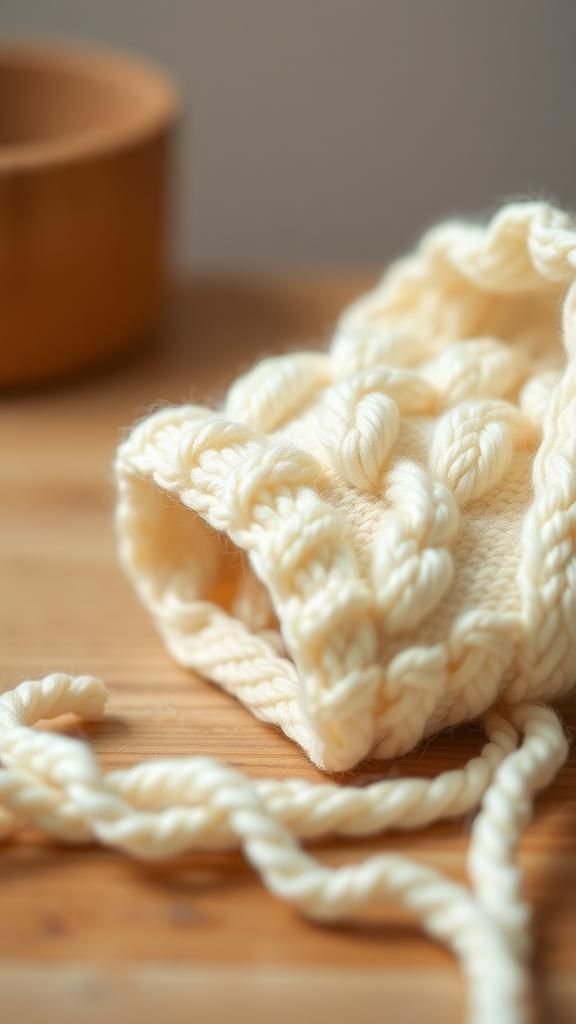
Chunky cable-knit mug cozy for cold mornings

I remember wrapping a hand around a steaming mug and noticing the contrast between hot ceramic and thick wool. This chunky cable-knit cozy has a dense, pillowy feel that muffles the bite of cold and invites slow sipping.
The cables pull light into shadow, creating ridges that beg to be stroked. The yarn gives off a faint lanolin scent that reminds me of market stalls and comfort.
Colors read warm and rich under soft daylight, and the cozy seems to absorb the room’s hush while adding a tactile note to a simple cup.
Steps
- Cast on enough stitches to fit around a mug, keeping the number compatible with a cable pattern.
- Work a few rows of ribbing at the base to add stretch and a neat edge.
- Establish the cable pattern and continue until the cozy reaches desired height.
- Bind off and seam the short edges together, aligning the ribbing rows for a tidy finish.
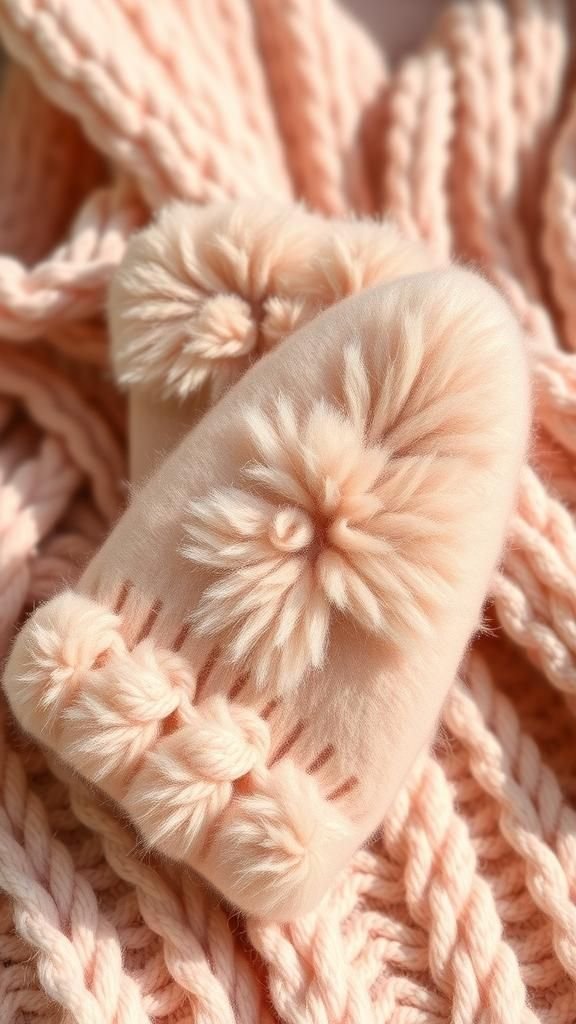
Plush pompom beanie that feels like a hug
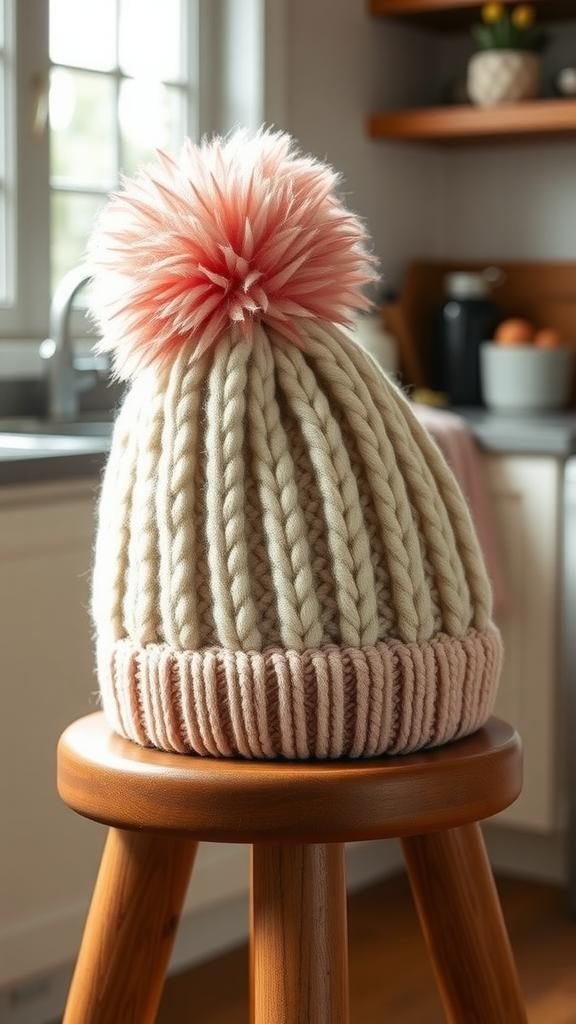
This beanie lived in my backpack for an entire winter; its crown is cushioned and its pompom is a small cloud that bounces with each step. The fabric compresses pleasantly when stuffed into coat pockets and rebounds without losing loft.
Fingers trace rows of soft stitches that capture a subtle sheen, and the brim folds with reassuring density. I liked the contrast of a muted base with a brighter pompom perched on top, a playful punctuation against grey skies.
The hat seemed to soften cold gusts and lend quiet comfort on hurried mornings.
Steps
- Cast on for the brim and work in a stretchy stitch until the band sits comfortably.
- Transition to larger needles and knit in the round, maintaining consistent tension and stitch pattern.
- Begin alternating decreases to shape the crown when the beanie reaches the right length.
- Fasten off, gather stitches to close the top, and secure a fluffy pompom at the crown.
Soft fingerless mitts perfect by the window
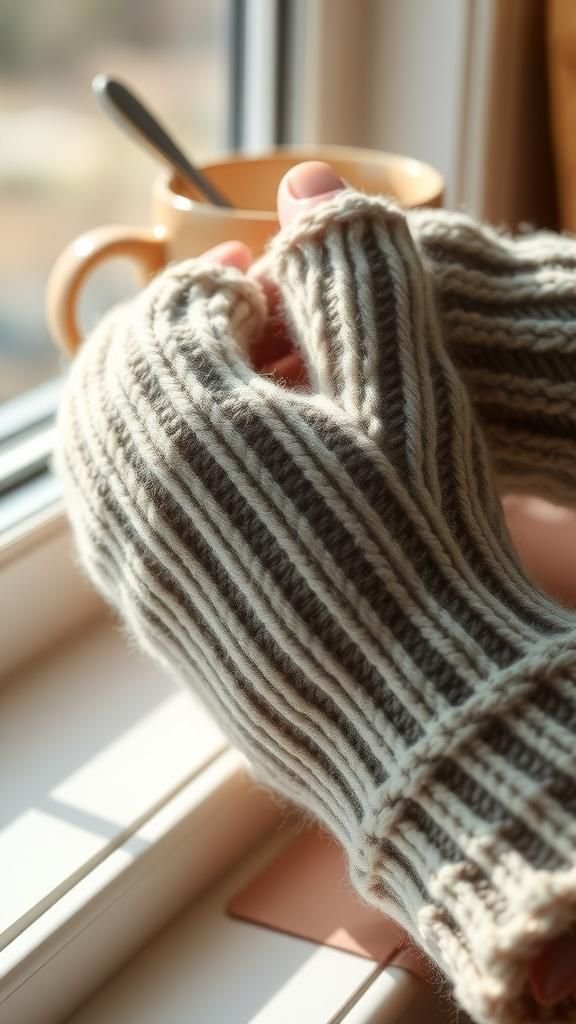
These mitts live on my wrist for half the season; they keep palms warm while freeing fingertips for mugs and pages. The stitch pattern is simple but the yarn choice lends a velvet softness against skin, and the thumb gusset tucks neatly into place.
When I slide them on, the room’s draft seems less intrusive and knitting a few rows by the radiator becomes an act of calm. The mitts fold flat in a basket, showing off ribbed edges and a subtle halo where the yarn catches light.
Steps
- Cast on a number of stitches that matches wrist circumference and knit ribbing for the cuff.
- Work the main body in a chosen stitch until reaching the thumb placement.
- Create a thumb opening by leaving a set of stitches on hold and continuing the hand section.
- Return to the held thumb stitches, pick up a few, and knit the thumb tube before binding off.
Textured throw pillow with cozy ridges
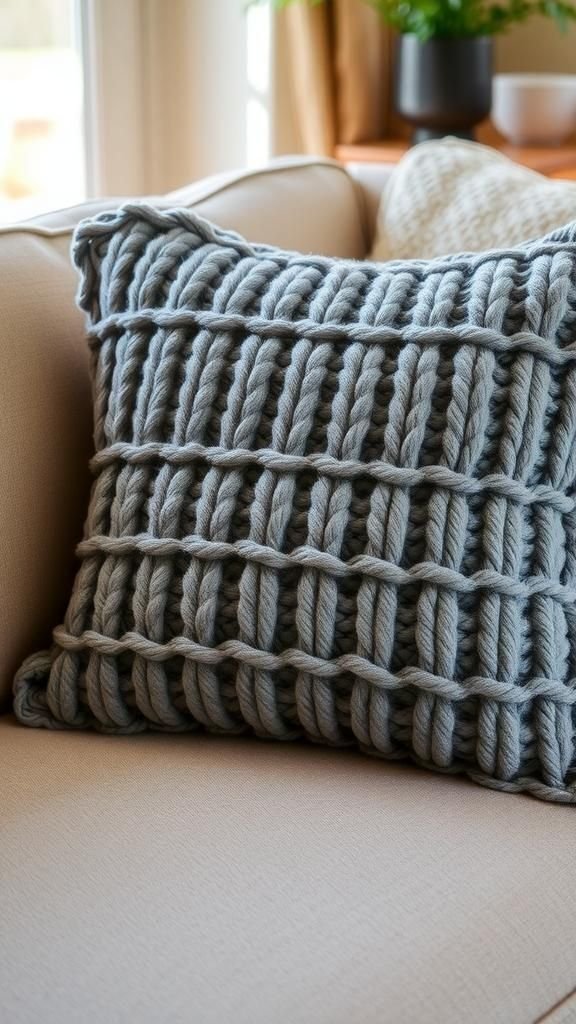
This pillow landed on my couch and instantly transformed the whole sofa into a retreat. Thick ridges ripple across the surface, offering an invitation to rest against chunky stitches.
The yarn feels springy yet dense, and the pillow keeps its shape without being rigid. Colors pooled in the valleys of folds, creating a quiet play of light and shadow when afternoon sun slid across it.
The cover looks as if it was sculpted by hands that favored texture over precision, and it brings a lived-in warmth that makes evenings feel slower.
Steps
- Cast on enough stitches to create the desired pillow width and work a sturdy border for structure.
- Follow a textured stitch pattern across the central panel until the piece matches the pillow height.
- Knit a matching back panel or opt for a simpler stockinette for contrast.
- Seam three sides together, stuff the pillow with filling, then seam the final side closed neatly.
Braided chunky cowl for brisk walks
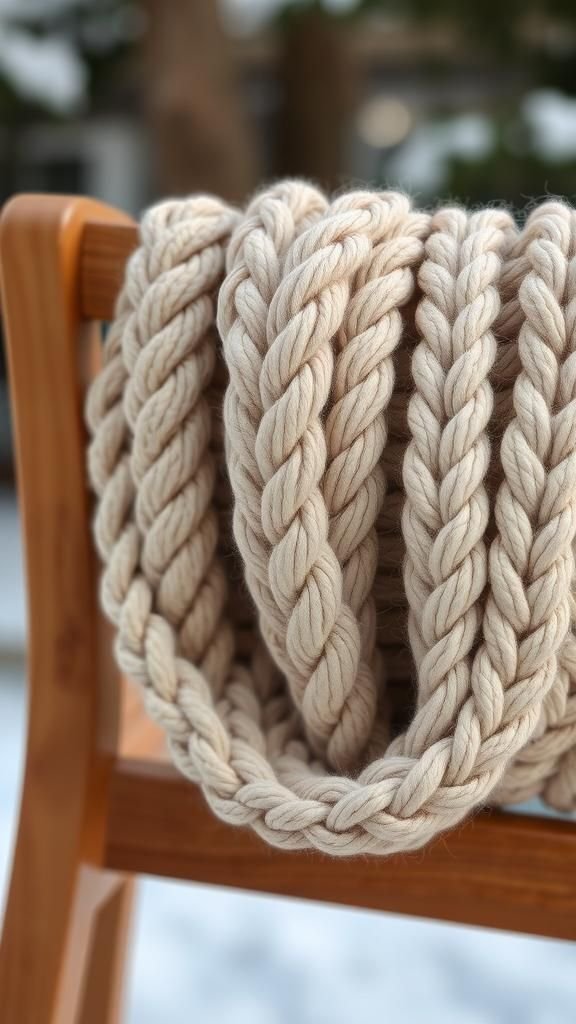
I reached for this braided cowl on a blustery day and felt the air relent. The braid creates sculpted channels that trap warm air, while the chunky yarn keeps the whole piece lightweight but substantial.
When pulled high it covers the chin with a cushioned softness, and when worn lower it frames the collarbone in a casual, relaxed way. The texture is tactile and slightly rustic, with faint flecks in the yarn that catch streetlight.
It looks like something you might borrow from a friend for the length of an afternoon.
Steps
- Cast on a wide number of stitches to create the cowl circumference and join in the round.
- Work a braided cable pattern, following charted crossings at regular intervals.
- Continue until the cowl reaches a comfortable height for double or single wrapping.
- Bind off loosely to preserve stretch and weave in ends for a clean inside.
Cable-knit newborn bonnet in gentle yarn
Holding this bonnet felt like cradling a little cloud. The cables are miniature and tidy, creating a pleasant three-dimensional texture that looks as soft as it feels.
The yarn choice has a baby-friendly softness and a hint of elasticity that allows for a snug, comforting fit. The bonnet edges roll gently, framing the face with a soft halo.
There was a hush to the stitches, a quiet domesticity that made me think of long winter afternoons and tiny naps. Colors read pastel and calming under soft indoor light.
Steps
- Cast on a small number of stitches suited to a newborn head and begin with a stretchy brim.
- Transition to the cable pattern for the crown, maintaining even stitch tension.
- Shape the crown with gradual decreases when the piece reaches the right length.
- Gather and close the top, then form ties or a soft under-chin strap as desired.
Colorwork holiday ornaments to hang on branches

Stringing these little orbs felt like threading memories. Each ornament carries tiny motifs that wink in festive light—chevrons, stars, and dots rendered in crisp color contrast.
The fabric is denser than it looks, with a slight spring that keeps shapes round and cheerful. When held close, the fibers release a faint woolly scent and the surface shows a miniature landscape of stitches.
Hung on a branch, they catch holiday glow and create pockets of visual rhythm. They seemed to gather a collection of small, tactile moments perfect for slow evenings.
Steps
- Cast on stitches sufficient for a small round ornament and knit in the round for a seamless body.
- Work stranded colorwork to create motifs, carrying yarn carefully to maintain even tension.
- Decrease toward the top to close the ornament and stuff lightly with filling.
- Finish by shaping and adding a loop for hanging through the crown.
Boisterous bobble scarf that snuggles the neck

This scarf became my favorite for hands-free warmth; bobbles pepper the surface like small, soft berries. Each bump adds a playful texture that tumbles when wrapped, and the fabric has a hearty weight without feeling clumsy.
The bobbles catch light differently than the flat stitches, creating a lively tactile pattern that makes the piece feel handcrafted in the most alive way. The yarn has a soft halo that softens edges and invites fingers to trace the bumps while waiting at a bus stop.
It wears with cheerful resilience across the season.
Steps
- Cast on a comfortable number of stitches for desired scarf width and knit a foundation border.
- Work a pattern row that incorporates bobble formation at chosen intervals.
- Continue repeating the bobble rows and plain rows until the scarf reaches desired length.
- Bind off and block gently to even the texture and set the shape.
Fuzzy ear warmers with a soft halo
These ear warmers have a whispery quality, a delicate fuzz that fluffs around the edges and feels like a soft exhale against the skin. The halo softens the stitch definition while maintaining cozy insulation.
They sit comfortably above the ears and have a gentle stretch that keeps them in place through movement. Colors read muted, like thinned watercolors, and the fabric glows slightly in dim light.
Sliding one on brought back memories of childhood scarves repurposed into headbands, a small creative comfort for brisk walks or quick errands.
Steps
- Cast on enough stitches for a snug head circumference and knit a wide band in a chosen textured stitch.
- Work until the band reaches a height that comfortably covers the ears.
- Suture or seam the short ends together neatly to form a headband.
- Finish by tucking and securing any loose yarn tails inside the seam for a tidy look.
Woven yarn wall hanging for warming a room
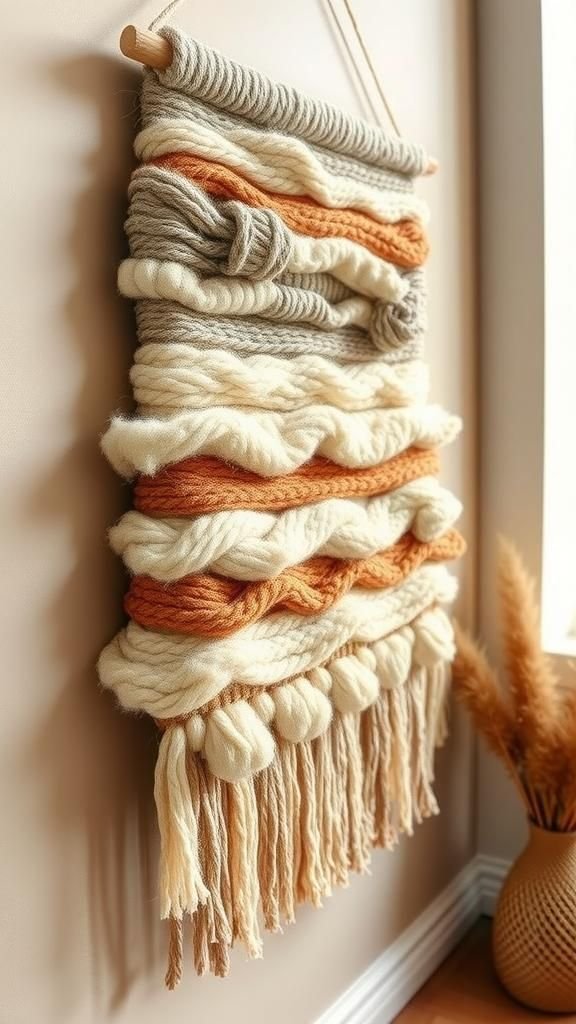
This wall hanging felt like a small landscape of fiber, with fringes and woven bands creating layers that read cozy from across the room. The weaving has a tactile geography: flat bands that contrast with plush, knotted sections, and tassels that skim the air.
When light falls across it, shadows emphasize depth and the yarn colors deepen into comforting tones. It adds a handmade hush to a wall and gives the room a softer acoustic quality.
I often paused to run a hand along the fringe, savoring the texture and weight of the piece.
Steps
- Prepare a simple loom or frame and warp it with a sturdy base yarn.
- Weave horizontal bands with varied yarn weights and textures to create contrast.
- Incorporate knotted or looped sections and add fringe and tassels along the bottom edge.
- Finish by securing ends and trimming fringe to an even length for a balanced look.
Tassel garland to brighten a mantelpiece

This garland became the small lift my mantel needed; tassels swing like little pieces of celebration. Each tassel has a soft motion and a clump of fiber that catches light and pattern.
Strung together they form a rhythm that breaks up long horizontal surfaces and brings a hint of handwork to seasonal displays. The yarn feels weighty enough to hang well but light enough to move with a draft.
I liked the contrast of matte yarn and the sparkle of a candlelit evening, the garland adding a low, tactile cheer.
Steps
- Wind yarn around a template to form tassels in chosen sizes and trim the tops to create even loops.
- Secure each tassel at the top and trim the bottom for a uniform appearance.
- Thread the tassels onto a long cord or braided yarn at regular intervals.
- Hang the garland across a mantel or shelf and adjust spacing for visual balance.
Yarn-wrapped wreath layered in winter shades
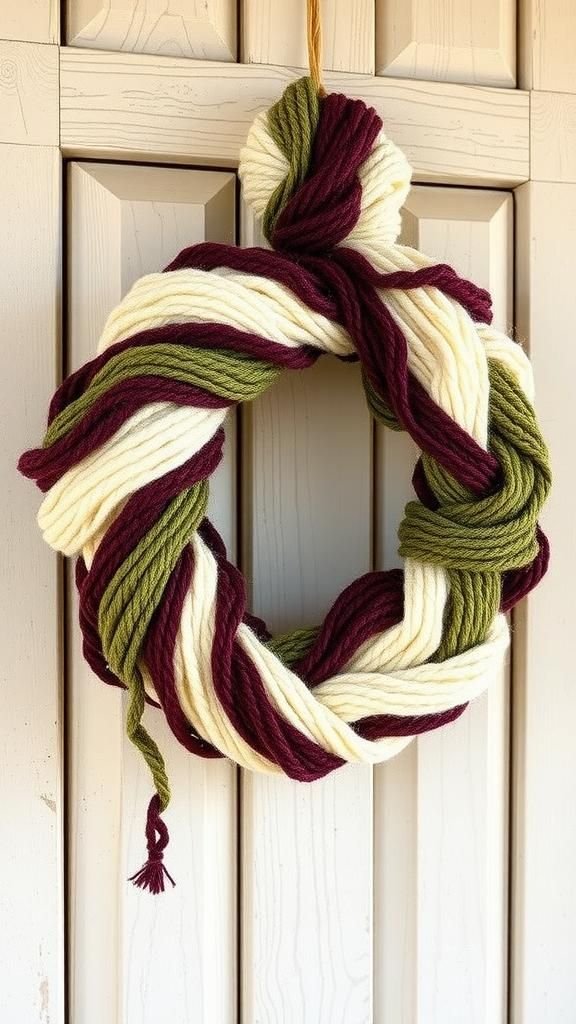
This wreath began as a quick impulse and ended up as the season’s welcome. Strands of yarn wrap and layer, creating bands of color and texture that read rich from a distance and intricate up close.
The wreath has a soft profile, a halo of fiber that refracts light and muffles the doorway’s draft. Small sprigs or a single pompom nestled among the yarn add quiet punctuation.
Bringing it to the door felt like tucking a soft blanket into the entrance, a warm note before stepping out into cold air.
Steps
- Select a sturdy ring base and wrap yarn tightly around it in overlapping passes to cover the form.
- Alternate colors and textures to create subtle banding and depth.
- Add small decorative elements like wrapped balls or tassels secured into the outer yarn layers.
- Finish by making a neat hanging loop and trimming stray ends for a polished edge.
Cozy knitted slippers with plush soles
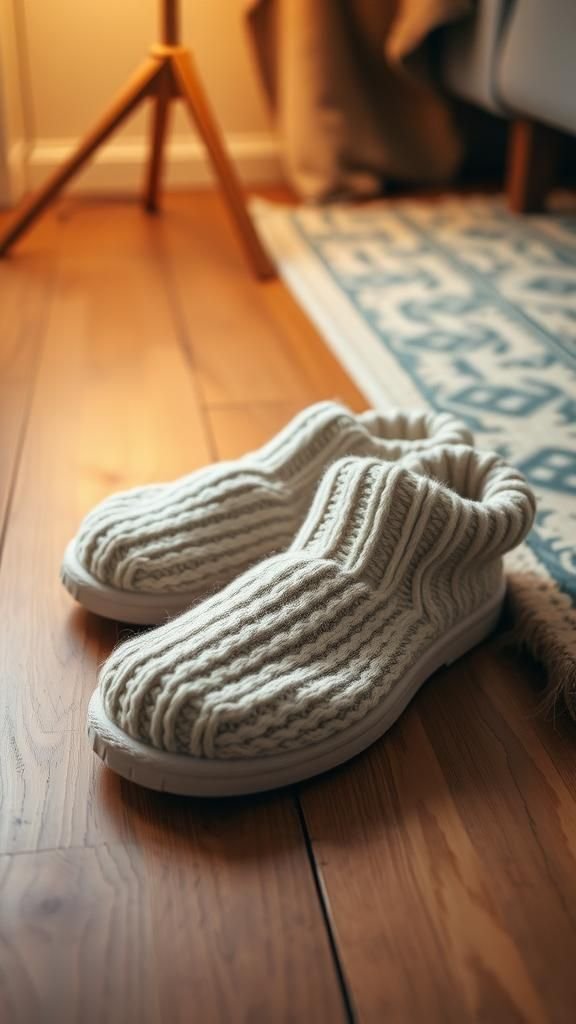
At the first frosty morning I pulled these slippers on and felt like the floor itself had been tamed. The soles have a dense, cushioned feel that buffers cold tiles while the uppers cradle the foot in a welcoming softness.
When I stand up, there’s a muffled hush underfoot and a gentle spring as the yarn compresses. The pair sits patiently by the bed, ready to be slipped on, and they keep shape despite repeated wear.
The colorway reads like a winter palette that makes the ritual of putting them on quietly satisfying.
Steps
- Cast on for the sole and knit a dense, cushioned base with short rows for shaping.
- Pick up stitches around the sole and work the upper in a soft, pliable stitch.
- Shape the toe with decreases and finish by seaming or grafting for a smooth join.
- Optionally, add a non-slip sole material to the base for traction.
Chunky basket organizer for yarn and keepsakes

This basket became the repository for half my projects; its walls are thick and forgiving, holding skeins and small treasures with steady softness. The chunky braid makes a sturdy silhouette while remaining tactile and squeezable.
When I lift it, there’s a satisfying weight that promises stability, and the edges show slight fuzz that invites fingers to smooth them. It sits under a side table like a quietly proud island of order, colors pooled like small hills of possibility.
The basket’s presence made the room feel tidier without losing warmth.
Steps
- Cast on a wide number of stitches and knit a dense base in the round to form the basket bottom.
- Transition to a thicker stitch or braiding technique for the sides to build height.
- Continue until the basket reaches desired depth, ensuring the walls remain sturdy.
- Bind off and finish the rim, tucking in loose ends for a neat interior.
Tasseled bookmarks that smell faintly of wool

These little bookmarks slipped into book spines and made reading feel ceremonious. The slender strip of yarn has a pleasant, supple texture while a tassel flares at the end like a tiny flag.
When fingers touch the fringe, there’s a faint woolly aroma and a satisfying softness that signals an invitation to linger over a page. Colors contrast playfully with book covers, and the bookmark tucks flat without bulking.
They seemed to travel easily between bags and bedside tables, each tassel gathering small scuffs that added character over time.
Steps
- Cast on a narrow number of stitches and knit a long, slim strip for the bookmark body.
- Work until the strip reaches desired length, keeping edges neat.
- Make a small tassel and secure it to one end of the strip.
- Block lightly if desired to even the shape and trim tassel ends for uniformity.
Chunky plant hanger that cradles a pot gently

Suspending a pot in a knitted cradle felt unexpectedly graceful. The hanger’s body has a braided tension that supports weight while remaining soft enough to cushion terra cotta edges.
The yarn’s warmth offsets the coolness of ceramic, and when light filters through leaves, shadows fall on stitches like a tiny tapestry. The hanger shifts with a breeze, the fibers whispering against each other.
It became a small statement of comfort among greenery, making a plain windowsill feel curated and tender without demanding attention.
Steps
- Cast on for a wide band and knit a circular cradle large enough for a small pot.
- Knit long cords or braids from the band to form suspension points.
- Gather the cords and secure them firmly at the top to create the hanger loop.
- Place a pot into the cradle and adjust cords to balance the plant evenly.
Tasseled headband for casual indoor style
This headband felt like a tiny crown I reached for on sleepy mornings. It sits comfortably around temples, the tassels adding a playful nudge at the ear.
The knit band is pleasantly elastic and the yarn has a soft halo that blurs hard edges. Wearing it turned routine tasks into small rituals, as if dressing the hair were a part of settling into the day.
The colors read cozy and approachable, lending a friendly note to indoor outfits and making quiet chores feel a bit more styled.
Steps
- Cast on enough stitches for a comfortable headband width and knit a textured band for elasticity.
- Work until the band comfortably wraps around the head, keeping edges tidy.
- Seam the short ends together to form the band or join in the round.
- Attach tassels at either side for a playful accent and secure ends neatly.
Arm-knitted infinity scarf for quick warmth
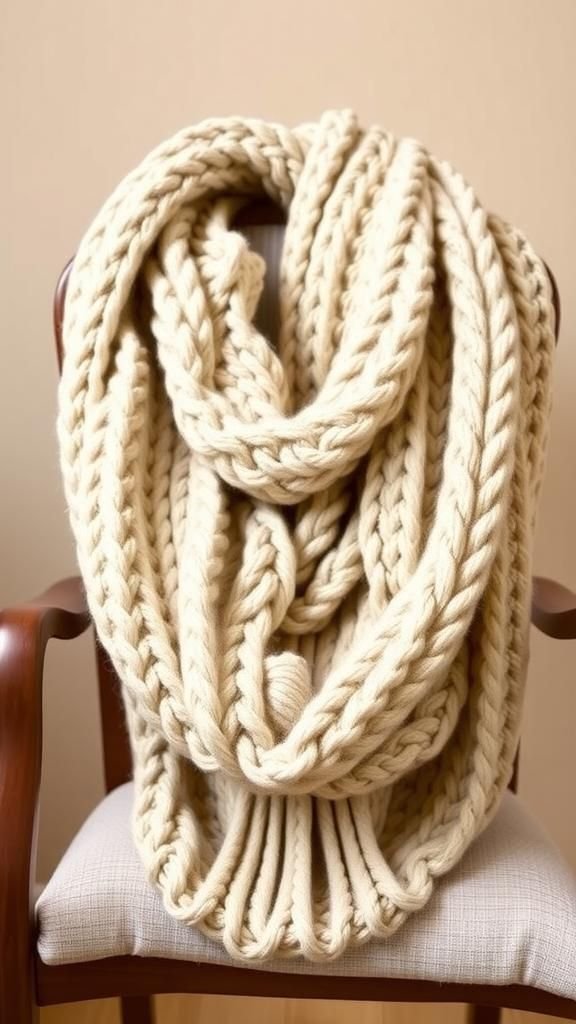
I tried arm knitting on a lazy afternoon and ended up with an enormous, cloudlike infinity scarf that wrapped like a warm thought. The stitches are oversized and obvious, creating a bold texture that reads modern and handmade at once.
The scarf folds with satisfying volume and breathes when draped, giving pockets of air that warm gradually. The yarn’s bulk makes the whole piece feel like a wearable blanket, and the rhythmic movement of the loops slows the pace of the room.
It’s the sort of thing to throw on and forget until comfort arrives.
Steps
- Cast on large loops directly onto the arms to form the base row of oversized stitches.
- Work successive rows by drawing loops through each other with hands, building the fabric to desired thickness.
- When the length feels right, bind off by passing loops through to close the final row.
- Join ends together to form an infinity circle and adjust stitch tension for consistency.
Sweet baby blanket in soft stripe rows

This blanket unfolded like a quiet lullaby across my lap. Stripes of muted color alternate in gentle bands, each row knitting into the next with soft continuity.
The yarn is plush without being heavy, and the fabric folds into small pillows when bundled. Edges hold a subtle rib that frames the piece like a gentle seam, and lying a hand on the blanket brings a sense of calm.
I imagined it being tucked over a sleeping baby or thrown over a coach arm, lending its hush to small domestic scenes.
Steps
- Cast on an appropriate number of stitches to reach desired blanket width.
- Work alternating color stripes, keeping color changes tidy at the edges.
- Continue until the blanket reaches the chosen length, maintaining even tension.
- Finish with a framed border and weave in ends for a tidy finish.
Cozy leg warmers for chilly afternoons
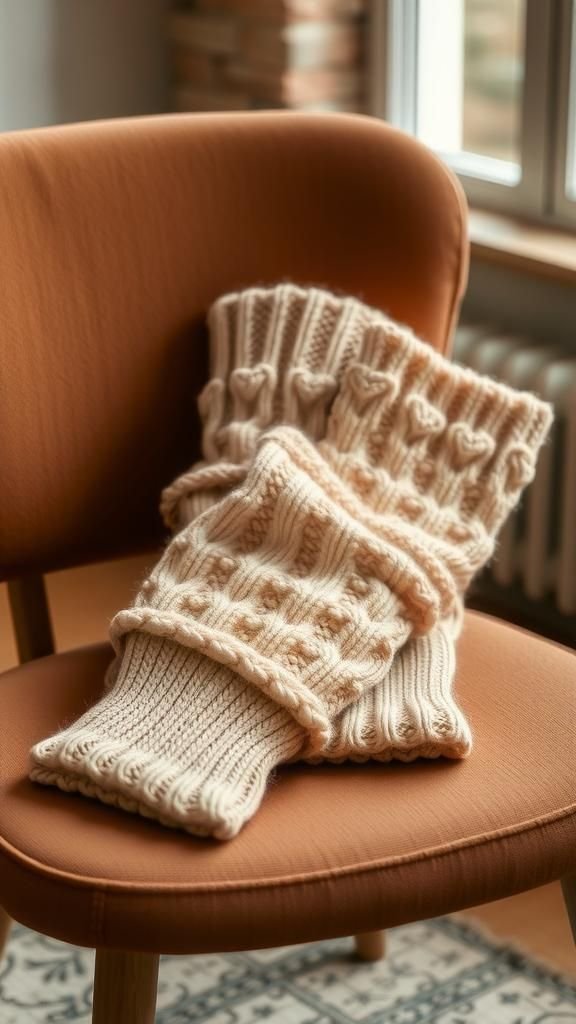
These leg warmers made sitting by a drafty window more pleasant; they slide up and hold warmth like little sleeves for the calves. The knit has a snug stretch and a soft interior halo that traps heat efficiently.
When worn over tights they add texture to outfits and a nostalgic nod to old photographs. Pulling them on feels like an act of self-kindness, a small barrier against cold floors and sudden gusts.
Their presence in a basket by the door makes grabbing them part of a slow routine.
Steps
- Cast on enough stitches to fit comfortably around the lower leg and work ribbing for elasticity at both edges.
- Knit the central tube in a stitch that balances stretch and warmth.
- Continue until the piece reaches desired height, then mirror the ribbing at the other edge.
- Bind off and block gently to even the shape and stretch.
Patterned holiday stocking with chunky stitches
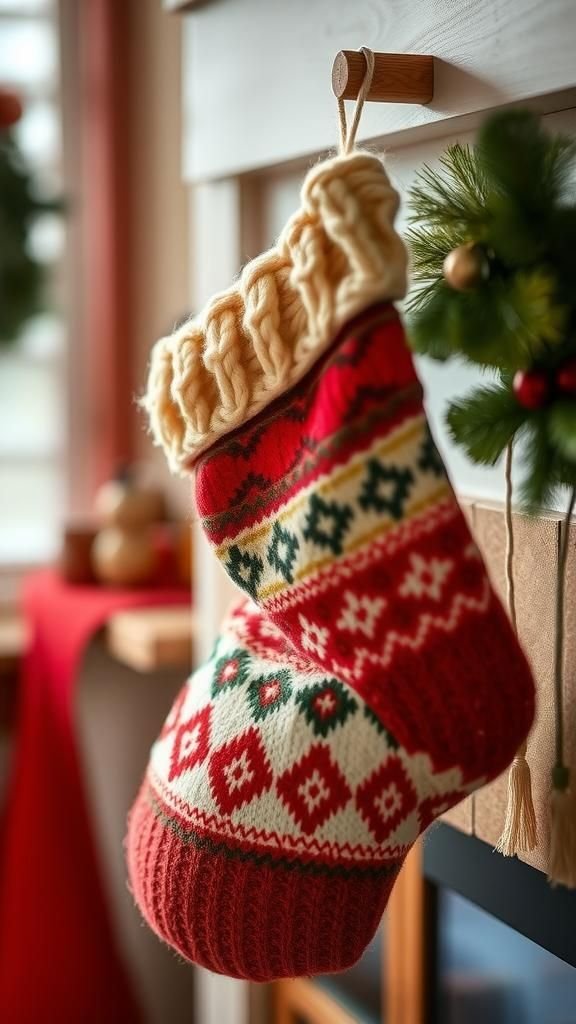
The stocking hung from a hook and felt like an heirloom in waiting. Bold, chunky stitches form geometric patterns that read well from across the room, and the cuff folds with a reassuring weight.
The yarn has a sturdy spring that keeps the stocking’s silhouette plump even when empty. It gave me the quiet pleasure of an object that balances utility and ornament—practical for small gifts yet decorative enough to anchor a mantel.
Felted edges carry a slight fuzz that aged the piece into something that looked as if it had seen a few winters already.
Steps
- Cast on for the cuff and knit a wide, foldable section in a dense stitch pattern.
- Transition to the stocking body, incorporating patterned colorwork or texture.
- Shape the heel and toe with decreases and short rows for a comfortable curve.
- Seam or graft the sole, fold the cuff and secure any decorative elements before hanging.