Disclosure: This post contains affiliate links, which means we may earn a commission if you purchase through our links at no extra cost to you.
I have a soft spot for handmade cards — the slightly crooked edges, the smudged ink, the tiny smudge of glue that becomes part of the charm. Over years of making things for friends and partners, DIY Valentine’s Day Card Crafts became a way to slow down and put a little personality into a small square of paper.
These ideas grew out of quiet afternoons with tea and an overstuffed drawer of scraps.
Each suggestion below reads like a little story about texture, color, scent and joy, and offers a fresh way to let someone know they’re cared for.
A pop-up heart with a tiny surprise

That moment when a flat card gives way to a little three-dimensional heart still makes me smile. The pop-up heart feels playful and a touch theatrical, a paper bloom that lifts and casts a delicate shadow.
I remember the soft rustle as the card opened and the contrast between the flat exterior and the tiny sculpted interior. The heart can be bright red, soft pink, or patterned with tiny florals, and there’s an intimate feeling to the pop, like a secret revealed only when someone takes the time to open it.
Steps
- Score the centerline of a folded card and crease sharply along the fold.
- Cut a heart shape from a separate piece of card, then score a small tab at its base.
- Glue the tab to the center fold so the heart stands when the card is opened.
Pressed flower heart on textured paper
A card dotted with tiny pressed blossoms always feels like a pocket of spring. The petals flatten into fragile, translucent ornaments that catch light like little stained-glass pieces.
I had a batch of daisies that turned into soft yellow freckles on a cream card and the scent of drying flowers lingered faintly for days. The textured paper around the flowers adds an earthy backdrop, and the contrast between crisp paper and velvety petal edges gives the whole piece a gentle, botanical calm that invites a slow look.
Steps
- Arrange pressed flowers into a heart shape on a sheet of textured card.
- Adhere flowers with archival craft adhesive to preserve delicate petals.
- Seal the composition beneath a thin strip of translucent vellum for protection.
Watercolor wash with handwritten sentiment
A loose wash of watercolor can feel like a mood captured on paper, a subtle sunrise or a blush of evening. I like when pigments pool and granulate, leaving soft bands of color where the brush paused.
Over that blur, a handwritten sentiment feels intimate and immediate, like a note slipped into a pocket. The paper drinks the paint differently at the edges, creating soft blooms and unpredictable halos.
There’s a comfort in the small imperfections — a stray dot, a lighter patch — that makes the card unmistakably human.
Steps
- Wet the front of heavyweight watercolor paper sparingly and apply a soft wash of pigment.
- Let the wash dry completely until the surface is cool and matte.
- Write a personal message with waterproof ink in the dried area for contrast.
Layered vellum hearts for soft translucency
Stacking translucent vellum hearts creates a dreamy, layered effect that catches light in unexpected ways. The top layers whisper through to the ones beneath, producing gentle color shifts and a sense of depth that feels both modern and romantic.
I once made a set in ombré shades and liked the way the edges blurred together like distant hills. The finish is matte and soft to the touch, and the overall impression is delicate and quiet, as if the card were a small diorama of muted color and hush.
Steps
- Cut hearts from graduated shades of vellum and arrange them in a stacked pattern.
- Adhere the vellum layers with tiny dots of clear-drying adhesive at hidden points.
- Mount the layered hearts onto a heavier backing card to provide support.
Fingerprint heart keepsake with tender charm
Tiny fingerprints pressed into ink and arranged into a heart shape feel personal in a way that a printed image never does. I remember giggling while arranging smudged little loops into something resembling a heartbeat.
The smudges carry the warmth of a hand, slight ridges of skin translated into tiny arcs of ink. The card reads like an imprint of presence, a tactile memory that invites closer inspection.
It’s modest and a little messy, and that honesty is part of why it feels so sweet and memorable.
Steps
- Ink fingertips lightly on an ink pad and press them onto card in a heart outline.
- Allow the ink to dry fully and then add a short handwritten note beneath the heart.
- Mount the finished piece inside a simple envelope for safe keeping.
Fabric scrap heart with cozy textile texture
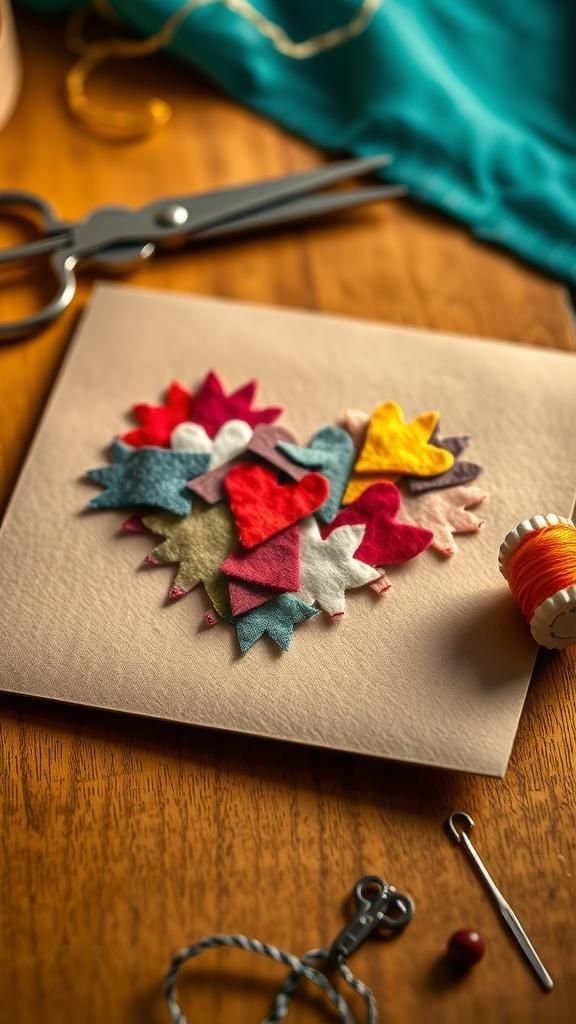
A heart stitched from tiny fabric scraps brings a comforting, tactile quality that paper alone doesn’t provide. The small bursts of pattern and thread give the piece a quiltlike personality, evoking sweaters and well-loved scarves.
I kept a jar of leftover prints from other projects and watching them come together into a single heart felt oddly like putting together a memory quilt. Threads peek at the edges and the fabric surfaces catch the light in each weave, creating a warm, homely layer very different from flat ink.
Steps
- Arrange small fabric scraps into a heart shape on a backing card or felt piece.
- Sew around the perimeter of each scrap with small stitches to secure them.
- Trim excess backing and attach the textile heart onto a heavy card stock.
Origami heart tucked into a pocket card

There’s a gentle satisfaction in a small folded heart that slips into a pocket on the card, like a paper secret waiting to be uncovered. The crisp folds create clean lines that contrast with the softness of the card stock.
I recall making a batch in bright origami paper that had tiny geometric prints, each one catching light at different angles. The pocket adds an element of interaction, a chance to slip a tiny note or tiny dried petal inside.
It feels neat, compact, and quietly playful all at once.
Steps
- Fold small squares of decorative paper into origami hearts following a classic folding sequence.
- Create a shallow pocket by folding up a strip of coordinating card stock and gluing its sides.
- Tuck the origami heart into the pocket and seal the pocket onto the card front.
Doily lace for vintage romantic flair
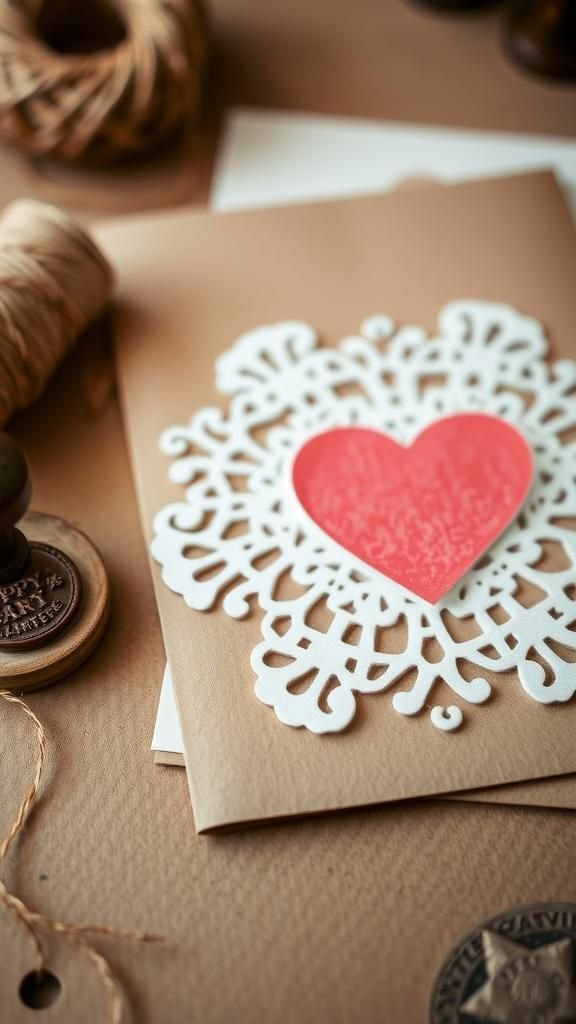
Tiny paper doilies add instant old-fashioned romance, their lace-like edges bringing a delicate frame to even the simplest design. The texture is finely perforated, and when layered it creates an intricate halo that catches and scatters light.
I once layered a small doily over kraft paper and loved how the contrast between rustic and delicate produced an unexpectedly elegant look. The scent of aged paper and the soft crinkle of the doily under a fingertip contribute to a nostalgic, tactile experience that feels like a small heirloom.
Steps
- Select a paper doily and trim it to fit the card front without overwhelming the edges.
- Place a circular or heart-shaped paper layer under the doily for color contrast.
- Secure the doily at a few hidden points and add a short handwritten message in the center.
Confetti shaker that rattles with delight

A tiny window filled with glittering confetti brings a playful, kinetic element to a card, the little pieces shifting with a soft rattle. I remember the delighted reaction the first time someone shook a shaker card and watched the bits swirl like tiny planets.
There’s a childlike joy in the sparkle and the movement, paired with the sound of light plastic or metallic disks hitting the window. The effect is celebratory but intimate, as though a private sprinkle of joy has been trapped beneath a clear pane.
Steps
- Cut a window in the card front and back it with clear acetate to form a cavity.
- Pour in a small amount of fine confetti or glitter and seal the edges with a strip of cardstock.
- Decorate the surrounding area and ensure the window is firmly sealed to prevent spillage.
Map heart for nostalgia and shared routes

A heart cut from an old map carries a sense of journey and memory, a tiny cartographic nod to places that matter. I once made a card with a heart centered on the town where a friendship began, and the recipient smiled at the familiar street names.
The map’s little lines and faded colors become a textured pattern, streets turning into veins of memory. The paper itself has an aged softness, and the idea of folding a place into a heart feels like folding a moment into something small and kept.
Steps
- Select an old map and trace a heart shape centered on a meaningful location.
- Cut the heart from the map and mount it onto a contrasting piece of card stock.
- Add a short caption beneath the heart referencing the chosen place or memory.
Scented sachet tucked inside a fold
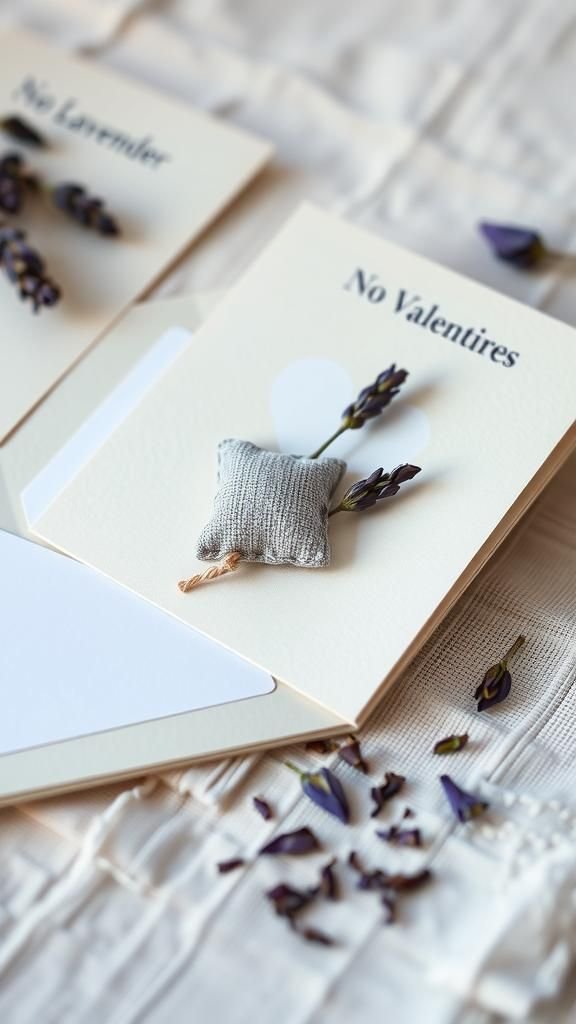
A hidden sachet of dried lavender or rose petals inside a card adds an unexpected sensory layer that lingers when the recipient opens it. The soft floral perfume lifts the moment beyond sight and touch, becoming almost memory-like.
I once slipped a tiny bundle of lavender into a card and later found the scent reminding both of us of sunlit windowsills. The sachet feels like a secret gift, a small thing that doesn’t announce itself but quietly enhances everything around it with warmth and calm.
Steps
- Cut a small pocket from lightweight fabric or paper to hold dried botanicals.
- Place a measured pinch of dried lavender or petals into the pocket and fold it closed.
- Secure the sachet inside the card so the fragrance releases gently upon opening.
Photo collage that tells a shared story
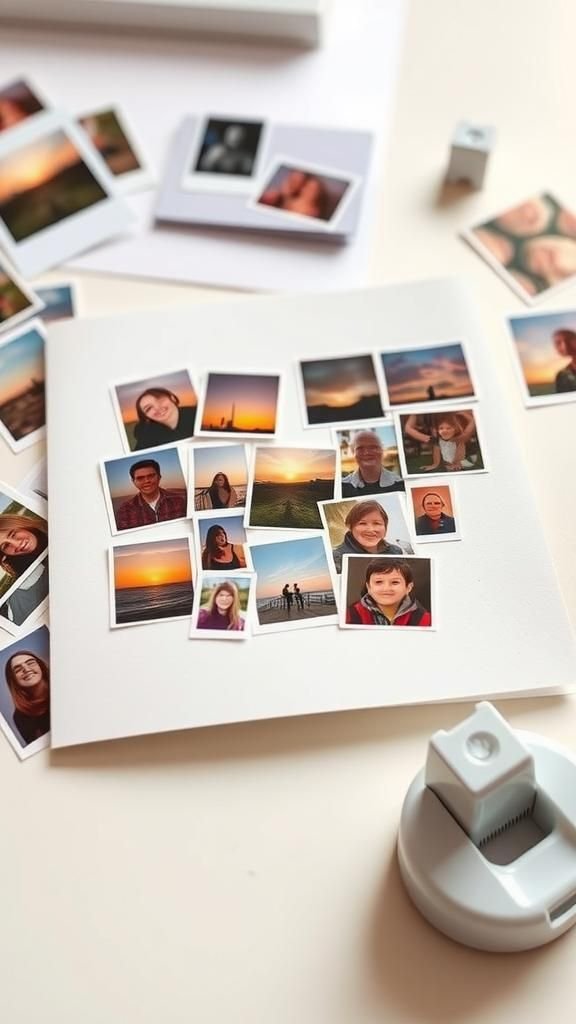
A small collage of snapped moments collects a story in thumbnail form. I enjoy arranging tiny photos so that faces, places and little gestures form a kind of visual shorthand — a laugh in the corner, an overexposed sunset, a close-up of clasped hands.
The tactile quality of glossy prints against matte paper creates a contrast that feels intimate, like flipping through a pocket album. The collage invites lingering glances as each image offers a micro-memory, and together they create a layered portrait of time spent together.
Steps
- Select a group of small prints that represent meaningful moments or moods.
- Trim and arrange the photos into a balanced collage on the card front.
- Adhere the photos and add a tiny caption or date in a corner for context.
Tiny LED lights for a soft glowing card

A subtle string of tiny LED lights peeking from a card adds a whisper of light that feels almost magical in low light. The glow is warm and intimate, like a miniature bonfire captured on paper.
I remember presenting one at dusk and watching the light flicker gently as the card was opened. The softness of the LEDs pairs with the paper textures to create a cozy scene, and the gentle hum of power feels less like technology and more like a miniature lantern tucked into a letter.
Steps
- Plan the circuit and place a small battery-powered LED string behind a cutout area.
- Secure the LED wiring flat against the card interior and conceal the battery pack in a pocket.
- Test the lights and finish the card exterior so the glowing elements peek through the design.
Hand-lettered flourish on heavyweight paper

Inked letters with flourishes feel like a handwritten embrace. The sweep of a nib, the way ink pools at the downstrokes, the slight wobble of a loop — these small traits carry personality.
I often linger over a single word, letting the pen find a rhythm that echoes how the message feels. The heavyweight paper drinks the ink in a way that emphasizes texture and depth, and when the light hits the raised ink the strokes come alive.
It’s an artful, quiet way of saying something without ornamentation.
Steps
- Sketch the layout lightly in pencil to determine spacing on heavyweight paper.
- Trace over the sketch with a calligraphy pen or brush pen for expressive strokes.
- Erase any pencil marks after the ink has dried and add a small decorative element if desired.
Seed paper heart that grows into something living
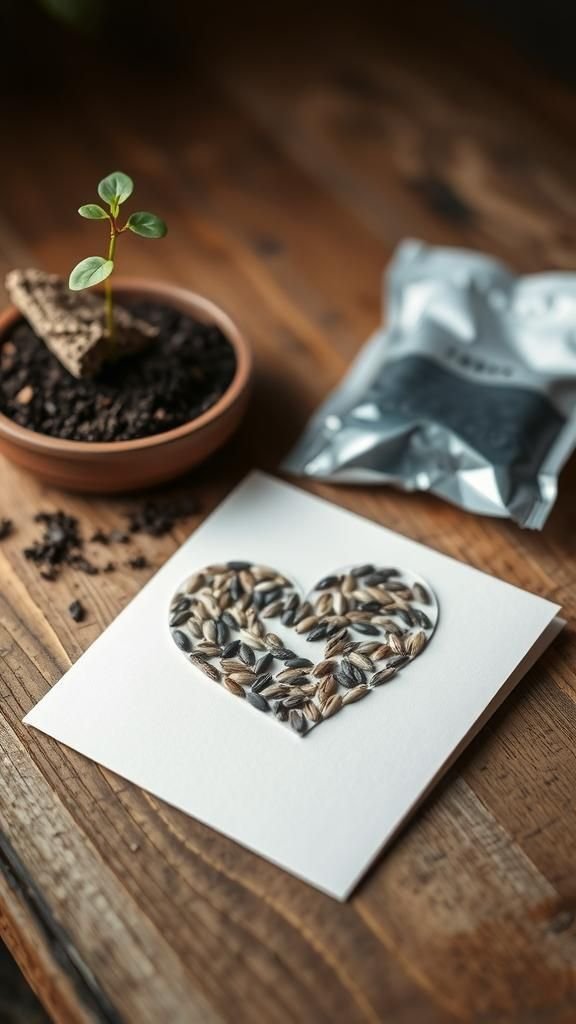
A heart made from seed-embedded paper carries the promise of blossoms beyond the card itself. The papery texture includes tiny flecks that hint at the seeds hidden within, and there’s a satisfying graininess to the surface.
I gifted a seed heart once and later received a photo of small sprouts pushing through soil, which felt like a second opening of the card. There’s a poetic loop between receiving a message and tending a living reply, and the small seeds make that metaphor tactile and hopeful.
Steps
- Cut a heart shape from commercially available seed paper or make your own from recycled fiber mixed with seeds.
- Attach the seed heart to a backing card with a small note about planting instructions.
- Present the card with a thin layer of protective wrap to avoid seed loss during transit.
Puzzle piece heart for playful connection
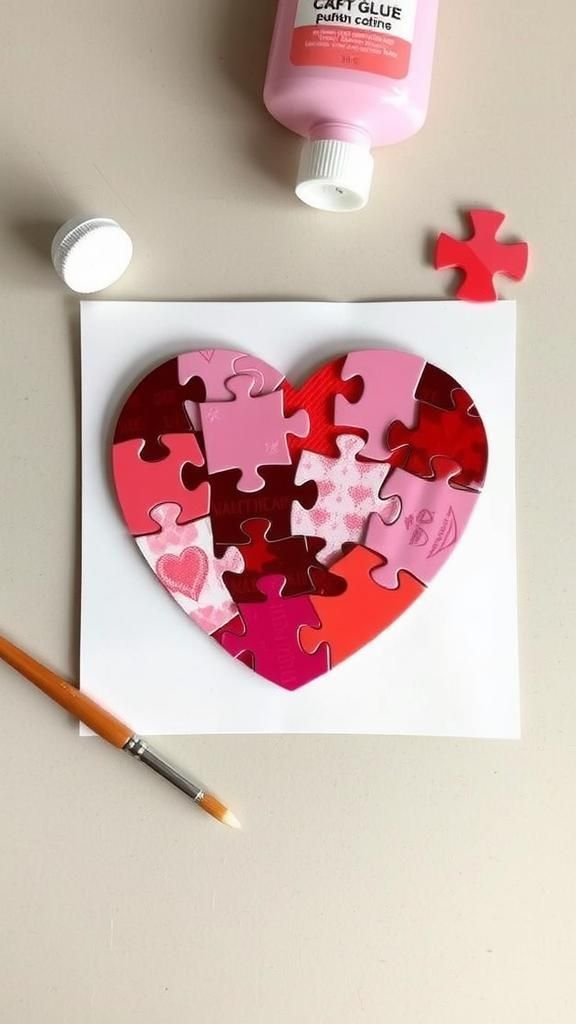
A heart built from tiny puzzle pieces carries a playful suggestion of fitting together. The irregular edges and glossy cardboard surface give a tactile contrast to the matte background, and there’s a certain charm in imperfect joins and mismatched patterns.
I kept a handful of old puzzle bits and arranging them into a heart felt like composing a tiny mosaic. The final piece reads like an invitation to complete a picture together, and the little tabs and slots cast miniature shadows that make the heart feel animated.
Steps
- Gather puzzle pieces with flat backs and arrange them into a compact heart silhouette.
- Glue the pieces onto a sturdy backing, aligning edges to create a cohesive shape.
- Fill any gaps with small painted dots or patterned paper to smooth transitions.
Embroidered heart with visible thread texture
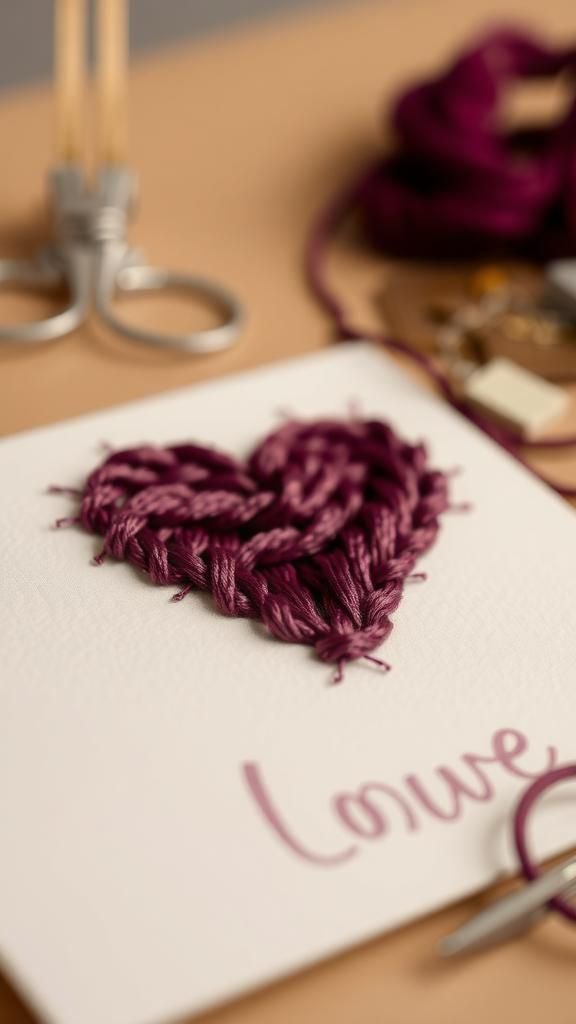
Tiny stitches tracing a heart create a tactile landscape of thread and subtle relief. The rhythm of stitches produces a pleasing texture and the small knots and loops invite fingers to follow the line.
I once stitched a tiny asymmetric heart in deep plum thread and liked how the uneven tension gave it character. The needle marks become part of the narrative, and the sheen of embroidery thread against paper adds a hint of luster.
It reads as handcrafted in the most literal way — a heart held together stitch by stitch.
Steps
- Pierce evenly spaced holes in card to map out the heart shape.
- Thread a needle with embroidery floss and sew back and forth through the pre-punched holes.
- Tie off the thread on the interior side and trim any excess for a clean finish.
Watercolor resist with waxy surprises

Wax resist creates little islands of untouched paper amid a wash of color, and those white shapes feel like tiny held-breath moments. I once scribbled a string of small hearts in a wax crayon before applying a wet pigment, and the hearts gleamed through the color like pale lanterns.
The contrast between the saturated wash and the waxy lines gives a playful tension, and the uneven edges where pigment halted create an organic, painterly finish. It’s a quiet trick that rewards a slightly experimental touch.
Steps
- Draw a pattern with a wax crayon or candle on watercolor paper to reserve white shapes.
- Apply a loose watercolor wash over the paper and allow it to dry completely.
- Gently rub the wax if desired to smooth edges and add a short note in a dry area.
Button bouquet arranged into a little bloom
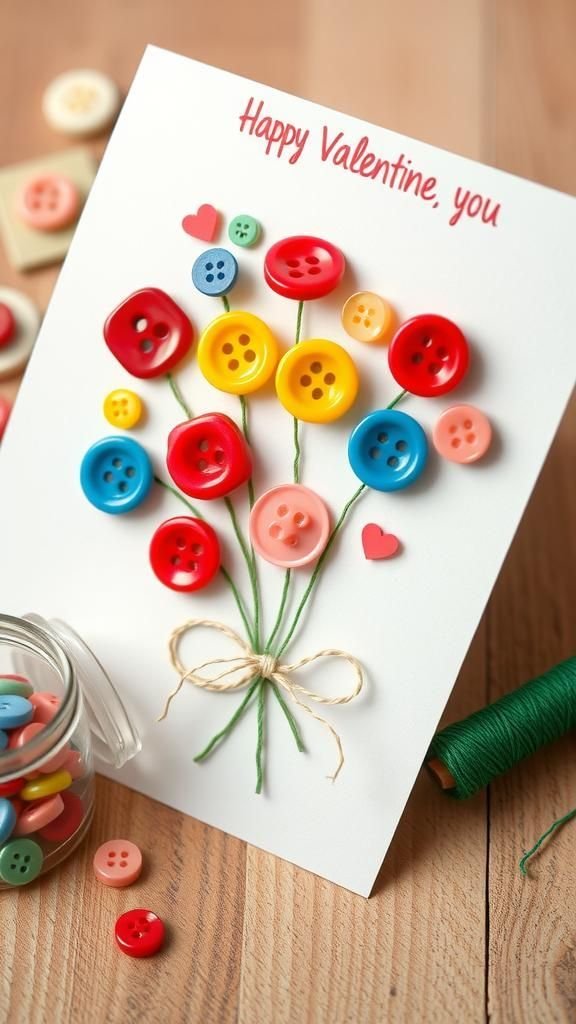
A cluster of mismatched buttons arranged into a bouquet reads like a playful take on petals and centers, each glossy surface catching light differently. The rounded domes create tiny highlights and reflections, and the clink of buttons against each other feels satisfyingly domestic.
I remember threading slender stems from green thread and watching the buttons sit like miniature flowers on the card. The mix of vintage and bright modern buttons gives a charming hodgepodge look that feels homey, cheerful, and a touch whimsical.
Steps
- Select a variety of buttons in coordinating colors and sizes.
- Arrange the buttons into floral clusters and attach them to the card with strong adhesive.
- Embellish with drawn stems or stitched thread to suggest bouquet ties.
Paper quilling for delicate curled details

Paper quilling turns narrow strips into coiled shapes that catch light at their edges, producing a filigree effect that feels both delicate and intricate. The tiny coils form petals and scrolls that sit slightly raised from the surface, throwing soft shadows and inviting touch.
I used thin gold-edged paper once and loved the shimmer that traced each curl. The quiet repetition of coiling becomes meditative, and the finished clusters have a lacey, handcrafted quality that looks unexpectedly elegant while remaining playful.
Steps
- Roll narrow strips of paper into tight coils and shape them into teardrops or scrolls.
- Arrange the quilled shapes into a heart or floral motif on the card front.
- Glue each piece carefully and allow the assembled quilling to dry flat.
Minimalist typed love letter on linen card

Sometimes a single typed line on linen-textured card feels quieter and more intimate than a crowded design. The clean serif letters against the subtle weave of the paper create a refined, calm presence.
I typed a two-word note once and found that the empty space around it amplified the sentiment; the texture beneath the ink added warmth without ornament. The effect is spare but deliberate, like a thoughtfully chosen word hung in a small frame.
It invites a slow reading and leaves room for the recipient’s own thoughts.
Steps
- Choose a linen-textured card and plan a short, heartfelt sentence for the front.
- Type the message using a typewriter or print it with a crisp font aligned centrally.
- Allow the ink to dry and pair the card with a matching envelope for presentation.