Disclosure: This post contains affiliate links, which means we may earn a commission if you purchase through our links at no extra cost to you.
I always end up gravitating toward little hands-on projects when friends come over, the kind that make the room smell faintly of paper and glue and leave everyone laughing over glitter on their sleeves. Galentine’s Day Party Craft Ideas became my go-to for turning a cozy night into something tactile and full of color.
There’s something comforting about crafting together, swapping stories while petals, ribbons, and tiny notes accumulate on the table.
These Galentine’s Day Party Craft Ideas are meant to spark playful conversation and leave each person with a small keepsake and a warm memory.
Heart confetti pockets for sweet surprise notes
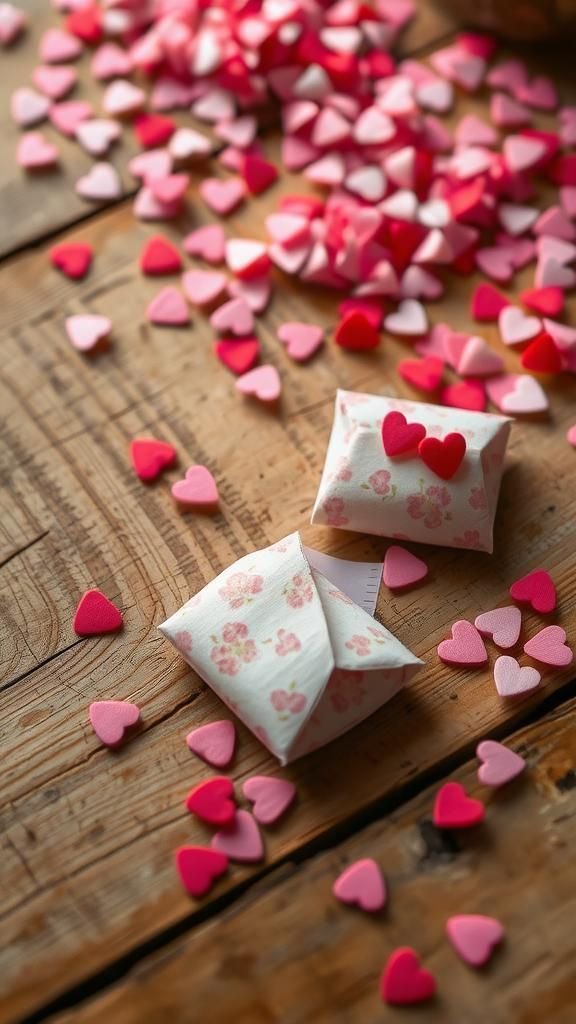
I remember the soft crinkle when the tiny heart confetti spilled out, a tiny celebration that felt delightfully private. The pockets had a slight tooth from recycled paper and faint floral prints that caught the light.
Passing one around, each friend found a folded note tucked inside, the edges of the paper slightly warmed by nearby tea. There was the faint scent of citrus glue in the air and a table scattered with pink scraps, which made the scene feel playful and intimate.
Steps
- Gather lightweight patterned paper, a heart-shaped cutter, adhesive, and small note cards.
- Punch hearts and stack them into little piles for each pocket.
- Fold and secure two small paper rectangles into pocket shapes and slip a note inside.
- Sprinkle a few hearts into each pocket before sealing for extra surprise.
- Add a tiny sticker or washi strip to keep pockets closed and pretty.
Mini paper flower bouquet in pastel tones
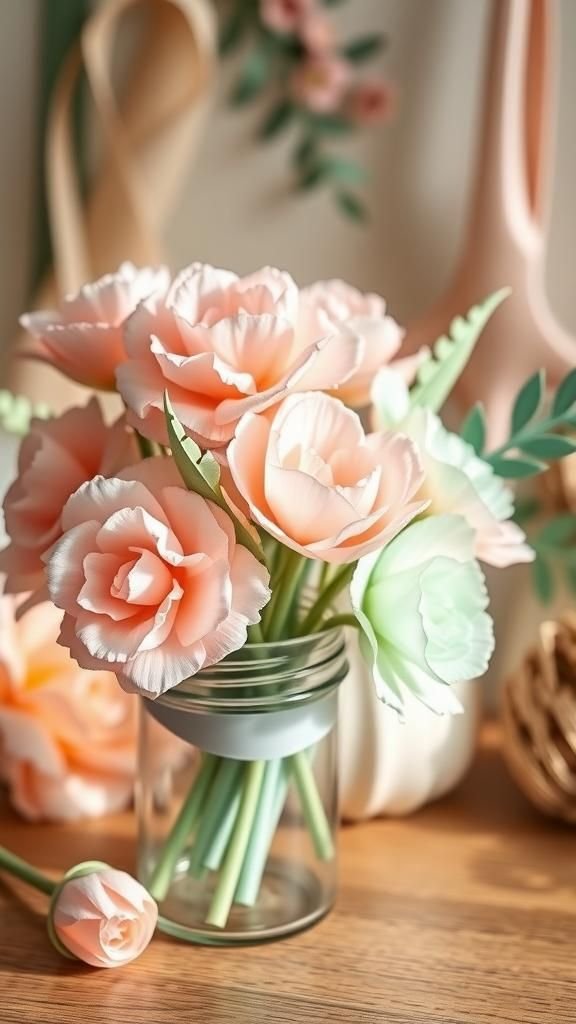
There was always a moment when everyone paused to admire the tiny bouquets, their edges ruffled like crepe paper petals. The paper had a fine grain that took soft folds well, and the stems had a gentle springiness from floral wire wrapped with satin ribbon.
Light caught on the pastel creases and made each bloom look like it was slightly sunlit, even indoors. Holding one, I noticed a faint papery scent and the way the bouquet fit comfortably in the palm, cheerful and fragile.
Steps
- Select pastel crepe paper, floral wire, and thin ribbon for stems.
- Cut petal shapes and curl edges gently around a toothpick or dowel.
- Wrap petals around the wire base, layering to form a bloom.
- Secure with floral tape and cover the wire with ribbon for a neat stem.
- Gather a few blooms and tie them together into a small bouquet.
Personalized wine charms with tiny charms
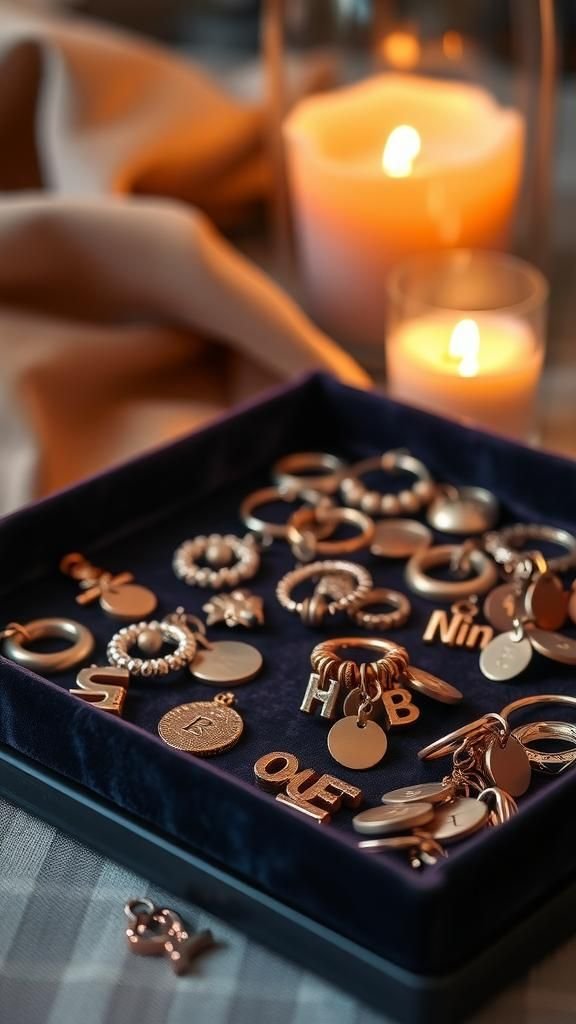
There’s something quietly celebratory about small trinkets dangling from glass rims, each charm catching a swirl of candlelight. My friends and I laughed over initials and tiny motifs that somehow matched personality — a small anchor for the steady friend, a tiny book for the reader.
The beads were cool to the touch at first, then warmed under fingers as conversations deepened. Strings of metallic thread and little clasps gave a subtle jingle, adding a cozy soundtrack to the evening.
Steps
- Choose small beads, letter beads for initials, tiny metal charms, and jewelry wire.
- Thread beads and charms onto short wire lengths, forming a loop for the glass.
- Twist wire ends neatly and secure with crimp beads to close the charm.
- Attach a tiny lobster clasp or ring so charms can clip onto stems.
- Lay charms on a velvet pad so guests can pick ones that match their style.
Scented soy candle jars with layered colors

The room smelled like soft citrus and lavender as jars lined the table, each layered color creating a tiny horizon. I watched wax cool and form subtle ripples, and the little wooden wicks made a faint, satisfying crackle when first lit.
The jars felt smooth and comforting in hand, and the labels were handwritten with tiny doodles that made each scent feel like a character. Steam from a nearby teapot added a cozy humidity that made the fragrances bloom fuller.
Steps
- Melt soy wax in a double boiler and choose essential oil blends for scent.
- Add color dye to separate portions if creating layers and pour thin layers into jars.
- Position wooden wicks centered in each jar and allow layers to set slightly between pours.
- Finish pouring the final layer and let jars cool completely at room temperature.
- Trim any wick unevenness and add handwritten labels once the wax is firm.
Custom photo coasters that feel nostalgic
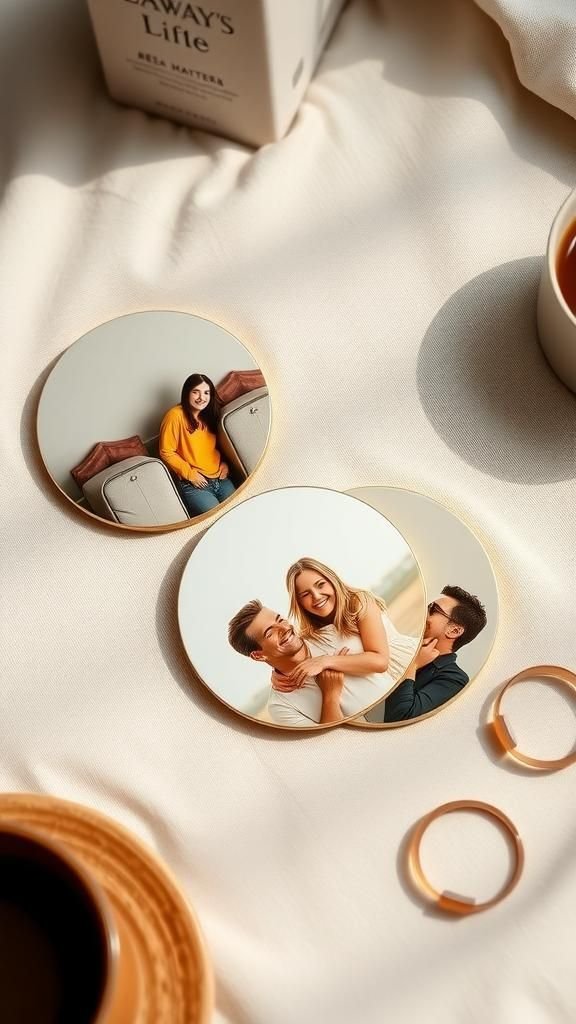
When the coasters came out, everyone leaned in to find familiar faces frozen in small circles — a silly selfie, a shared memory, a group trip. The surface had a slight gloss and the edges showed faint texture from the backing.
I loved how the photos picked up little imperfections that made them feel lived-in; the ink had a soft matte look under light, and the coasters gave off a reassuring weight when set down. They became easy conversation starters, prompting laughter over the stories behind each image.
Steps
- Print small square or circular photos on high-quality photo paper sized for coasters.
- Cut photos to fit coaster blanks and adhere them using a thin layer of decoupage medium.
- Smooth any bubbles and allow the surface to dry before sealing.
- Apply several coats of clear sealer for durability, letting each coat dry fully.
- Add felt pads to the bottoms to protect surfaces and store them in a neat stack.
Hand-lettered mini cards for heartfelt notes

Small squares of thick cardstock sat in a little wooden tray, each waiting with quiet potential. The ink had a slight sheen on the paper and tiny smudges where pens paused, giving each piece personality.
I enjoyed the hush that settled while letters were written, pencils shifting and pens whispering across the surface. Some messages were playful, others warm and reflective; the different inks and nibs produced a pleasing variety of strokes that felt intimate when folded into tiny envelopes.
Steps
- Cut heavyweight cardstock into mini card sizes and prepare a selection of pens and inks.
- Sketch light pencil guides for placement and choose a simple lettering style.
- Trace over pencil with ink pens, varying line weight for visual interest.
- Erase any remaining pencil lines gently once the ink is dry.
- Tuck cards into small envelopes and place them in a decorative box for gift exchange.
Glitter-dusted mason jars for cozy table lights
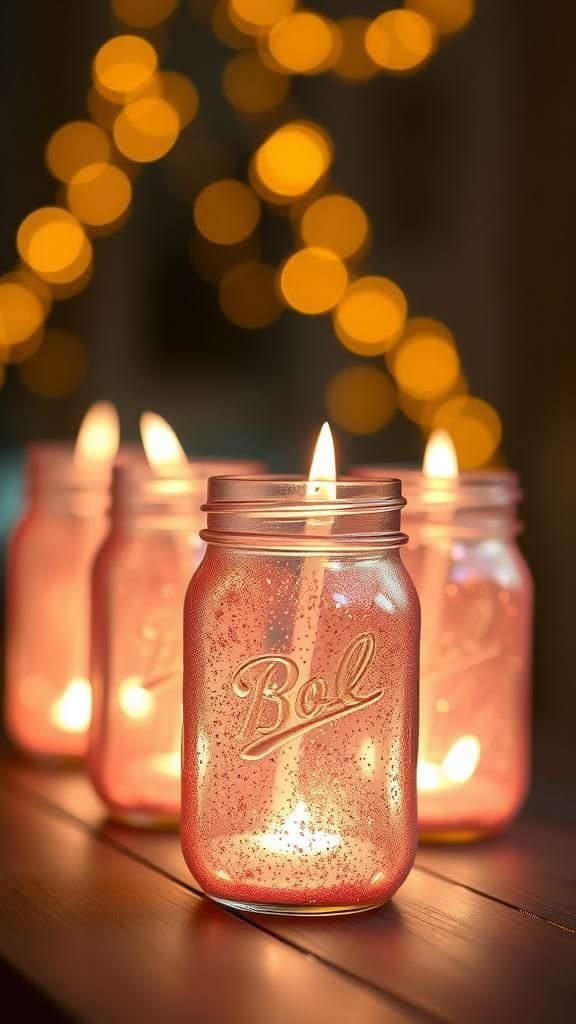
The jars caught light in unexpected ways, tiny flecks dancing as candles flickered within. Sanded glass felt cool at first, then the glittered surface added a tactile, slightly grainy touch.
The color palette leaned toward blush and gold, creating an intimate glow that softened faces and tableware. Passing a jar around, I noticed how each angle produced a different shimmer, and the scent of nearby votives mixed with the faint metallic tang of glitter dust in the air.
Steps
- Clean mason jars and wipe them dry to ensure an even finish.
- Apply a thin coat of adhesive to the outer surface and sprinkle fine glitter until coverage is even.
- Shake off excess glitter and set jars aside to dry completely.
- Seal with a clear spray sealer to reduce shedding once fully cured.
- Place tea lights or battery-operated candles inside for ambient table lighting.
Friendship bracelets with a grown-up twist

The bracelets felt both nostalgic and newly grown, a mash of childhood knotting with metallic thread and gemstone beads. I liked the slight coolness of beads against skin and how the braided cords had a comforting elasticity.
Each pattern hinted at the maker — a mix of bold colors for the loud laughers, muted tones for the quieter ones. When stacked, the bracelets made a satisfying clink and the metal accents caught the light like tiny rays, turning wrists into a soft chorus of texture.
Steps
- Select embroidery floss, metallic thread, and small gemstone or glass beads.
- Cut lengths of thread and secure them at one end for consistent knotting.
- Create a woven pattern by tying repeating knots and adding beads at intervals.
- Finish ends with a small knot and trim excess, leaving a loop or clasp.
- Add a small charm or bead to personalize each bracelet before gifting.
Mini terrarium jars with tiny moss gardens
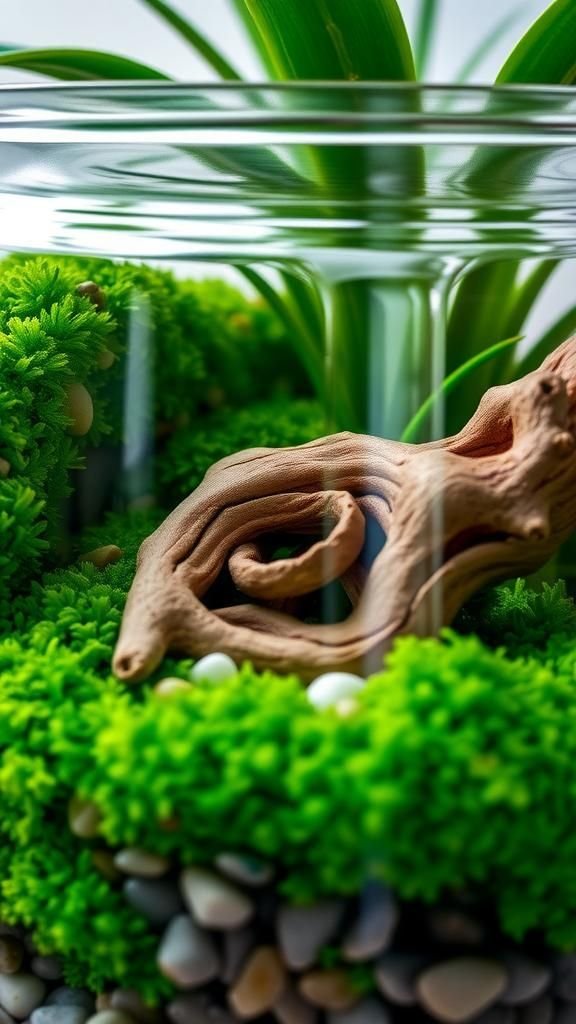
Opening the jar felt like stepping into a miniature landscape, cool and slightly damp with a scent of fresh earth. The moss was soft under fingertips and contrasted with the tiny pebbles that formed dry riverbeds.
I enjoyed arranging small accoutrements — a bit of driftwood, a tiny ceramic heart — and watching the light refract through glass onto the green. Each terrarium seemed to develop its own little microclimate, a quiet living thing that encouraged gentle observation and small, whispered conversations about memories tied to nature.
Steps
- Layer small pebbles and activated charcoal into a clear jar for drainage and freshness.
- Add a thin layer of potting mix and press it gently to form a base.
- Place moss and small plants into the soil, arranging any decorative elements.
- Mist the terrarium lightly to settle the soil and provide moisture.
- Close the jar or leave it open depending on the plants chosen and light conditions.
Paper tassel garlands in mixed textures
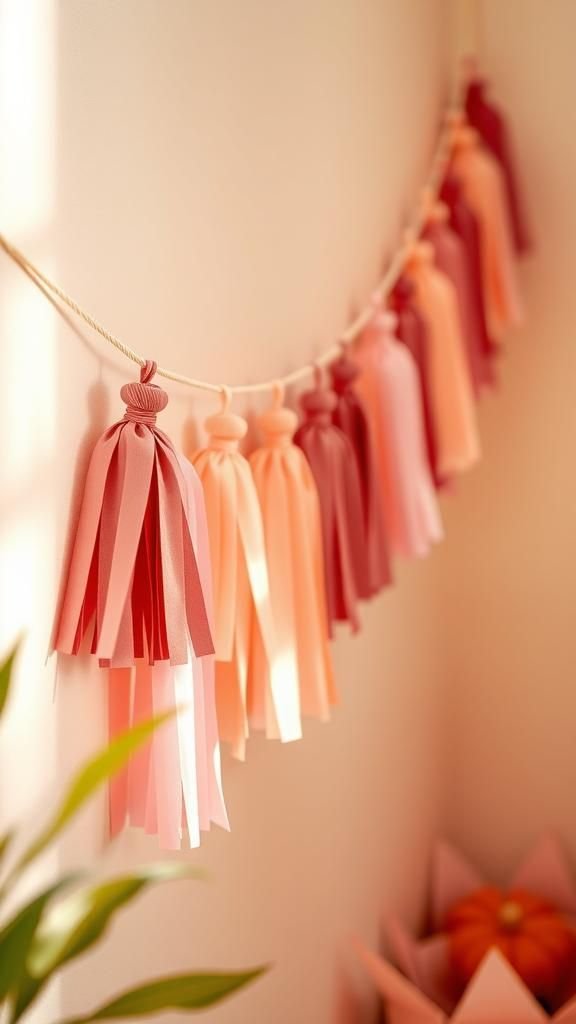
The tassels swayed gently over the snack table, each one whispering as someone brushed past. I liked how crepe, tissue, and thin leatherette each reacted to movement differently; crepe had a soft flutter, tissue a feather-light hush, and leatherette a subtle stiffness.
Colors blended from blush to deep berry, creating a visual rhythm over the room. The garland added a casual, celebratory vibe, and the slight creak of paper against twine felt familiar and comforting in the quiet moments between conversations.
Steps
- Cut strips of chosen materials and fold them lengthwise to form tassel bundles.
- Wrap the top portion with thin thread or metallic wire to secure each tassel.
- Trim the bottoms evenly to create tidy edges or a staggered look.
- Thread tassels onto a length of twine, spacing them as desired.
- Hang the garland above a table or across a mantel for a decorative accent.
Mini bath salt jars smelling faintly of rose

Opening a jar released a gentle floral lift that felt like opening a small, private garden. The salts had a pleasing crystallized texture and left a faint dust of petals on fingers when scooped.
Tiny labels were hand-tied with twine, and the glass caught the light at angles that made the salts sparkle. I enjoyed the quiet ritual of closing lids and imagining the warm soak ahead, sensing the soft weight of a handmade token destined for a soothing evening.
Steps
- Mix fine Epsom salts with a few spoonfuls of sea salt in a bowl.
- Add drops of essential oil and a small pinch of dried rose petals, stirring to combine.
- Spoon the mixture into small glass jars and tamp it gently to remove air pockets.
- Seal jars and label them with scent notes and a handwritten tag.
- Group jars in a decorative tray for gifting or party favors.
DIY cocktail stirrers with painted tips
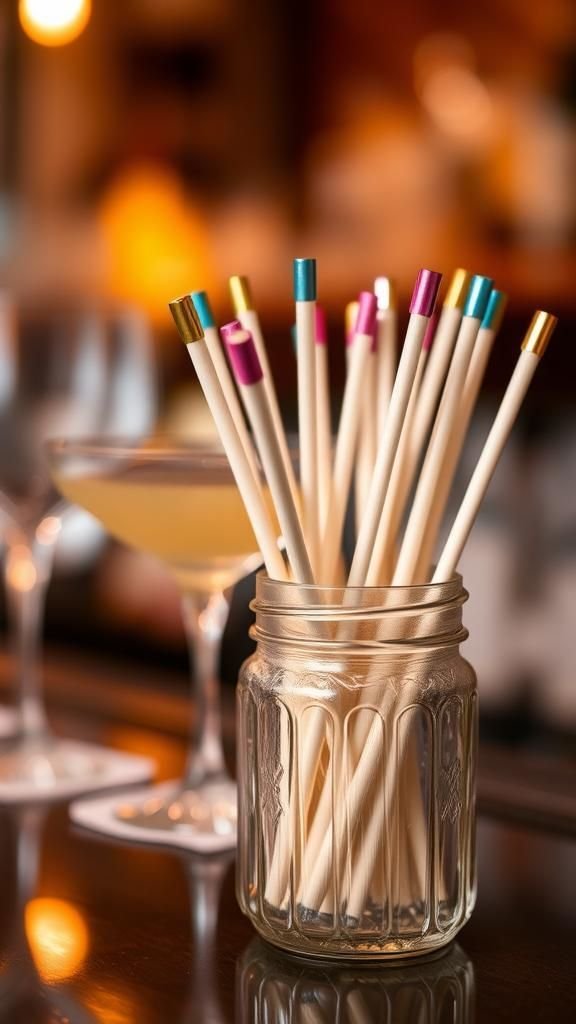
The stirrers added a little flourish to drinks; painted ends glinted against ice and lifted the whole presentation. Thin wooden sticks took color well, and metallic paint left a faint sheen that caught candlelight.
I enjoyed the small imperfections left by brush strokes, each one a tiny signature. Laying them across glasses created a playful tableau of color, and the faint scent of citrus or herbs from nearby garnishes mingled with the metallic paint in a way that felt surprisingly homey.
Steps
- Gather wooden stir sticks, acrylic or metallic paint, and a small cup for drying.
- Paint the tips in chosen colors and set them upright to dry completely.
- Add a thin layer of clear varnish to protect the painted tips once dry.
- Glue or tie a tiny ribbon or bead near the painted end for extra flair.
- Arrange the finished stirrers in a decorative holder beside the drink station.
Mini embroidery hoop art for quick keepsakes
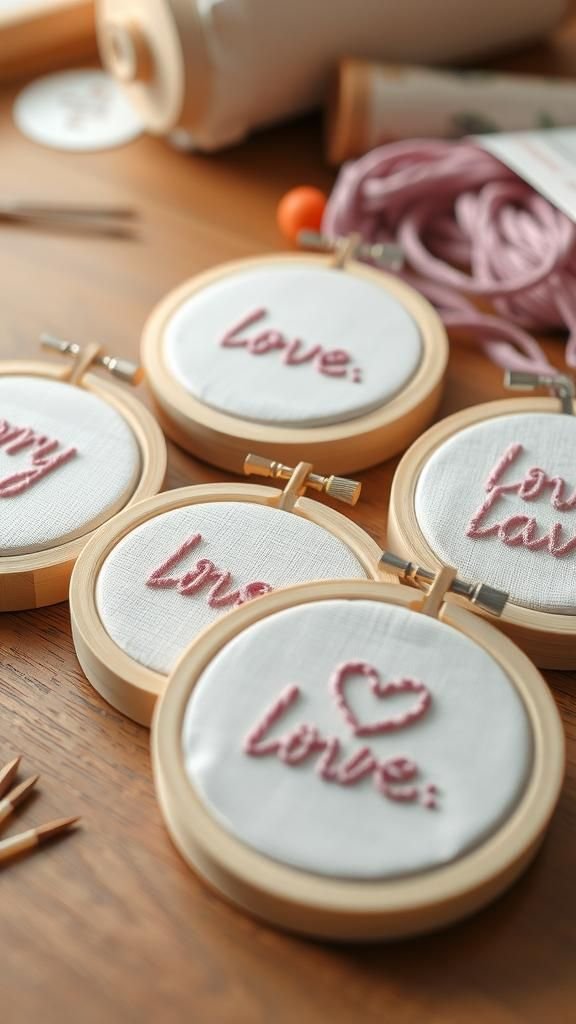
Tiny hoops looked adorable lined up on the table, each one holding a small scene stitched in simple thread. The fabric had a soft weave that welcomed needlework and the tiny stitches created a pleasing texture under fingertips.
There was a calmness to the rhythm of running thread through cloth while soft chatter continued nearby. A stitched heart or a single word seemed to carry more weight at that size, intimate and tucked away like a whisper between friends.
Steps
- Prepare small embroidery hoops and cut fabric slightly larger than each hoop.
- Stretch fabric in the hoop and tighten to create a smooth working surface.
- Choose a simple motif and stitch with embroidery floss using basic stitches.
- Trim excess fabric at the back and secure it neatly with glue or stitching.
- Add a ribbon loop or small bow for hanging or display on a mantel.
Paper mache heart bowls for holding treats
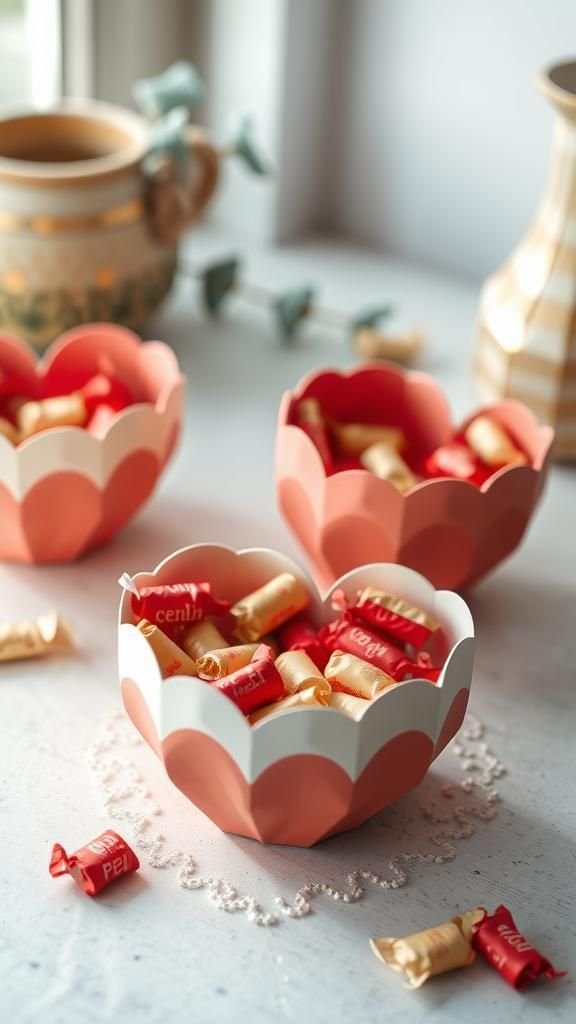
The bowls had a pleasantly uneven surface with soft ridges from layers of paper and paste, giving them a handcrafted character. Painted in muted coral and cream, they warmed up the table and seemed to nestle candies gently.
The inside had a smooth, slightly glossy finish that reflected light like a tiny scoop of sunrise. Handling them felt grounding; each one carried fingerprints from the making process, which made them feel like genuine objects with a bit of history even when brand new.
Steps
- Tear strips of paper and prepare a paste base for paper mache.
- Layer paper strips over a heart-shaped mold until firm, allowing layers to dry.
- Remove the hardened shell from the mold and sand any rough edges lightly.
- Paint the bowls with chosen colors and apply a light protective varnish.
- Fill the bowls with wrapped treats or small favors for guests to enjoy.
Hand-stamped linen napkins with tiny motifs
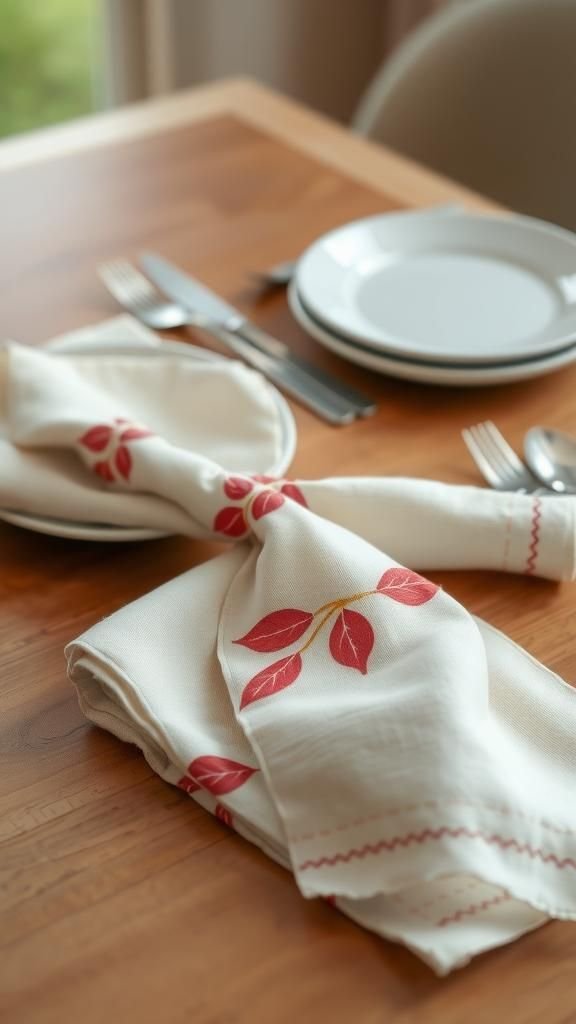
The napkins felt cool and slightly weighted, linen threads visible under close inspection. Each stamped motif had tiny imperfections that made it charming — a little smudge here, a paint dot there.
Soft berry inks and muted golds created a gentle contrast against the neutral fabric. Folding one, I liked the quiet luxury of the texture and how the stamped image seemed to anchor a place setting, turning a simple snack into something thoughtful.
They folded neatly into pockets that hid utensils like small secrets.
Steps
- Prewash linen napkins and iron them flat to create a smooth stamping surface.
- Press a small rubber or foam stamp into fabric ink and apply evenly.
- Position the stamp onto the corner or center of the napkin and press firmly.
- Allow ink to dry thoroughly and heat-set if ink instructions recommend it.
- Stack the napkins and tie them with a thin ribbon for a pretty presentation.
Custom tea blend sachets tied with ribbon
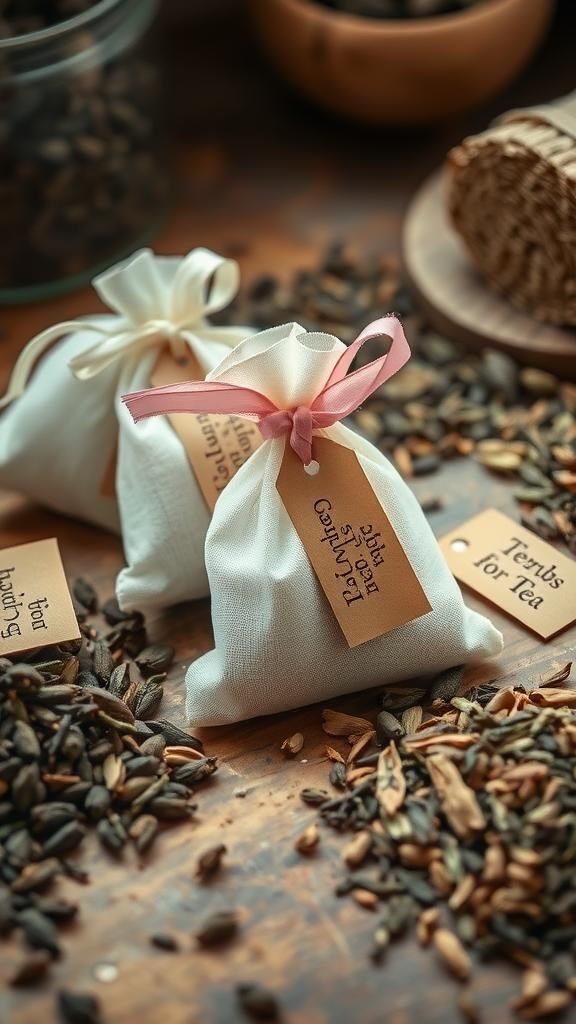
The little sachets smelled like afternoon warmth, each blend carrying a distinct note of spice or citrus. Muslin bags felt soft and breathable, and the loose leaf tea inside made a pleasant dry rustle when shaken.
Tags bore handwritten blend names and tiny doodles that hinted at flavor profiles. I enjoyed how the ribbon colors suggested whether a blend was calming or bright, and the overall effect made the tea station feel like a tiny apothecary counter at the party.
Steps
- Measure loose tea leaves and complementary dried herbs into small muslin sachets.
- Seal the sachets by pulling the drawstring tight and tying a neat knot.
- Attach a small tag with the blend name and any brewing notes.
- Tie a decorative ribbon around the bag to add a festive touch.
- Arrange sachets in a decorative box or on a tray for guests to choose.
Mini felt heart keychains with stitched edges

Felt hearts had a soft fuzz that invited fingers to linger over the stitched seam. The thread formed a neat dashed line around each shape, and tiny beads added a playful accent at one tip.
Holding one, the felt felt comforting and a little warm from handling. Colors ranged from dusty rose to deep plum, and the metal rings gave a satisfying weight that balanced the softness.
They carried a handcrafted innocence that made them easy to give away and harder to part with once made.
Steps
- Cut heart shapes from two layers of felt and prepare embroidery thread and key rings.
- Place the layers together and whipstitch around the perimeter, leaving a small opening.
- Add a few beads or a tiny charm through the thread near the top if desired.
- Insert a small bit of stuffing through the opening, then finish stitching closed.
- Attach a key ring through the top and knot securely for everyday use.
Decorative matchboxes with floral decoupage
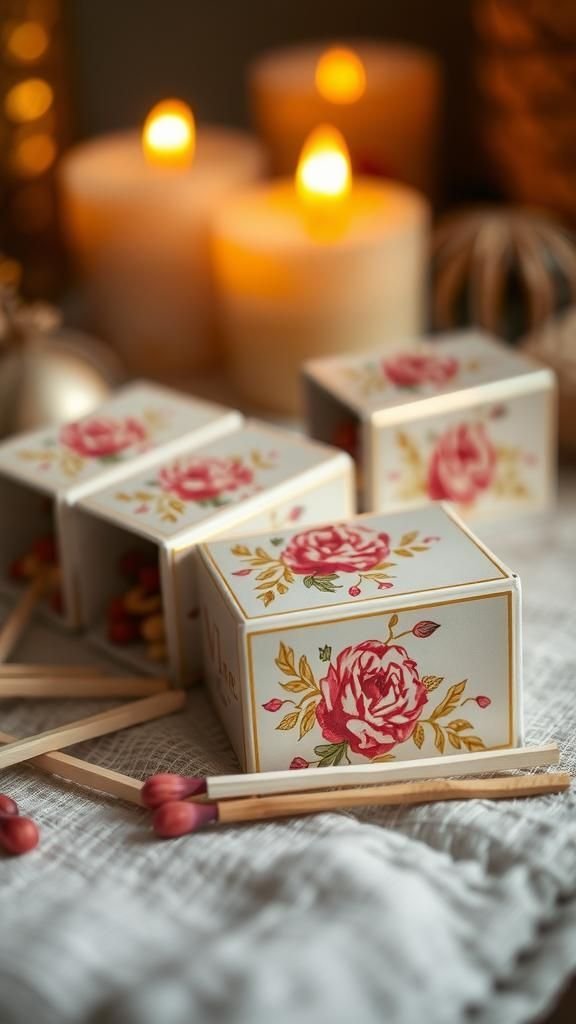
The little boxes fit neatly into the palm, the surface layered with tiny floral cutouts that created a collage of color. There was a faint papery scent and the slight abrasion of the striker on the side.
I liked how a simple matchbox became unexpectedly elegant when adorned with patterned paper and a touch of gold leaf. The finished pieces had a tactile collage feel and felt like miniature keepsakes, each one hinting at cozy nights of candlelight ahead.
Steps
- Paint matchbox outsides with a base color and allow them to dry.
- Cut small floral motifs from decorative paper to fit the box surface.
- Adhere paper pieces with a thin layer of decoupage medium, smoothing gently.
- Add highlights with metallic leaf or fine paint accents and let dry.
- Seal with a clear finish for durability and present them in a small tray.
Charming polaroid frames from cardboard scraps
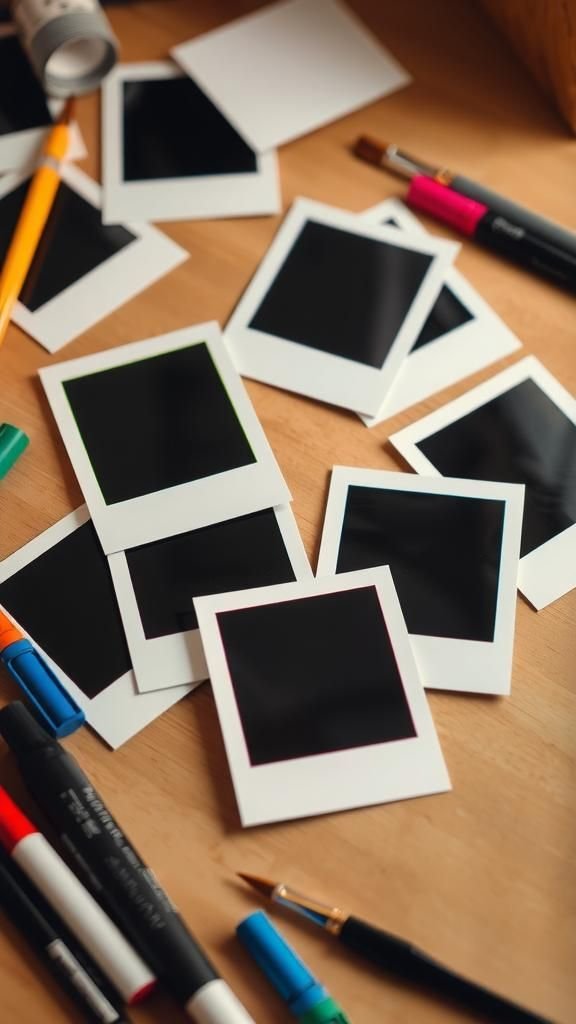
Cardboard frames lent a homespun charm to instant photos, the edges slightly rough where they had been cut but softened by hand-colored borders. Each frame had a small thumb-sized notch that made pulling out the photo feel tactile and intentional.
I liked the way marker ink sank into the cardboard, adding color that looked slightly weathered. When stacked, the frames made a satisfying rustle and the photos inside peeked out like little portals to other evenings, evoking shared laughter and quick, candid smiles.
Steps
- Cut cardboard into rectangles sized for instant photos and cut inner openings slightly smaller than the photo.
- Paint or color the borders and decorate with doodles or small stickers.
- Slide photos into the frames from the top or back to secure them.
- Add a small tab or sticker to the back for display on a table or wall.
- Create a collection and arrange them on a tabletop display during the party.
Tiny watercolor art trading cards to swap
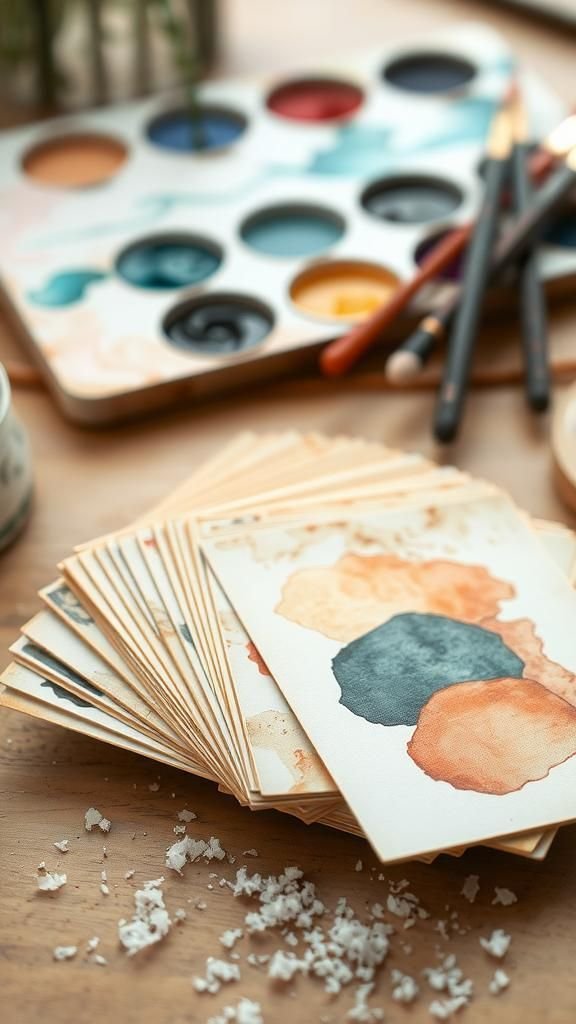
The cards had soft washes of pigment that pooled at edges and left delicate flecks where salt had been sprinkled. They felt slim and slightly warped from drying, which made them tactile and honest.
Swapping them brought out playful commentary on brushwork and color choices, and each mini landscape or abstract smear seemed to hold a short mood. I noticed how the paper absorbed color differently depending on pressure, and the stack of cards grew into a small, colorful anthology of that evening’s quiet artistry.
Steps
- Cut heavyweight watercolor paper into small trading card sizes and gather paints.
- Wet the paper lightly and apply washes of color, experimenting with salt or masking fluid.
- Let the paint settle and dry completely to reveal unique textures.
- Add delicate ink details or signatures once the paint is dry.
- Exchange cards at the end of the session, pairing each with a tiny note.
Mini succulent planters painted in soft hues
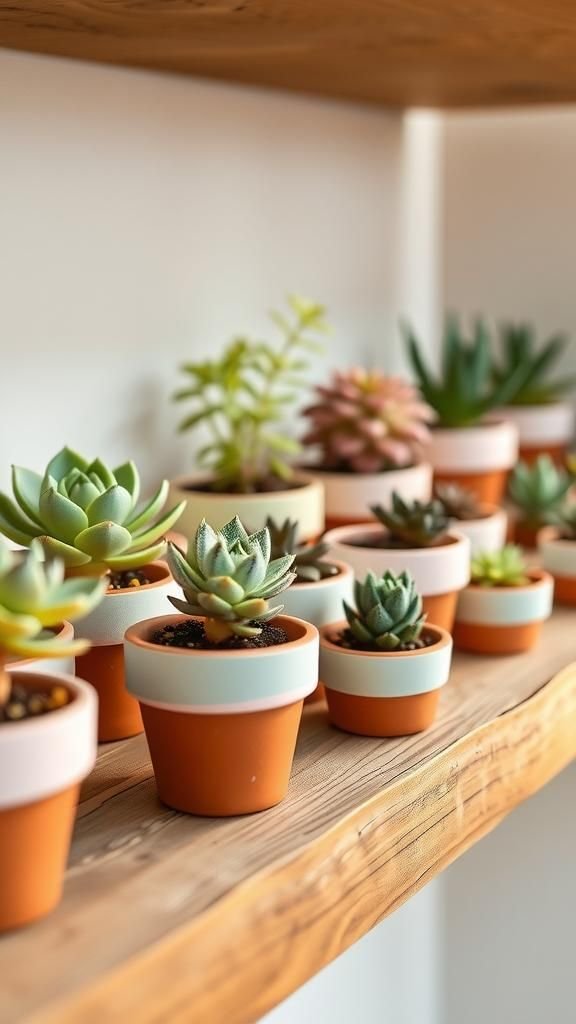
The little planters had a comforting weight and a smooth glaze that reflected a muted studio light. Each planter held a tiny rosette or trailing baby, their leaves thick and cool under fingers.
Paint strokes were visible at the rims, lending a handmade quality that made the groupings look like a curated collection. A faint earthy scent hovered nearby from potting mix, and when arranged together the planters formed a tiny green neighborhood that felt lively and reassuring.
Steps
- Select small terracotta pots and clean them before painting.
- Apply base coats of acrylic paint and allow them to dry between layers.
- Add patterns or accents with a fine brush for visual interest.
- Seal painted surfaces with a clear varnish to protect the finish.
- Plant small succulents with a bit of well-draining soil and display on a sunny windowsill.