Disclosure: This post contains affiliate links, which means we may earn a commission if you purchase through our links at no extra cost to you.
I get a little giddy when spring rolls around and the first local blooms start showing up at the market. There is something quietly joyful about gathering soft petals, pale greens, and tiny buds to make a spring floral wreath DIY crafts project on a slow weekend morning.
I often find myself sipping coffee, listening to birds, and letting a handful of blooms steer the plan.
These spring floral wreath DIY crafts have been a way for me to pay attention to texture and scent. Each idea here grew from warm afternoons spent experimenting with unexpected pairings and the small satisfaction of seeing a doorway come to life.
Grapevine wreath with early forsythia blooms

A rustic grapevine base wrapped in bright yellow forsythia feels like a sunrise pinned to the front door. The woody tang of the vine blends with the blossom’s faint citrus hint, and the uneven twiggy texture catches light in a pleasing way.
I remember finding a small pile of branches after a windy afternoon, the twigs warm from the sun, and weaving the blooms in until the wreath had that slightly imperfect, homegrown look. It has an inviting, farmhouse energy that surprises guests and makes me smile every time.
Steps
- Gather a grapevine wreath base, fresh forsythia stems, floral wire, and twine.
- Trim forsythia stems and tuck them into the grapevine base in small clusters, securing with floral wire.
- Layer more blooms around the wreath for even coverage, hiding wire inside the vines.
- Add a small loop of twine for hanging and fluff blooms gently for fullness.
Soft felt flower wreath in pastel tones

A felt flower wreath brings a cozy, tactile quality that feels like a craft-room afternoon. The wool felt petals are slightly fuzzy under the fingertips, offering a quiet matte contrast to glossy greenery.
I remember making a batch of mismatched blooms while an old playlist hummed in the background; the colors blended gently—dusty rose, sage, and buttercream—while the felt edges gave each bloom a handmade charm. It hangs like a fabric bouquet, soft enough to touch and reassuringly light on the door.
Steps
- Select felt sheets in complementary pastels and lay out petal shapes.
- Stack petals to form flowers and secure centers with small stitches or hot glue.
- Attach finished felt blooms to a foam or wire wreath base, arranging for balance.
- Add felt leaves or a small ribbon loop for hanging.
Eucalyptus and white blooms for minimalist charm
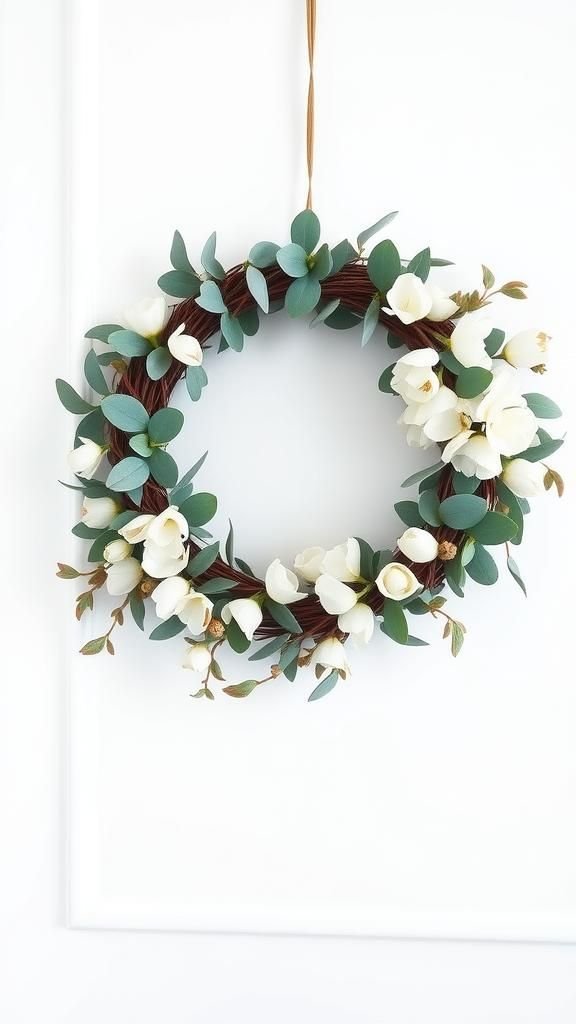
A minimalist wreath of silvery eucalyptus and crisp white blooms creates a calming doorway statement. The eucalyptus leaves make a soft rustling sound in a gentle breeze and carry a cool, herbal scent that feels almost spa-like.
I made one to match a pared-back hallway and loved how the pale leaves caught the light, their veins like tiny rivers. The white flowers provide small bright notes against the muted greenery, resulting in an elegant, airy balance that never feels overdone.
Steps
- Choose a sturdy wreath base and gather eucalyptus sprigs plus white seasonal blooms.
- Layer eucalyptus around the base, overlapping stems for a continuous garland effect.
- Tuck white blooms intermittently among the leaves and secure stems with floral tape or wire.
- Trim any excess stems and adjust for a graceful, even silhouette.
Vintage fabric scrap wreath with faded roses

This wreath feels like a trunk of found treasures turned into a circle of memories. Strips of worn floral fabric, faded roses, and tiny calico prints twist together and create a quilted, layered surface that invites longer looks.
I made one from leftover skirt fabric and a thrifted tablecloth; the colors had softened into a gentle harmony and a faint scent of old linens lingered. The overall effect is nostalgic, like pressing a slow breath of summer against a door, and it pairs beautifully with brass hardware.
Steps
- Collect fabric scraps in complementary floral and calico patterns and cut into strips.
- Wrap or tie fabric strips around a wreath base, overlapping to create fullness.
- Tuck in small clusters of faux or dried roses for focal points.
- Fluff fabric strips and trim ends for an even, textured finish.
Succulent halo: a drought-friendly wreath idea

A succulent wreath offers a succulent-rich texture that stays fresh-looking for a long time. The little rosettes and fleshy leaves bring a sculptural, almost architectural element that contrasts with soft blooms.
I built one and enjoyed the tactile pleasure of different leaf shapes nestling together: tight cups, elongated paddles, and powdery blue-green tones. The wreath felt cool to the touch and surprisingly contemporary against a bright door.
It seems like the kind of object that rewards occasional misting but otherwise sits serenely, changing subtly with light.
Steps
- Prepare a wire or foam wreath base and select a mix of small succulents.
- Create pockets in sphagnum moss around the base and place succulent cuttings into each pocket.
- Secure roots with floral pins and press moss firmly to hold moisture.
- Spritz lightly after planting and hang where it receives bright, indirect light.
Paper quilled blooms for delicate visual texture

Paper quilling adds an intricate, lightweight look that plays beautifully with spring palettes. Tiny coils and shaped strips form petals with a papery crispness that catches the light in subtle ways.
I spent an afternoon rolling and pinching little motifs while a kettle hummed nearby, and the repetitive motion felt calming. The finished wreath has a fanciful quality, like a paper garden preserved at a perfect moment.
Each swirl reflects a small human touch, and the thin edges create soft shadows when the sun slips across the wall.
Steps
- Select colored quilling paper and a quilling tool to form coils and teardrops.
- Assemble clusters of quilled shapes into floral units with glue and allow to dry.
- Arrange quilled flowers on a lightweight wreath base and adhere with a strong craft adhesive.
- Balance shapes and colors across the wreath for a cohesive appearance.
Pressed flower resin wreath with glossy finish

A pressed flower resin wreath preserves fragile petals under a glassy sheen that feels like a time capsule. The translucent resin magnifies tiny veins and keeps colors softened, giving each bloom an almost ethereal glow.
I once pressed a handful of wild violets and forget-me-nots, then encased them; handling the finished piece was like holding a preserved breeze. The weight of the resin brings a satisfying solidity while the flowers inside remain delicate, suspended as if in a slow, quiet bloom.
Steps
- Press freshly picked flowers between heavy books until fully dried and flat.
- Arrange pressed flowers on a silicone wreath mold or within a flat ring form.
- Pour clear epoxy resin carefully over the arrangement and allow to cure fully.
- Demold and sand edges smooth before adding a backing or hanging hardware.
Dried lavender and ribbon: calming scent combo

A wreath of dried lavender tied with a soft ribbon carries a lavender-forward scent that lingers in the air. The slim purple stems and tiny buds create a slender, wispy texture that feels both refined and relaxed.
I made one after a summer trip to a lavender farm and kept it near my bedroom door for that calming aroma: there was a subtle floral sweetness that replayed memories of warm fields. The ribbon adds a silky contrast, catching light and moving gently with the breeze.
Steps
- Harvest or purchase dried lavender bunches and gather floral wire and a wreath base.
- Bundle small groups of lavender and secure them together with wire.
- Arrange bundles around the wreath base, overlapping to hide stems, and fix with wire.
- Finish with a ribbon bow and trim ends for a tidy look.
Bright citrus slice wreath with bay leaf accents

A wreath featuring dried citrus slices paired with glossy bay leaves feels both festive and fragrant. The thin orange and lemon rounds offer translucent jewel-like spots when backlit, while the bay leaves bring a deep evergreen contrast and a savory scent.
I crafted one during holiday prep and enjoyed the almost culinary vibe: the citrus smell lifted the room in the same way a citrus peeler might. The overall impression is sunlit and slightly Mediterranean, with a crisp, fragrant presence that gets noticed without shouting.
Steps
- Dry thin citrus slices in an oven or dehydrator until translucent and leathery.
- Prepare a wreath base and arrange bay leaves as a green backdrop.
- Attach citrus slices to the base with floral wire or hot glue, spacing evenly.
- Add a loop for hanging and gently fluff bay leaves for depth.
Sunflower farmhouse wreath for cheerful afternoons

A sunflower wreath grabs attention with big, golden faces and a friendly, gallery-like boldness. The velvety central disks contrast with wide, serrated petals, creating a joyful, sunflower-field kind of energy.
I remember making one after a farmers market haul and being tempted to rest my hand on a bloom to feel its velvet warmth. It casts a sunny silhouette on a porch and pairs well with woven doormats and weathered wood.
The visual weight is steady and unabashedly bright.
Steps
- Select faux or dried sunflowers and a sturdy wreath base to support their weight.
- Position larger sunflowers as focal points and fill gaps with smaller blooms or greenery.
- Secure stems with floral wire and tuck filler elements to hide mechanics.
- Adjust petals and leaves so the arrangement looks balanced from all angles.
Tender peony cluster wreath for soft elegance

Clusters of peonies create a lush, pillowy wreath that feels indulgent without being fussy. The layered petals fold into themselves like a silk robe, and when slightly opened they exhale a gentle fragrance.
I once received a bouquet and salvaged a few blooms to make a door halo; their soft blush and coral tones blurred into each other, forming a romantic, almost vintage tableau. The wreath reads like a springtime cloud, inviting close inspection to appreciate the delicate layering and muted color transitions.
Steps
- Select fresh or high-quality faux peonies in a harmonious color palette.
- Group peonies into small clusters and attach to a foam or wire wreath base.
- Fill spaces with small leaves or filler flowers for a full, balanced look.
- Fluff petals for natural volume and trim stems as needed.
Moss and tiny mushroom wreath with forest mood
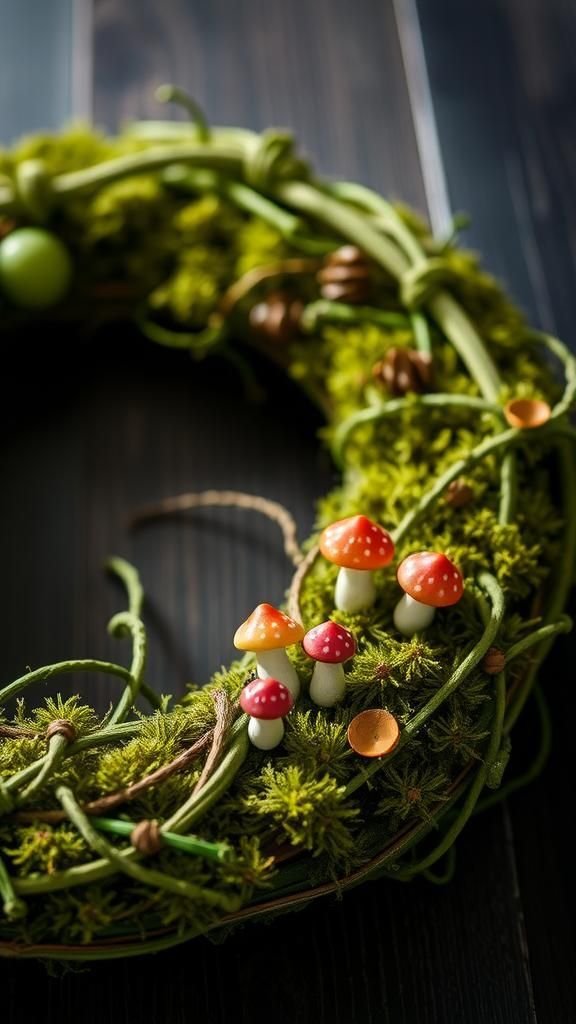
A moss wreath dotted with tiny faux mushrooms evokes a shaded woodland floor and brings an earthy, tactile depth to the entry. The moss feels springy under fingers and has that cool, damp forest scent in memory.
I put one together after a walk under pines; small ceramic mushrooms added a playful, storybook element. The color palette runs from deep green to ochre, and the irregular surface invites shadow play, making the wreath feel alive in a quiet, slow way.
Steps
- Attach sheet moss to a foam or wire wreath base with floral adhesive or pins.
- Arrange small faux mushrooms and secure them into the moss with pins or glue.
- Add tiny twigs or seed pods for textural contrast and press elements gently into place.
- Ensure a balanced distribution of elements and add a backing for hanging.
Cherry blossom branch wreath with airy pinks
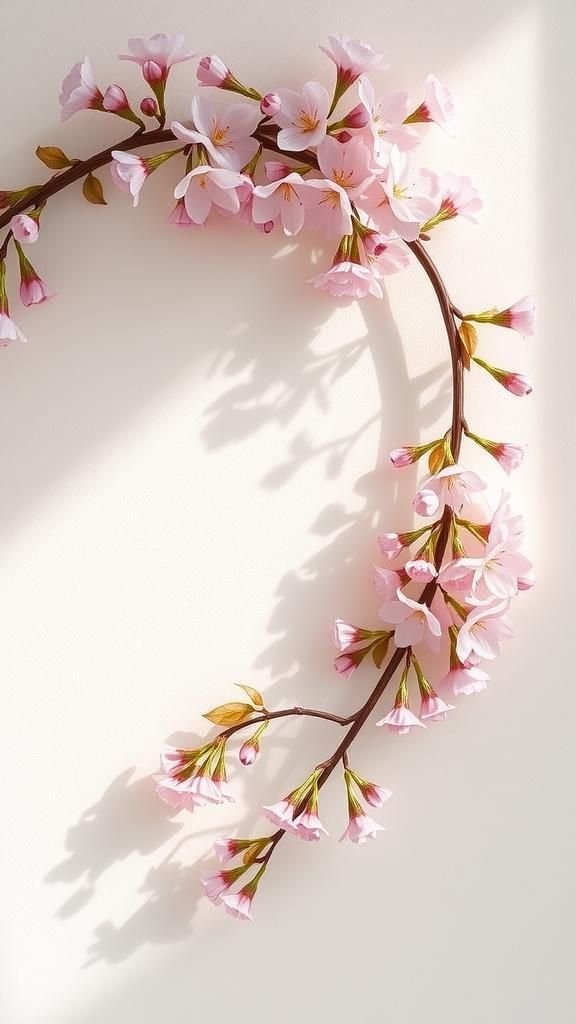
A wreath woven from delicate cherry blossom branches reads like a springtime postcard. The tiny pink petals cluster in soft clouds, and the thin branches arch gracefully into a loose circle.
I once brought clippings indoors after a windstorm and watched the blossoms brighten the kitchen with quiet elegance. The scent is faint and clean, almost fleeting, and the overall impression is ethereal.
It leans toward a more organic silhouette where negative space matters as much as the blooms themselves.
Steps
- Select pliable cherry blossom branches and form them into a circular base.
- Layer additional branches around the base, intertwining to build volume and secure connections.
- Tuck small sprigs of blossoms into gaps and fasten with floral tape or thin wire.
- Adjust branches for an airy, balanced silhouette and prune stray twigs.
Burlap and lace wreath with cottage charm

Burlap and lace paired together make a tactile contrast between rough weave and delicate trim. The burlap gives a rustic, grounding texture while lace brings vintage romance, and the two together read like a well-loved tablecloth repurposed for the door.
I enjoyed the way the burlap’s coarse threads caught specks of dust while the lace floated above them in gentle loops. The color story favors soft neutrals and cream, which settle comfortably on both bright and muted doors.
Steps
- Wrap a wire wreath frame with burlap strips, overlapping to create a full base.
- Layer lace ribbons over the burlap and secure at intervals with hot glue or pins.
- Add small fabric flowers, dried sprigs, or a bow as a focal point.
- Fluff lace loops and trim burlap ends for a tidy finish.
Wildflower meadow wreath with informal freedom

A wildflower wreath captures the joyful messiness of a roadside meadow: daisies, cornflowers, and tiny asters mixed with grassy fronds. The bouquet of shapes and scales feels spontaneous, as though it arrived with a breeze.
I made one after a day wandering a field and loved how each bloom added its own personality, from shy buds to bright open faces. The scent is green and slightly herbaceous, and the overall look reads as carefree and welcoming, perfect for someone who likes a slightly untamed aesthetic.
Steps
- Gather a mix of fresh or dried wildflowers and slender greenery stems.
- Create small bundles and bind stems with twine before laying them onto a wreath base.
- Overlap bundles around the base, securing with floral wire for stability.
- Add a hanging loop and trim any uneven stems for a unified outline.
Ribbon-wrapped hoop with tiny floral clusters

A simple hoop wrapped in ribbon becomes an airy frame for little floral clusters that whisper rather than shout. The ribbons slide and shimmer slightly as light hits them, and the small groupings of blooms feel like punctuation marks along a delicate line.
I assembled one to compliment a narrow hallway and loved its minimalist, almost Scandinavian restraint. The whole piece feels light and modern, with the ribbon offering a soft visual rhythm against the solid background of a wall.
Steps
- Select an embroidery hoop and wind a complementary ribbon around it until fully covered.
- Form small clusters of faux or dried blooms and leaves and secure them to the hoop with floral wire.
- Space floral clusters around one side of the hoop for an off-center composition.
- Hang with a loop of ribbon placed at the top of the hoop.
Paper flower medley with painted edges

Paper flowers with hand-painted edges introduce a graphic, slightly whimsical quality to a wreath. The crisp paper faces and colored rims catch light differently than fabric, giving each petal a playful sheen.
I once experimented with watercolors along petal borders while a rainstorm drummed outside; the drying colors pooled into tiny gradients that made each bloom feel painterly. The overall effect is both crafted and artistic, a gallery of small paper gestures that brighten a space without overpowering it.
Steps
- Cut petal shapes from heavy cardstock and paint the edges with watercolor or acrylic for subtle gradients.
- Layer and glue petals to form flowers and add paper centers for dimension.
- Attach paper blooms to a lightweight wreath form using hot glue or strong adhesive.
- Balance colors and shapes across the wreath for a cohesive composition.
Daisy chain wreath with casual country feel

A daisy chain wreath carries a sunny, approachable personality that feels handmade and cheerful. The small white petals and bright centers form a repeating rhythm that reads as uncomplicated and friendly.
I remember threading daisies at a picnic and liking the way the stems sat together in a loose circle, imperfect and charming. This wreath exudes a casual country energy and invites smiles from passersby.
It pairs nicely with natural wood tones and uncomplicated porch decor.
Steps
- Gather fresh daisies and a pliable vine or wire frame to work with.
- Form small bunches of daisies and secure them around the frame with floral tape or thin wire.
- Overlap bunches slightly to create continuous coverage and hide mechanics.
- Finish by trimming stems and arranging blooms for an even look.
Cherry tomato vine wreath with edible surprise
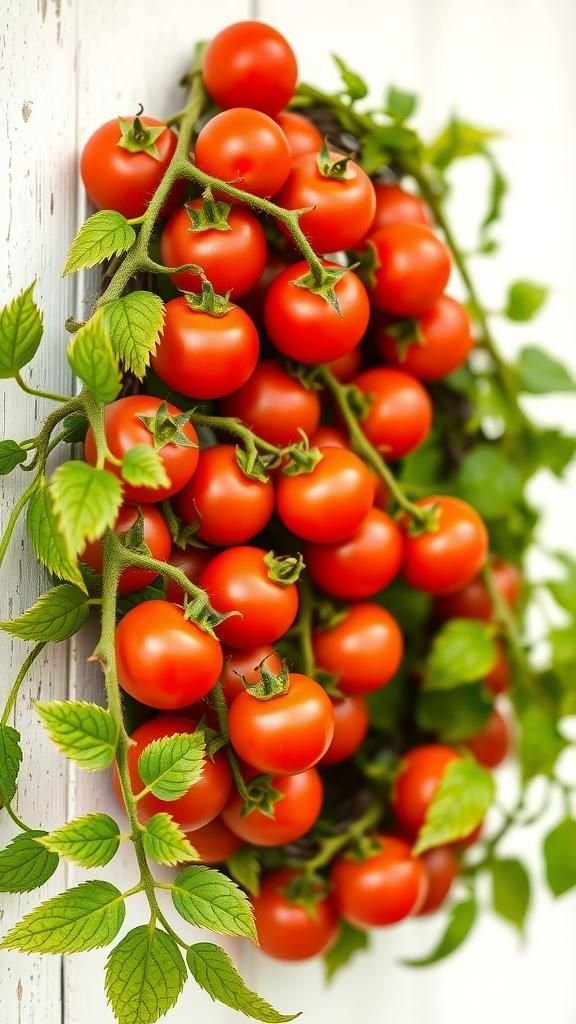
A wreath made from tomato vines and small cherry tomatoes brings a playful, edible twist to seasonal decor. The tiny fruits add pops of ripe color and a slightly glossy surface that contrasts with matte foliage.
I crafted one during an abundant harvest and enjoyed how the wreath suggested a gardener’s life—hands in soil and dinner plans nearby. Its presence hinted at a kitchen where fresh ingredients matter, and it introduced a culinary note to the doorway display without being literal.
Steps
- Choose sturdy tomato vines with ripe or ripening cherry tomatoes and wire for support.
- Wind vine segments around a wreath base, tucking tomatoes into pockets and securing with floral wire.
- Reinforce any loose areas and add small sprigs of herbs for contrast.
- Hang in a shaded spot and replace fruit as it ripens to maintain visual appeal.
Lace and dried baby’s breath cloud wreath
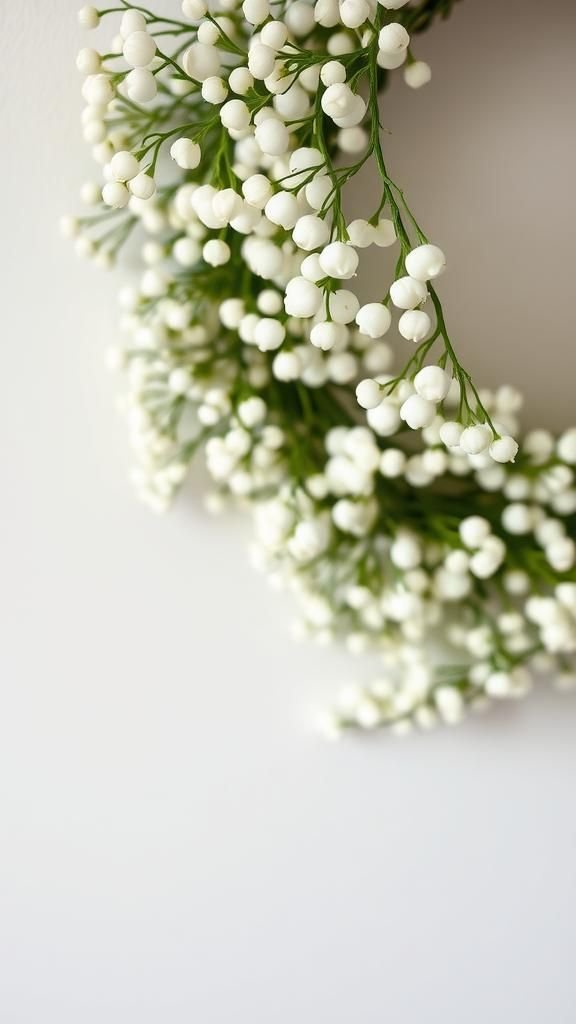
A cloud of dried baby’s breath paired with delicate lace results in an airy, whisper-soft wreath that feels like a memory. The tiny white clusters shimmer together into a soft, almost foggy surface while the lace peeks through as a romantic undercurrent.
I made one after a wedding and loved how it held onto a faint floral scent, like a lingering greeting. The color story stays light and neutral, lending an elegant simplicity that still reads as tender and personal.
Steps
- Collect dried baby’s breath bunches and a lightweight wreath form.
- Wrap lace ribbon around the base for a soft background layer.
- Attach small bundles of baby’s breath around the form, securing with floral wire or pins.
- Fluff and shape the clusters for an even, cloud-like appearance.
Tassel and bloom wreath with playful motion

Tassels paired with small blooms bring an element of movement and textile interest to a wreath. The silky threads swing slightly in a breeze, contrasting with the static roundness of blossoms.
I crafted one with leftover yarn tassels and felt buds; the tactile mix felt lively and a bit bohemian. The colorway leans toward joyful contrasts, and the little tassel tails catch light in a way that makes the whole piece feel animated, like a quiet parade at the door.
Steps
- Create tassels from yarn in coordinating colors and prepare small faux or dried flowers.
- Attach tassels to a wreath base at regular intervals using strong thread or glue.
- Add floral clusters at tassel tops to anchor them visually and secure firmly.
- Adjust tassel lengths for balanced movement and trim any uneven fibers.