Disclosure: This post contains affiliate links, which means we may earn a commission if you purchase through our links at no extra cost to you.
Spring always nudges me to poke through cupboards and imagine new life for forgotten things. A chipped mug, a stack of worn books, a jar of buttons have each sparked tiny projects that brightened a corner and smelled faintly of lemon cleaner and sun-warmed wood.
Upcycled Spring Home Decor Crafts felt like a gentle pact with the season: refresh without waste.
I started with one small thing and kept collecting odd pieces from thrift runs and neighbors’ giveaways. Those experiments turned into a pile of favorite ideas that I kept returning to, each an Upcycled Spring Home Decor Crafts note of color and texture around the house.
Mason jar herb vases with ribbon accents

Mason jars never feel cold when they hold fresh herbs clipped from the windowsill. I like the way basil leaves press against the glass, their glossy green catching morning light.
A faded ribbon tied around the neck brings a whisper of color and a soft texture against the smooth glass. Tiny droplets bead inside after watering and make the arrangement look like a miniature greenhouse.
The scent is a quiet green burst, mingling with lemon soap and warm wood from the windowsill. It feels like bringing a small, breathing garden indoors.
Steps
- Clean the mason jar thoroughly and remove any labels or residue.
- Place a thin layer of pebbles or small stones in the bottom for drainage, then add potting soil and gently press in herb seedlings.
- Tie a ribbon around the jar neck and set the jar on a sunny windowsill where the herbs will receive bright light.
- Water lightly so soil is moist but not saturated and rotate the jar occasionally for even growth.
- Trim stems as they grow to encourage fresh, bushy growth and keep the jar tidy.
Wine bottle planters glowing with fairy lights

There is a comforting weight to a repurposed wine bottle; it feels like history waiting to be rewritten. I love the way tiny leaves peek from a slim opening and how fairy lights drape through the neck, their warm points of light catching the glass and making the bottle look like a tiny lighthouse.
The green and amber hues of older bottles add a vintage mood, while cool clear ones brighten a shelf. On quiet evenings the glow is soft and a little secretive, like a porch light from another house.
Steps
- Rinse out the wine bottle and remove the label, soaking in warm water to peel off residue.
- Fill the bottle bottom with small pebbles for weight and add potting soil or sand as the base for succulents or air plants.
- Insert the plants gently into the neck and arrange fairy lights around and through the bottle, letting some lights rest inside.
- Place the bottle on a side table or shelf where it can catch indirect light during the day and glow at night.
- Swap plants or lights seasonally to refresh the look and maintain plant health.
Teacup candles with leftover wax and charm

Small teacups often carry the faint ghost of tea and old conversations, and filling them with wax feels like giving them a second story. I remember choosing a delicate floral cup that smelled faintly of bergamot and watching the new wax settle, the wick standing like a tiny mast.
When lit, the flame reflects off patterned porcelain and throws a warm pool of light across a table, accompanied by a soft vanilla or citrus scent if scented wax is used. The cups sit neatly on saucers, ready to be moved from room to room.
Steps
- Collect clean teacups and place leftover wax in a heatproof container to melt gently over a double boiler.
- Position a wick in the center of each teacup using a small dab of melted wax to hold it steady at the base.
- Pour melted wax into the teacup, leaving a small gap at the rim, and allow the wax to cool until solid.
- Trim the wick to an appropriate length and rest the teacup candle on its saucer on a heat-resistant surface.
- Light the candle carefully and relocate when cooled, swapping cups or scents for variety.
Old sweater cozy planters for spring greens
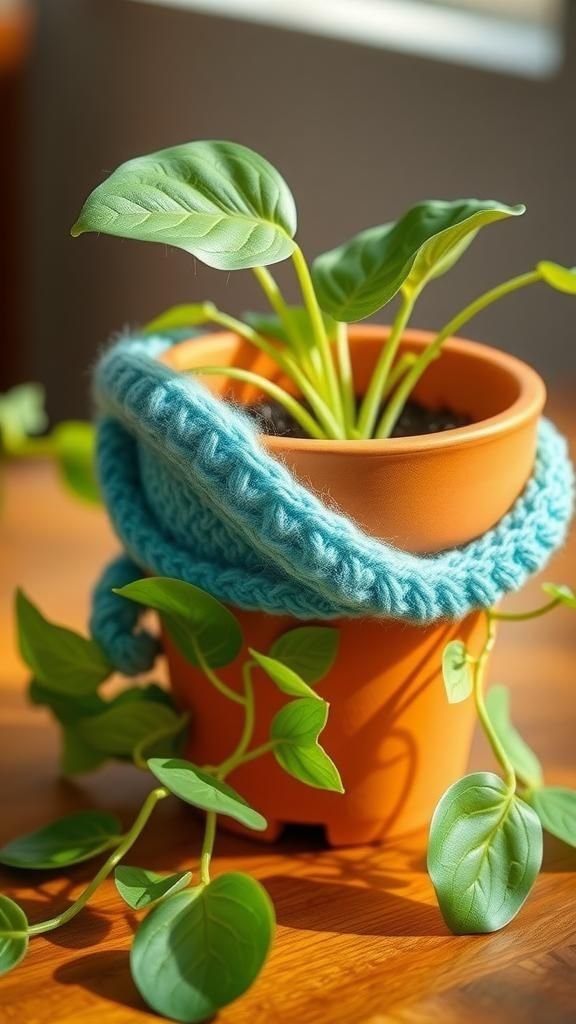
An old sweater has a memory of winter warmth, and wrapping it around a planter turns that memory into something lively. The knit offers a plush, tactile contrast to leafy plants, and the seams and buttons become decorative details.
I enjoy the slight give of wool when I press a pot into the sweater cuff, the way ribbing frames a trailing plant like a soft collar. Colors mellow over time, so a faded teal sweater brings a gentle, weathered tone that complements bright new shoots and the earthy scent of damp soil.
Steps
- Select a clean, unstained sweater and slide a small planter or plastic pot into the sweater sleeve or body section chosen.
- Fold and tuck excess fabric around the planter to create a neat fit, trimming sparingly if necessary and finishing raw edges with a running stitch if desired.
- Insert a liner if the sweater will touch moist soil directly to protect fabric from dampness.
- Place a plant into the wrapped pot and position the cozy planter in a spot with suitable light for the plant variety.
- Refresh the sweater wrap seasonally or swap in different sweater textures to vary the look.
Tin can lanterns with punched hole patterns
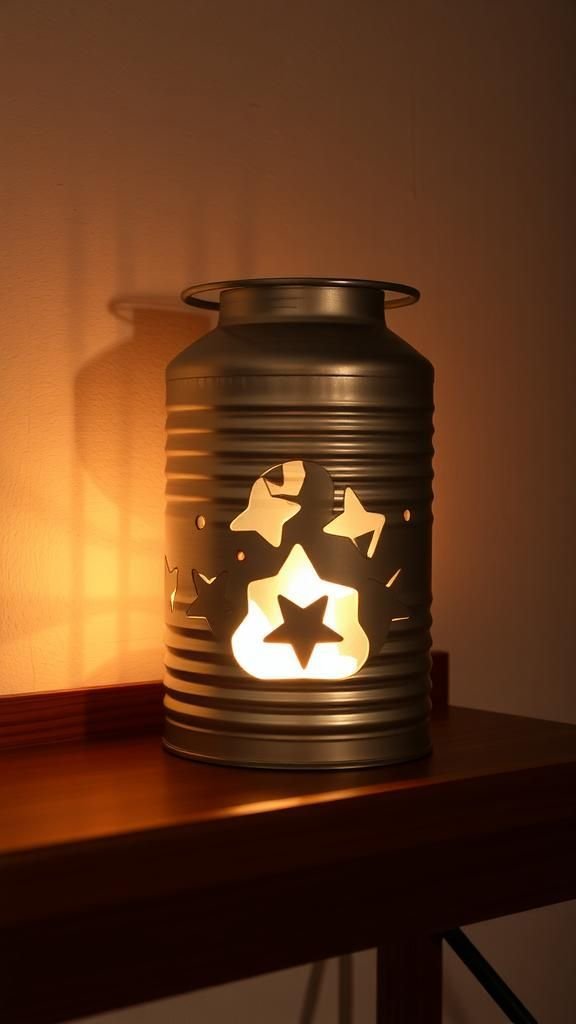
Empty tin cans can look unexpectedly elegant when dotted with patterns of light. I remember a rainy afternoon tapping holes with a hammer and nail, then holding the can up to see constellations of light wink through.
The metal edge feels cool under fingertips and the sounds of tapping became oddly satisfying. Sitting a candle or LED inside casts patterned shadows across nearby walls, turning a shelf into a soft, moving mural.
The reused metal carries a faint scent of coffee or tomatoes that fades as the can finds new purpose.
Steps
- Clean and dry the tin can thoroughly, smoothing any sharp edges at the rim with sand or pliers.
- Sketch a simple pattern lightly on the can surface with a marker to guide piercing.
- Carefully punch holes through the can along the pattern using a nail and hammer, spacing holes evenly for a balanced light effect.
- Place a small candle or battery-operated light inside the can and set it on a heatproof surface or hanging fixture if intended.
- Rotate patterns or cans to change shadow effects and enjoy the shifting light at night.
Pallet sign turned spring welcome piece
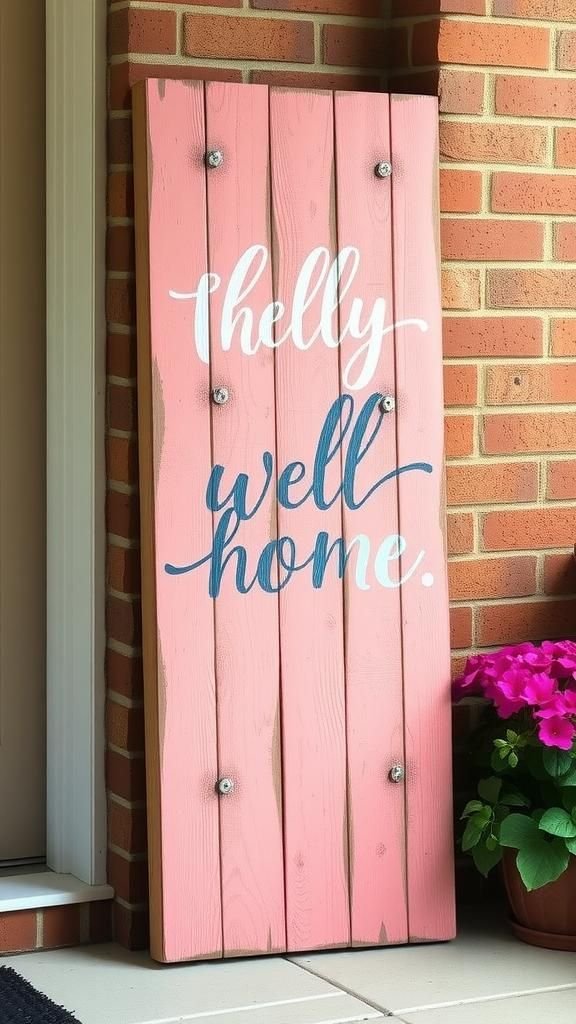
A slatted pallet board has a lived-in texture that makes every brush of paint feel like a gentle update rather than a remake. I recall sanding a single plank and leaving the rest raw to keep that honest, weathered look.
The grain absorbed paint in uneven ribbons, creating a faded ombré that caught the eye from across a porch. Old nails and knots become part of the charm, and little chips of paint flake in a comforting way.
Once propped by the door, it felt like the house had gained a quiet, handwritten greeting.
Steps
- Disassemble or select a clean pallet board and sand rough edges lightly to remove splinters while preserving texture.
- Arrange planks into a single sign layout and secure them together with cross braces on the back using screws or nails.
- Apply a thin coat of outdoor paint or stain in chosen colors, allowing natural grain and imperfections to show through for character.
- Add lettering or a simple stencil design with contrasting paint, then seal the surface with a clear exterior varnish.
- Mount the sign on a porch wall or lean it against a planter to welcome guests with rustic charm.
Denim pocket organizer from old jeans
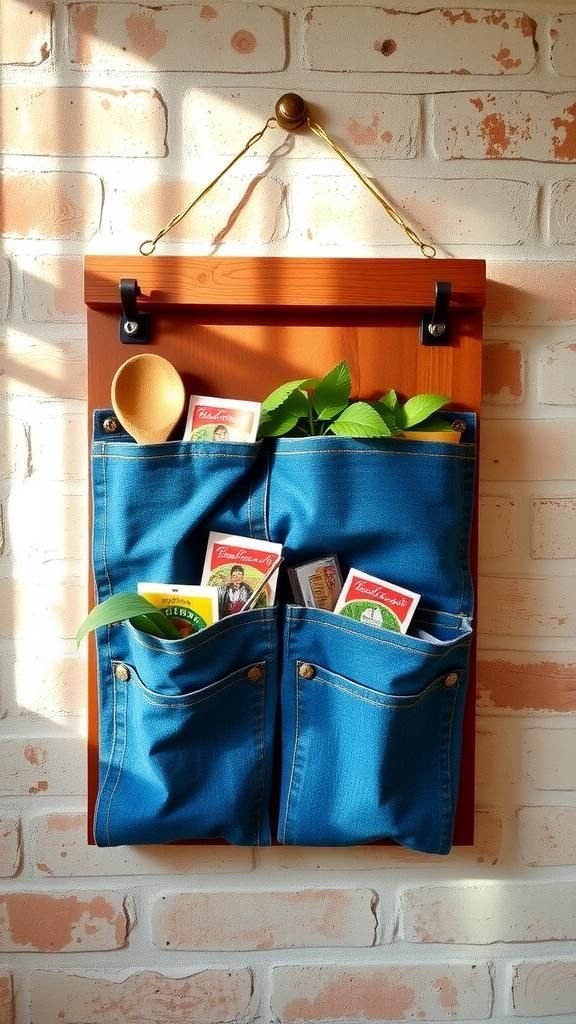
A pair of beloved jeans offers amusing architectural details once cut apart. I have a memory of a stack of mismatched socks and thinking that those pockets wanted a second life on the wall.
The denim feels reassuringly heavy and soft at once, with frayed edges and copper rivets narrating past adventures. Hanging it by the belt loops turns it into an impromptu organizer, the pockets sagging pleasingly as they hold seed packets, garden twine, and small hand tools.
The blue tones age into a serene palette next to fresh spring greens.
Steps
- Select a sturdy pair of jeans and remove the back pockets neatly, leaving a small fabric margin around each pocket if preferred.
- Attach pockets to a wooden board in an appealing arrangement using strong fabric glue or by sewing through both denim and wood with heavy-duty thread and screws with washers.
- Add decorative labels or small rings from which to hang lightweight items, reinforcing pocket tops as needed for durability.
- Install a hanging system on the board’s back and mount the organizer on a wall near an entryway or potting bench.
- Fill pockets with small essentials like seeds, pens, or garden tags for an attractive, handy storage solution.
Book page garland with folded florals
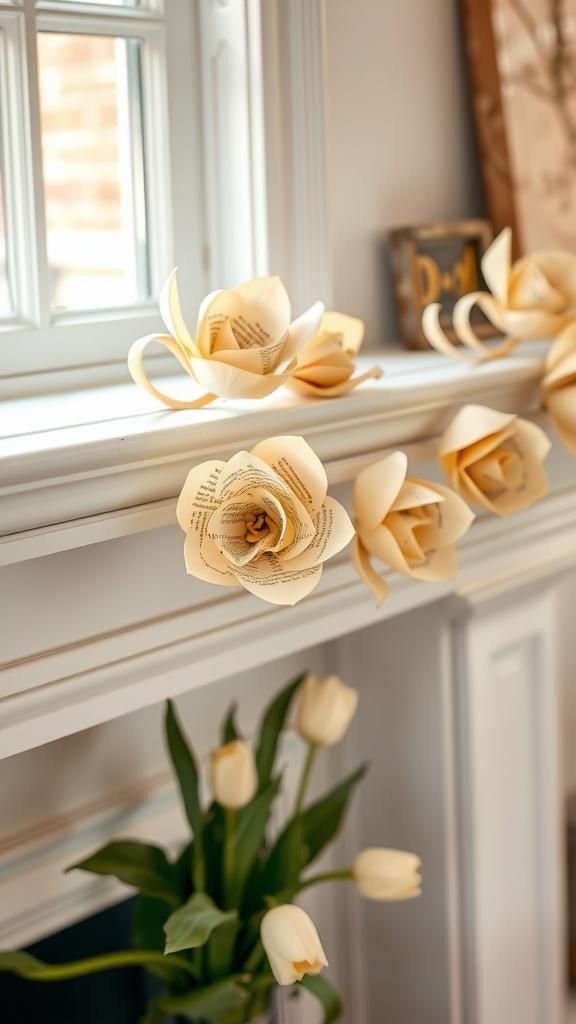
Stacks of old novels and forgotten phonebooks smell faintly of dust and time, and turning their pages into paper flowers felt like giving old stories a light, airy encore. I remember the papery whisper as each petal was shaped, the edges soft and slightly browned.
Hung across a mantel, the garland moves with drafts and spills a soft sepia rhythm against fresh tulips and ceramic vases. The paper catches and filters light in a delicate way, and small bits of printed text peek out like secrets from another era.
Steps
- Select book pages that are clean and free of major stains, and flatten them under a weight if they are heavily curled.
- Cut or tear pages into petal shapes and assemble floral clusters by layering petals and securing their centers with glue or thread.
- Attach the finished flowers to a length of twine or thin ribbon with craft glue, spacing them evenly along the strand.
- Hang the garland across a mantel, doorway, or window, allowing the paper blooms to sway gently with air movement.
- Replace or reposition clusters seasonally to refresh the display and preserve more delicate pages.
Lightbulb terrariums: tiny glass worlds

An old incandescent bulb becomes a curious little globe when emptied and cleaned, and making a tiny plant world inside felt quietly magical. I remember the pinch of nerves as the metal base separated and the filament gave way, then the careful wash that followed.
Inside, pale sand and a speck of moss sit like a miniature landscape, and when the sun hits the glass the interior seems to hold its own weather. The bulb’s reflective curve bends surrounding colors into a jewel-like shimmer that makes a shelf look like an apothecary drawer.
Steps
- Safely remove the metal base and inner filament from an old incandescent bulb using protective gloves and tools, disposing of fragments responsibly.
- Rinse the glass interior gently and allow it to dry completely before adding materials.
- Add a small base layer of sand or fine gravel, then a tiny pinch of potting mix and a preserved moss or air plant suited for enclosed spaces.
- Seal the bulb opening with a decorative stopper or cap and place the terrarium on a small stand or in a shallow tray to display.
- Position the terrarium in bright, indirect light and mist lightly if the plant inside requires occasional humidity.
Spoon wind chime with silver and copper tones

Old metal spoons carry a history of meals and gatherings, and the day I bent a few into soft curves they began to sing. Hung together they make a chiming that is pleasantly thin and tinkling, each tone slightly different depending on shape and weight.
The metal surface shines with worn highlights and little scratches, catching sun in a sharp, cheerful way. Against the backdrop of leaves and early blooms outside, the chime adds a bright auditory thread, a small mood-lifter that moves whenever a breeze crosses the porch.
Steps
- Select metal spoons of different sizes and clean them thoroughly, polishing or leaving patina depending on the desired look.
- Flatten or bend the spoon handles into gentle curves if needed, forming a pleasing variety of lengths and shapes.
- Drill small holes near the ends of handles and use sturdy string, fishing line, or thin chain to connect spoons at staggered heights to a central ring or branch.
- Hang the completed chime outdoors where it can catch a breeze and test the tones, adjusting spacing for desired sound.
- Replace or refinish spoons over time to maintain appearance and sound quality.
Cork trivets with cheerful spring mosaics

Collecting corks under a jar lid felt like gathering little story stubs from dinners and garden parties. Lining them up into a round trivet was oddly satisfying, the natural cork scent warm and mellow under the palms.
The mosaic of pale beige and darker edges has a tactile, almost pebbled feel that resists heat and protects surfaces. When my kitchen fills with the scent of lemon and herbs, the trivet sits under a kettle as a quiet, practical accent.
Its surface bears tiny nicks and wine stains like badges of hospitality.
Steps
- Gather a collection of wine corks and sort by color and size to create a balanced composition.
- Slice corks lengthwise if a flatter surface is desired and arrange them tightly in a round pattern on a heatproof backing board.
- Secure the cork pieces together using a strong, heat-resistant adhesive and clamp gently until set.
- Trim any uneven edges and optionally sand lightly for a uniform finish, then seal the trivet with a clear, heat-safe sealant.
- Allow full curing before placing hot pots or pans on the trivet and refresh by replacing corks as they age.
Drawer planter: a tiny reclaimed window box
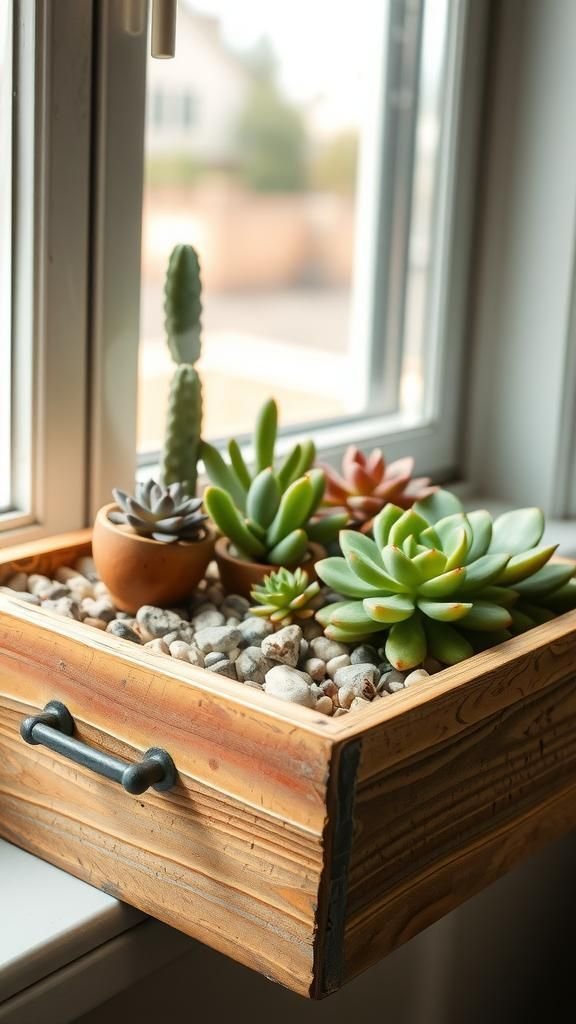
An old dresser drawer, paint peeled and drawer runners still warm from hands, makes a pleasing shallow bed for succulents. I remember pulling one out of a curbside pile, surprised at its faint perfume of polish, and arranging stones and a patchwork of tiny plants inside.
The drawer’s interior held old stickers and faint pencil marks like a secret history. Placing it on a shelf or hanging with hooks turned it into a quirky window box that fit neatly into a narrow sill.
It wore its age like a smile.
Steps
- Clean the drawer thoroughly, removing any loose debris, old liners, or stickers, and sand rough spots lightly.
- Line the drawer with a plastic sheet or pond liner to protect the wood from moisture and add drainage holes if needed.
- Add a layer of small stones or gravel, then fill with potting mix suited to the chosen plants such as succulents or herbs.
- Arrange plants within the drawer, leaving space for growth, and decorate the surface with pebbles or small decorative elements.
- Place the drawer planter on a protected sill or mount securely, keeping in mind light and watering needs for the plants.
CD mosaic mirror catching spring reflections

Old compact discs throw rainbows like a small, shimmering fountain when angled to a mirror frame. I once lined a thrifted mirror with tiny CD shards and watched sunlight scatter into a hundred soft prisms across the ceiling.
Touching the sharp edges felt a little daring, and the colors shifted from blue to gold as the day moved. The mirror became less about exact reflection and more about mood, catching fragments of sky and blossom.
From a distance it reads as iridescent trim, and up close it carries a tactile, jewel-like surface.
Steps
- Select a mirror with a wide enough frame and clean both the mirror surface and old CDs to remove dust and grime.
- Carefully score and snap CDs into small pieces while wearing protective gloves and eyewear, creating a variety of shard sizes.
- Arrange the CD pieces along the mirror frame in a pleasing pattern, securing each shard with a strong adhesive suited for glass and plastic.
- Fill gaps with smaller pieces to create a continuous mosaic and allow the adhesive to cure fully.
- Mount the mirror securely and position it to catch natural light for maximum iridescent effect.
Fabric scrap bunting for a cheerful mantel
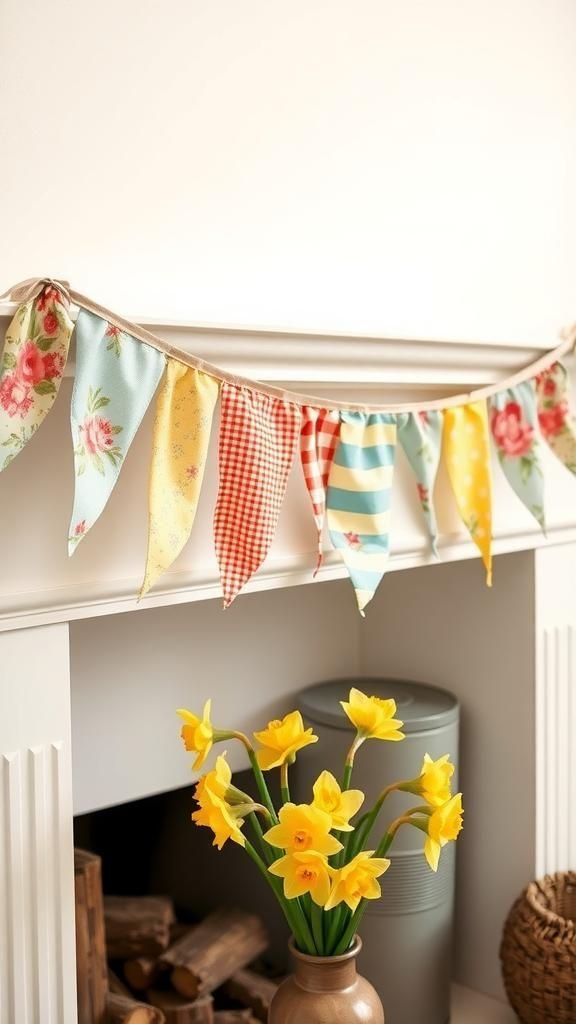
Little triangles of leftover fabric can be like tiny flags of memory, each carrying a hint of floral print or gingham from projects past. I have kept a jar of these scraps and string them together when the mantel feels bare.
The bunting swings a little when doors close, a soft clack of cotton that pairs well with the smell of fresh coffee. The layered patterns create a quilt-like rhythm that reads lively without shouting, and the frayed edges add a relaxed, handcrafted accent that feels especially right for spring’s casual brightness.
Steps
- Gather assorted fabric scraps and cut them into uniform triangular shapes for a cohesive look.
- Fold the top edge of each triangle over a length of twine or ribbon and sew or glue the fold to secure the triangle in place.
- Space the triangles along the twine to achieve a balanced pattern, mixing prints and solids for texture and color variation.
- Hang the bunting across a mantel, window, or doorway using small hooks or removable adhesive, adjusting drape as desired.
- Store gently folded between seasons and replace individual triangles if they become worn over time.
Tin lid magnets with painted garden scenes
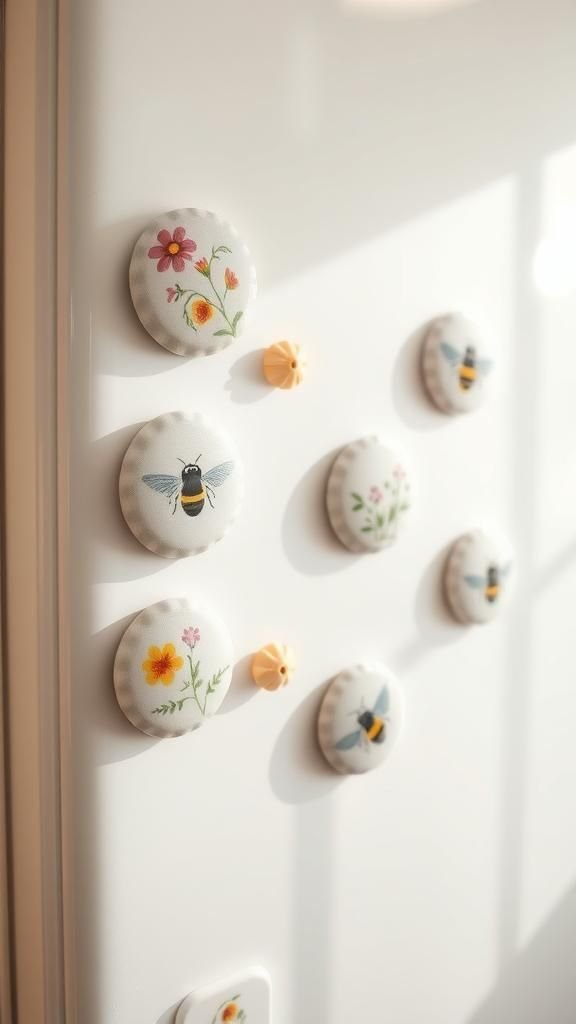
Bottle caps and tin lids feel like miniature canvases when painted with tiny blooms and bees. I remember sitting at a kitchen table with a cup of tea, brushing little strokes that turned metal domes into pocket-sized landscapes.
The metal cooling under my fingertips gave a pleasant contrast to the warmth of the tea cup. Once magnetized, they dot the fridge with small snapshots of spring, each one casually charming and a little sided with nostalgia.
They hold recipes and notes with a friendly wink rather than a stern push.
Steps
- Clean tin lids or bottle caps thoroughly and prime their interior surface with a thin layer of paint suitable for metal.
- Paint small garden scenes, floral motifs, or abstract patterns onto each lid using fine brushes and allow paint to dry completely.
- Seal the painted surface with a clear varnish for durability and waterproofing.
- Attach small strong magnets to the back of each lid using adhesive and let the bond set.
- Arrange the finished magnets on a refrigerator or magnetic board to display notes and photos with a springtime touch.
Bottle cap garland with colorful enamel finish

A string of bottle caps painted in enamel feels delightfully folk-like when draped over a curtain rod or stair banister. I recall the satisfying clink of metal as I threaded them and the way sunlight made painted colors sing.
Each cap has a slight hollow sound and a rounded edge that catches paint in ridged rings, creating subtle concentric texture. The garland moves with a gentle mechanical rustle, and the palette of mint, coral, and buttery yellow brings a cheerful cadence to a room full of spring light and potted plants.
Steps
- Flatten or leave bottle caps as is and paint each with enamel paint in a chosen color palette, allowing full drying between coats.
- Drill or punch a small hole near the top edge of each cap for threading, taking care to smooth sharp edges.
- Thread caps onto strong twine or thin chain, spacing them to create a balanced visual rhythm.
- Secure caps in place with small knots or crimps and hang the garland where it will sway gently in air movement.
- Refresh paint over time as needed and store carefully when not in use to maintain the enamel finish.
Old frame herb garden with chalkboard labels
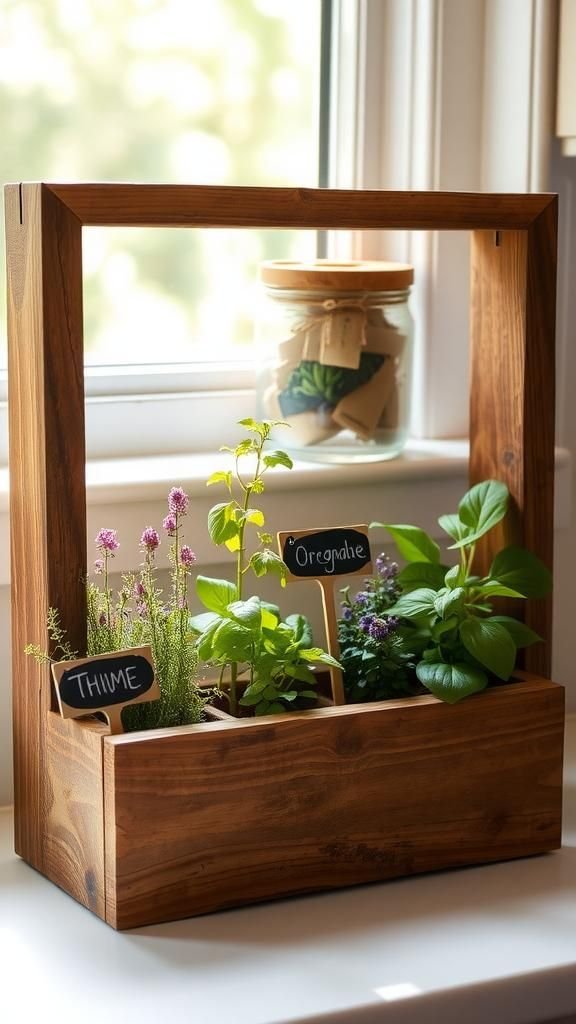
A salvaged picture frame, glass removed and paint flaked into soft curls, becomes a tidy little herb bed when mounted on a sill. I remember arranging thyme and oregano inside, tucking their small stems through a lattice of chicken wire, and being pleased at how the frame contained the green like a living picture.
The chalkboard label at the front carried my messy handwriting and a faint smudge of soil. At mealtime, rubbing the new leaves released citrusy and peppery scents that felt like a fragrant applause for the summer that would come.
Steps
- Choose an old frame and prepare it by removing glass and backing, then attach a shallow box or tray to the back to hold soil.
- Line the box with landscape fabric and add a layer of small stones for drainage followed by potting soil suitable for herbs.
- Plant small herb seedlings or cuttings snugly into the soil and press gently to secure them.
- Attach a narrow chalkboard strip or small label to the front of the frame for plant names and light notes.
- Mount the frame on a sunny wall or place it on a windowsill where herbs will receive bright light.
Pallet coffee table with glass top and blossoms
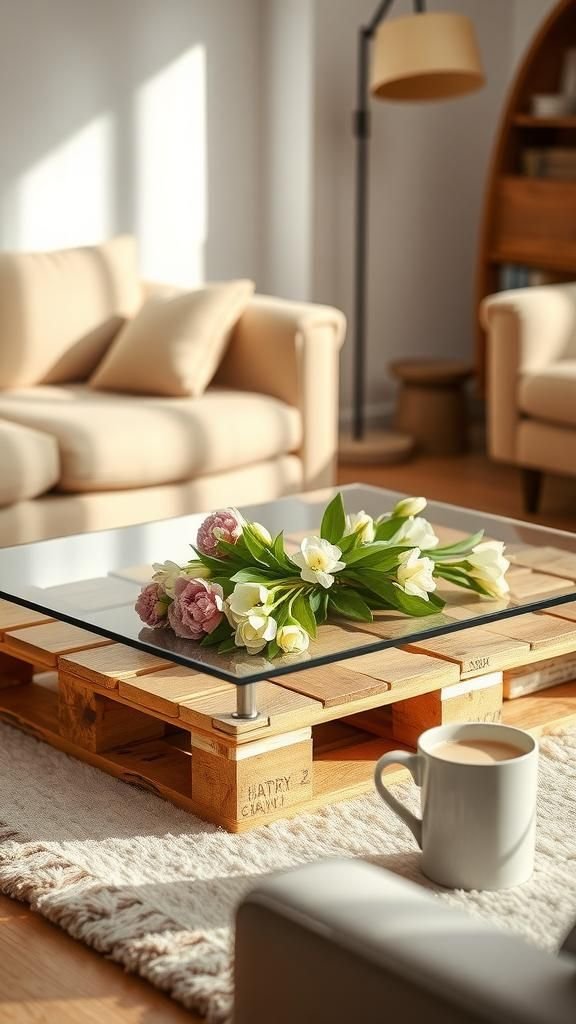
A low coffee table built from a pallet has a grounded, casual energy that invites scattered magazines and a steaming mug. I remember finding a split pallet that fit perfectly into a cozy corner and thinking the gaps could cradle tiny vases.
Laying a glass top over the slats turned the rough texture into a smooth canvas for display, and spring blooms arranged beneath the glass made each cup of tea feel ceremonious. The scent of cut flowers mingled with the dry wood, creating an honest, lived-in centerpiece that welcomed lazy afternoons.
Steps
- Select a sturdy pallet, clean it thoroughly, and sand rough areas while preserving the pallet’s character.
- Reinforce the pallet underside with additional support beams or legs to achieve desired height and stability.
- Measure and have a piece of tempered glass cut to fit the pallet top precisely for a smooth surface.
- Place the glass atop the pallet securely, adding small rubber bumpers to prevent slipping, and arrange decorative items underneath if desired.
- Position the table in the living area and enjoy with coasters to protect the glass.
Sweater pillow covers bringing softness indoors

Old sweaters make pillows feel like hugs. I have a soft gray cable knit cover that sits on my reading chair and seems to slow things down when I lean back.
The ribbing and stitch patterns add sculptural detail that a plain fabric rarely has, and the leftover perfume of dry detergent fades into a gentle cotton warmth. The pillow absorbs afternoon sun and keeps a faint outline of a favorite sweater sleeve as if holding a memory.
Paired with a bright floral throw, it softens the room into a calm nook.
Steps
- Measure the pillow insert and cut the sweater accordingly, leaving enough fabric for seams and overlap.
- Sew three sides of the sweater fabric together with a durable stitch, slipping the pillow insert inside before closing the final side.
- Reinforce corners and any worn areas with extra stitching or a small fabric patch to extend life.
- Optionally add decorative buttons or a zipper to the back for easy removal when washing.
- Place the finished pillow on a chair or sofa to add a cozy, tactile accent to the room.
Newspaper woven baskets with rustic charm

Stacks of old newspapers can feel heavy with yesterday’s world, yet rolling them into tubes and weaving them becomes a surprisingly meditative craft. The faint ink smell blends with sunlight as the basket form grows under fingertips, the paper taking on a woven texture like straw.
I kept a basket beside the couch for stray envelopes and pens, its rim slightly uneven in an appealing, hand-formed way. The neutral grayscale of print complements bright spring cushions, and the finished piece is unexpectedly light despite its dense appearance.
Steps
- Roll newspaper pages tightly into tubes and secure the ends with a dab of glue or tape to form weaving strands.
- Arrange several tubes into a spoke formation to create the basket base and weave additional tubes around the spokes to build up the sides.
- Tighten and adjust the weave periodically to maintain even tension and form a neat shape.
- Finish the rim by folding and tucking ends or wrapping with a contrasting strip for stability and visual interest.
- Seal the basket with a clear coat or diluted glue to increase durability and place in use as lightweight storage.
Painted milk jug planters with pastel hues
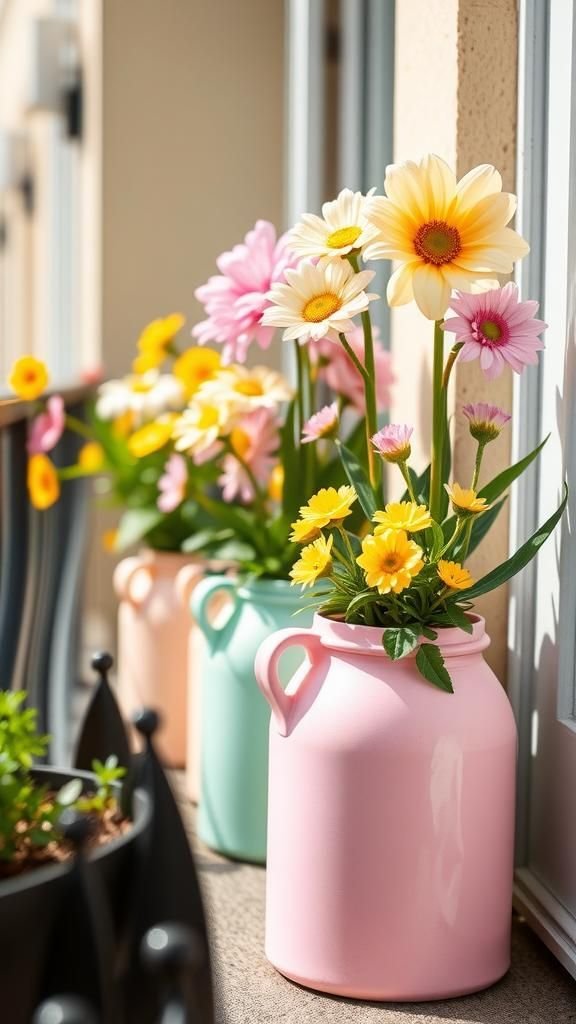
Plastic milk jugs are humble and oddly generous when they accept a coat of pastel paint. I once lined a row of them along a balcony railing, their soft colors reading like a simple, improvised garden.
The plastic takes paint in thin, slightly streaked bands that feel charmingly improvised. When filled with bright primroses or baby lettuce, the contrast between the smooth painted surface and the lively plants is uplifting.
Rain taps on the jugs with a clean, tinny sound, and the overall effect reads as cheerful thrift with a sunny afternoon mood.
Steps
- Clean used plastic milk jugs thoroughly and remove labels, allowing them to dry completely.
- Apply a base coat of spray paint or acrylic paint formulated for plastic in soft pastel shades, adding additional coats for coverage as needed.
- Once paint is dry, punch drainage holes in the bottom and add a layer of small stones for drainage.
- Fill with potting soil and plant shallow-rooted spring flowers or herbs suited to container growth.
- Arrange jugs along a balcony or fence, grouping colors for a pleasing gradient effect and watering according to plant needs.