Disclosure: This post contains affiliate links, which means we may earn a commission if you purchase through our links at no extra cost to you.
When spring rolls around I always itch to tidy the garden and name the little plots. I started with mismatched bits gathered from the shed and now keep a small box of projects that cheer the beds.
DIY Spring Garden Marker Crafts became my weekend ritual, a way to sip coffee and tinker while bulbs push up.
These marker ideas are playful and easy to personalize, and I love how painted stones catch sunlight while clay tags feel cool and matte in my hand. After many quiet afternoons of testing textures and colors, I wanted to share these favorites.
Hand-painted river stones with botanical sketches
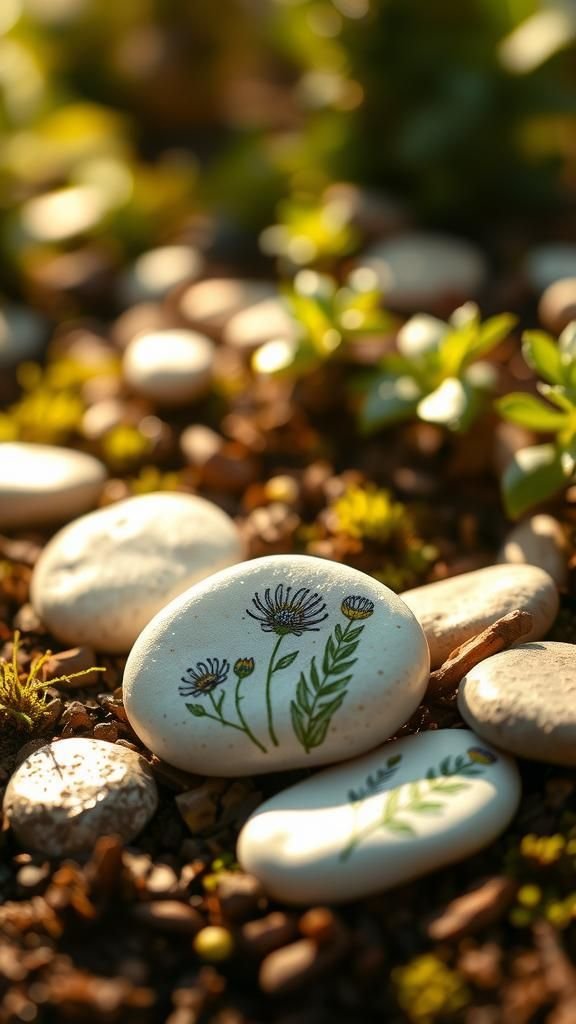
I have a soft spot for river stones that carry a glossy wash of color and delicate leaf sketches. Holding one, the smooth, cool surface warms under my palm while tiny brushstrokes seem to float over the grain.
Morning light makes the colors glow and a faint earthy scent rises from damp soil nearby. There is a thrift store vibe to this, a joyful imperfectness where a chipped edge or a tiny fleck of mica becomes part of the charm and story in the garden.
Steps
- Gather smooth river stones and lay them on a protective surface outdoors.
- Apply a base color with weatherproof craft paints and allow full drying.
- Add botanical sketches with a fine permanent marker or small brush.
- Coat with a clear weather-resistant sealant for outdoor durability.
- Place stones among herbs or along a border so names are visible.
Are vintage spoons still charming garden markers?

I rescued a bundle of vintage spoons at a flea market and they felt instantly right among herbs. The cold metallic curve has a satisfying weight and a tiny dent or patina tells a little history.
When planted near basil or thyme, the reflective bowls catch slivers of sun and offer a subtle glint amid green leaves. Hand-lettered names on the handles look casually elegant, and the forked silhouette peeking from soil sparks conversation with visiting neighbors who ask where they came from.
Steps
- Clean vintage spoons thoroughly and dry them.
- Mark plant names on the spoon handles with a weatherproof marker or metal stamping kit.
- Add a protective clear coat to preserve lettering.
- Insert handles into the soil so bowls sit above ground and names remain readable.
Terracotta shard tags with naturally weathered edges

Broken terracotta pieces have a satisfying roughness, a matte, earthen surface that feels cool in the hand. I like how edges fray slightly after a season outdoors, collecting dust and lichen that deepen the color.
The warm clay tones sit beautifully against dark soil and the residual chalk from a garden marker pen creates a soft contrast. Each shard feels like a tiny fragment of old pottery, and when tucked into the soil beside sprouting rows it adds an artisanal, rustic note to the plot.
Steps
- Gather terracotta shards and smooth any sharp bits with a fine file or emery cloth.
- Write plant names using a permanent garden marker or pencil designed for outdoor surfaces.
- Dust lightly with garden soil to integrate aged look if desired.
- Nestle shards into soil with names facing up for easy reading.
Wine cork stakes threaded with garden wire loops

Cork markers bring a quiet, recycled charm to container gardens. The soft, slightly spongy texture of cork contrasts nicely with glossy green leaves, and the scent of natural cork hints at old summer evenings.
Thin wire loops add a little industrial twang and create a vertical silhouette that stands out among low plants. I enjoy the tiny handmade feel when names are hand-lettered on cork ends and when moisture darkens them slightly after an afternoon rain, they gain a lived-in character that feels comfortable in clay pots.
Steps
- Gather clean wine corks and small lengths of garden wire.
- Thread wire through each cork, forming a secure loop to act as a stake.
- Write plant names on the cork ends with a permanent marker.
- Push the wire stakes into potting mix so names face outward and remain visible.
Repurposed fork markers with stamped letter details

Old forks carry a hum of kitchen life and their tines offer a playful silhouette when planted in soil. The cool metal feels reassuringly solid and the sound of a little clink when moved by wind is oddly satisfying.
Stamped letters on a handle read like tiny headlines above the soil, and light catches the polished faces in dappled shade. I often picture dinners where these utensils served, and that small story adds warmth to the bed.
There is a tidy vintage elegance when rows of forks stand like sentries among seedlings.
Steps
- Select forks and flatten handles slightly if needed for lettering.
- Use metal stamps and a mallet to impress plant names into the handles.
- Polish any rough edges and optionally seal with a clear metal lacquer.
- Press the tines into soil until markers stand upright and readable.
Clothespin flags that flutter above seedlings
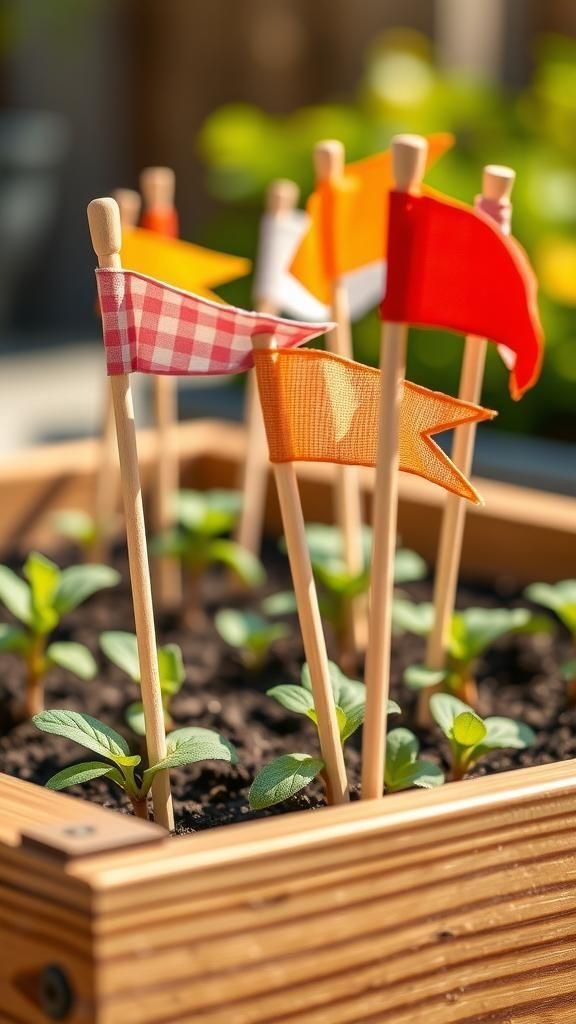
Wooden clothespins carry a playful, almost nostalgic energy when clipped to slender stakes or set beside seedlings. Their grain feels warm and familiar, and the tiny clamp action offers a satisfying tactile click.
Tiny flags of patterned fabric or bright paper create a miniature celebration above tiny shoots, and the soft flutter of cloth in a breeze brings a hand-crafted joy to the plot. I like the way small imperfections in fabric stitching or ink handwriting make each marker feel personal, like a postcard to the plants.
Steps
- Prepare wooden clothespins and tidy any rough splinters with fine sandpaper.
- Attach small flags of fabric or cardstock to the flat end of each clothespin.
- Write plant names on the flag surface with a permanent pen.
- Clip pins to thin wooden skewers or stick them into soil so flags flutter above seedlings.
Polymer clay leaf tags in soft spring hues

Polymer clay tags shaped like leaves carry a quiet sculptural quality and a pleasantly firm, almost silky surface. I remember squishing a tiny coil between fingers and watching it take a leaf impression, the cool clay holding every vein.
Pastel tones and subtle marbling make each tag feel like a tiny ornament, while the slight weight of baked clay gives them presence when they perch on stakes. The contrast of smooth clay against coarse soil and crinkled leaves creates a pleasing tactile duet that I enjoy seeing after a watering.
Steps
- Condition polymer clay by kneading until pliable and form leaf-shaped tags.
- Press a natural leaf into the clay surface to create vein impressions.
- Bake the tags according to package instructions and allow full cooling.
- Write plant names with archival ink and attach to small stakes or hang near plants.
Domino labels: tiny tiles with bold graphics
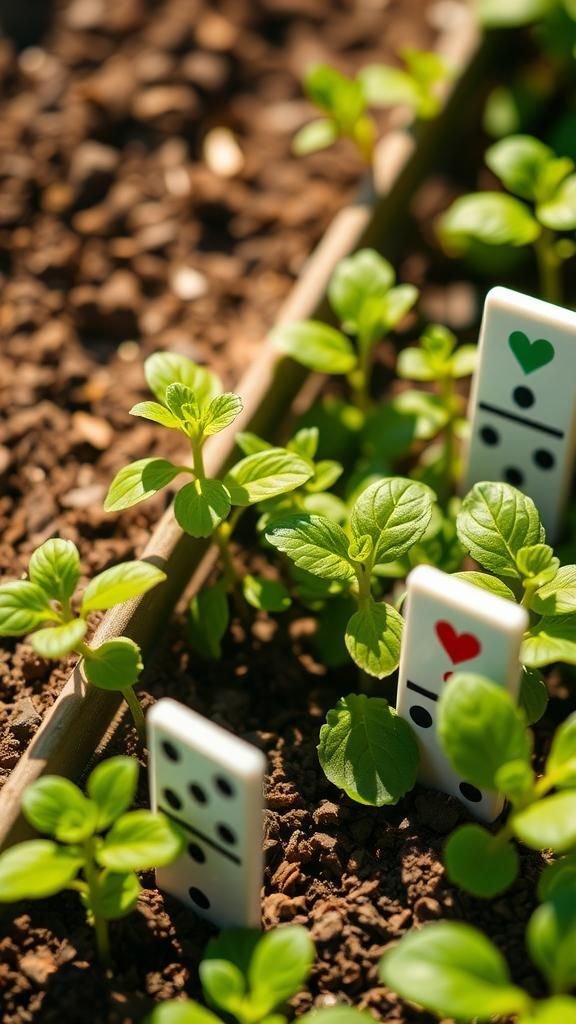
Old domino tiles feel satisfyingly hefty in a pocket and their glossy black-and-white surface catches light like a tiny canvas. When names are inscribed or tiny icons painted on the blank backs, they take on a playful, game-like character amid soil and sprouts.
The smooth ceramic coolness contrasts with warm terracotta, and I enjoy lining them along a row where the stark graphics add a contemporary pop. There is a thrift-store joy to the project, a sense of making something witty and light-hearted out of a found object.
Steps
- Sort domino tiles and clean surfaces with rubbing alcohol.
- Write plant names or tiny icons on blank sides with permanent markers or paint pens.
- Seal markings with an outdoor clear coat for weather resistance.
- Place tiles upright in soil or glue onto small stakes for visibility.
Copper discs stamped with plant initials
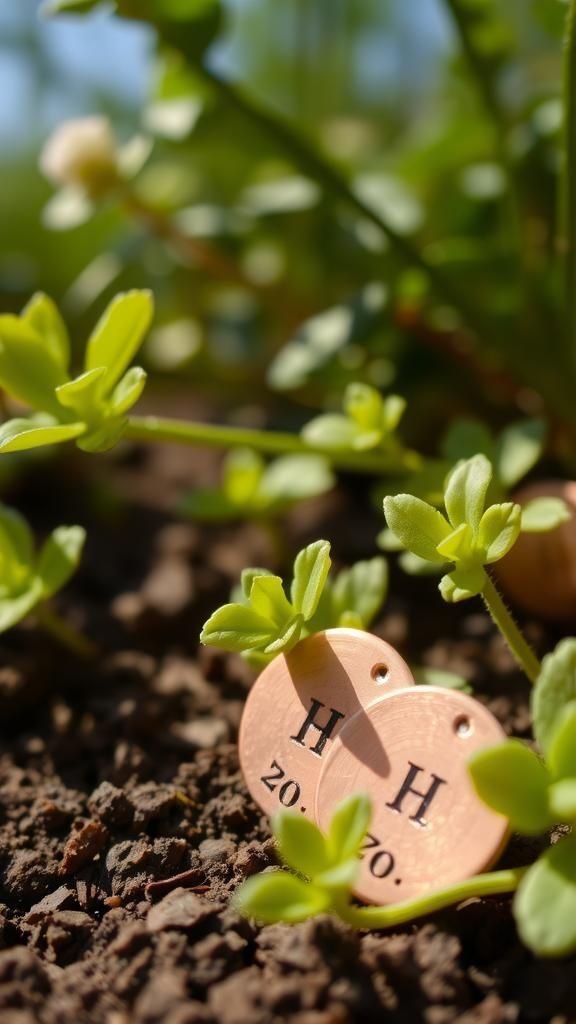
Thin copper discs warm quickly in the sun and their metallic surface develops a glowing patina over time. The soft ring of a stamped initial has a satisfying impression that feels both industrial and intimate.
When scattered among thyme and rosemary the little warm circles catch afternoon light and add a subtle jewelry-like shimmer to the bed. I like the contrast between cool blue-green oxidation spots and freshly polished edges.
Each disc seems to age gracefully, gaining quiet character season after season, like a small heirloom laid against the soil.
Steps
- Cut or source thin copper discs and smooth edges with a file.
- Place a disc on an anvil or hard surface and stamp letters with metal stamps.
- Lightly sand any rough spots and optionally apply a protective clear lacquer.
- Mount discs on short stakes or wire and insert into soil near plants.
Weathered driftwood slivers with burned lettering
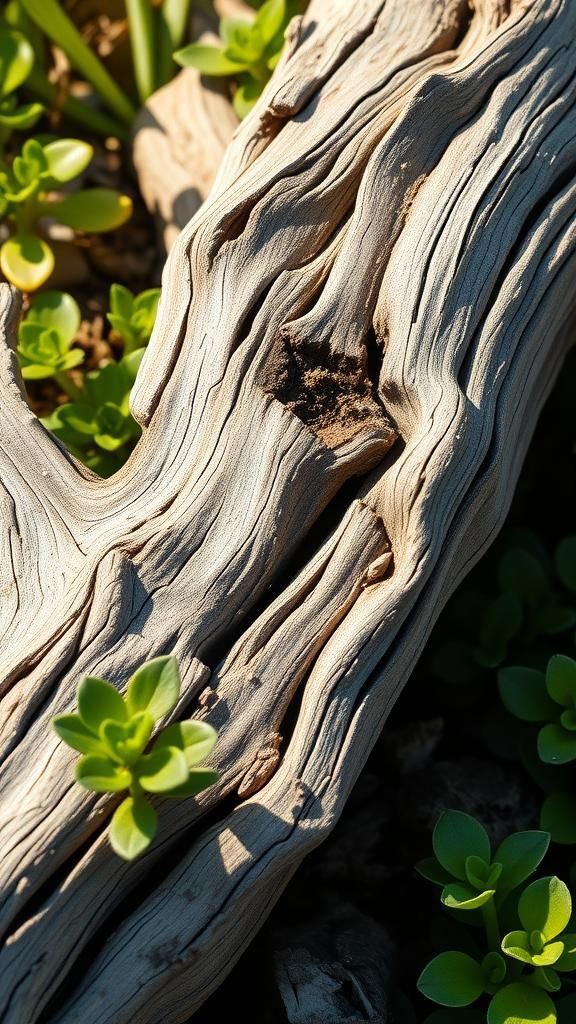
Pieces of driftwood carry the long, softened history of tides and sand, their surfaces worn into rippled grooves and gentle hollows. The scent of sun-warmed wood rises faintly on a hot day and the grain invites the eye to follow its lines.
Pyrography lettering sits in dark brown on pale wood, the contrast both precise and organic. When nestled among border plants these slivers feel like finds from a beachside walk, bringing salt-air memories to a backyard bed and offering a pleasingly natural, timeworn marker.
Steps
- Select small pieces of driftwood and clean off loose sand or debris.
- Plan lettering and lightly trace names with a pencil if desired.
- Burn names into wood carefully with a pyrography tool following safety guidance.
- Apply a thin coat of outdoor wood oil for protection if wanted and plant ends into soil.
Pressed flower resin tags that catch light

Tiny petals and leaves suspended in clear resin look like time held still, a glossy little window to a single bloom. The surface is smooth and glass-like, cool to the touch, and light passes through with a jewel-like clarity.
I recall collecting small petals after an especially windy afternoon, pressing them under heavy books, and later seeing them float in resin with unexpected delicacy. When placed above soil the tags refract light and throw soft color onto nearby leaves, offering a whimsical, almost magical accent among green textures.
Steps
- Press small flowers and leaves flat for several days between absorbent paper.
- Mix clear casting resin according to package instructions and pour into small molds.
- Set pressed botanicals into the resin and allow to cure fully.
- Demold finished tags, add a hole for hanging, and mount on small stakes near plants.
Chalkboard painted stakes for changing notes
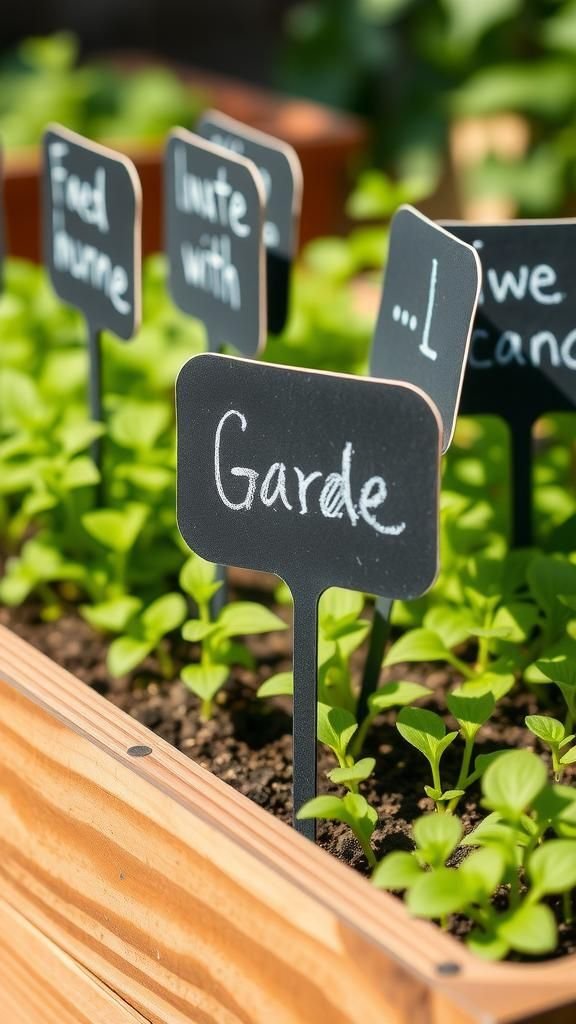
Matte black chalkboard paint turns a plain wooden stake into a tiny slate that invites interaction. The smooth texture of chalk against dark paint leaves a soft powdery trail that can be fussed with on rainy afternoons.
I enjoy the small ritual of scrawling a new note after observing seedlings, the impermanence making labels feel alive and responsive. Smudged edges and half-erased names tell gardening stories across weeks, and when the sun hits the matte surface it reveals the faint ghost of earlier marks, layering time in a pleasing way.
Steps
- Prepare wooden stakes and apply chalkboard paint in thin even coats, allowing to dry between layers.
- Season the painted surface by rubbing chalk all over and wiping clean for best contrast.
- Write plant names with chalk or chalk markers and refresh as needed through the season.
- Place stakes in soil so writing faces the gardener for easy reading and editing.
Bottle cap markers with tiny hand-drawn icons
![]()
Old bottle caps have a crisp metallic rim and a concave center that catches raindrops like tiny bowls. I like their compactness and the way a single hand-drawn icon fits comfortably into the shallow well, like a miniature sign.
The metal squeaks faintly when knocked against a pot rim, and painted centers with enamel tones stand out against muted soil. Lining a row with caps painted in complementary shades creates a playful border that feels both thrifty and energetic, a small wink among the leaves.
Steps
- Flatten bottle caps slightly and clean thoroughly to remove residue.
- Paint the concave center with outdoor-safe enamel and let dry.
- Draw small icons or initials with a fine permanent marker and seal with a clear coating.
- Attach caps to short stakes or press them into soil around small plants.
Mosaic ceramic tile markers with glossy grout
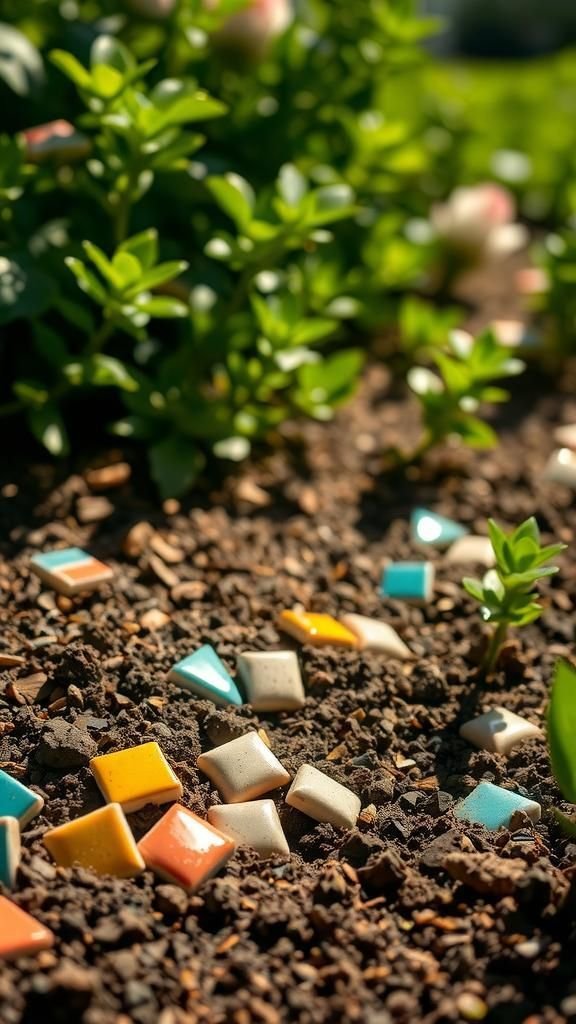
Fragments of ceramic tile come together into a tiny collage that sparkles when light hits the glossy glaze. Running a thumb over the grout reveals a pleasantly grainy contrast to the smooth tiles, and the mosaic surface seems to hold little reflections that dance in afternoon sun.
I imagine the meditative smallness of selecting pieces and arranging them, a quiet craft session on the porch. When lodged at the head of a raised bed those tiles bring a burst of color and pattern that reads like a little landscape within the garden.
Steps
- Select ceramic tile fragments and arrange them on a small blank tile or wood blank.
- Adhere pieces with an outdoor-rated adhesive and allow to set.
- Grout between tiles, wipe excess, and let grout cure.
- Seal the mosaic and mount on a stake before placing in soil.
Planting pencils that double as tiny markers

Slim pencils tucked near seed rows feel almost like tiny sentinels, their graphite tips offering a soft leady scent when freshly sharpened. The wood warms in the sun and faint shavings sometimes catch at the base after tilling.
Writing a name along the barrel keeps information close at hand and when the pencil tilts slightly it suggests a playful, improvised label. I recall keeping a handful in a tin next to the tool tray; they get smudged and stained over a season, carrying traces of soil and hands-on afternoons.
Steps
- Select sturdy wooden pencils and sharpen gently so tips remain usable.
- Write plant names along the pencil body with a permanent ink pen.
- Optionally coat the pencil with a clear varnish for weather resistance.
- Insert pencils into soil near seed rows with labeled ends visible.
Beaded twig markers with dangling charm names
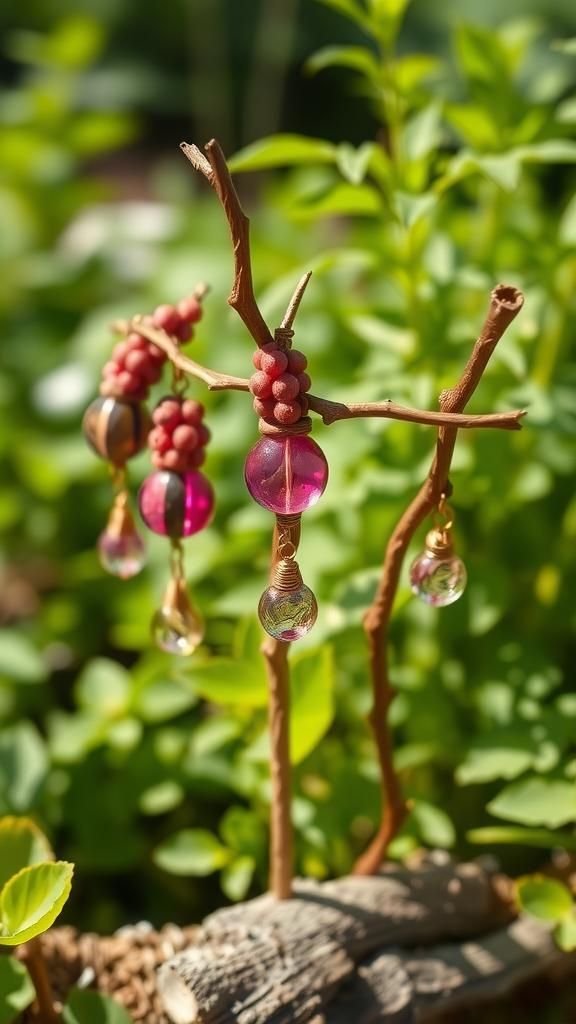
A slender twig threaded with tiny glass beads and finished with a dangling charm carries a joyful, almost festival-like quality. The beads catch sunlight and make a soft clinking sound when brushed by wind, while the twig itself is feather-light and warm to the touch.
Lettered charms sway and add a small kinetic element that feels lively among static leaves. I often picture these bobbing at the edges of a herb patch, their colors echoing container glazes nearby, lending a handcrafted, bohemian accent to the plot.
Steps
- Find straight twigs and trim to a uniform length appropriate for plant height.
- Thread small glass beads onto thin wire and secure around the twig, leaving room for a dangling charm.
- Attach a small metal or clay charm with the plant name and fasten wire ends.
- Press the twig marker into soil so the charm dangles visibly above foliage.
Seashell labels for coastal herb pots
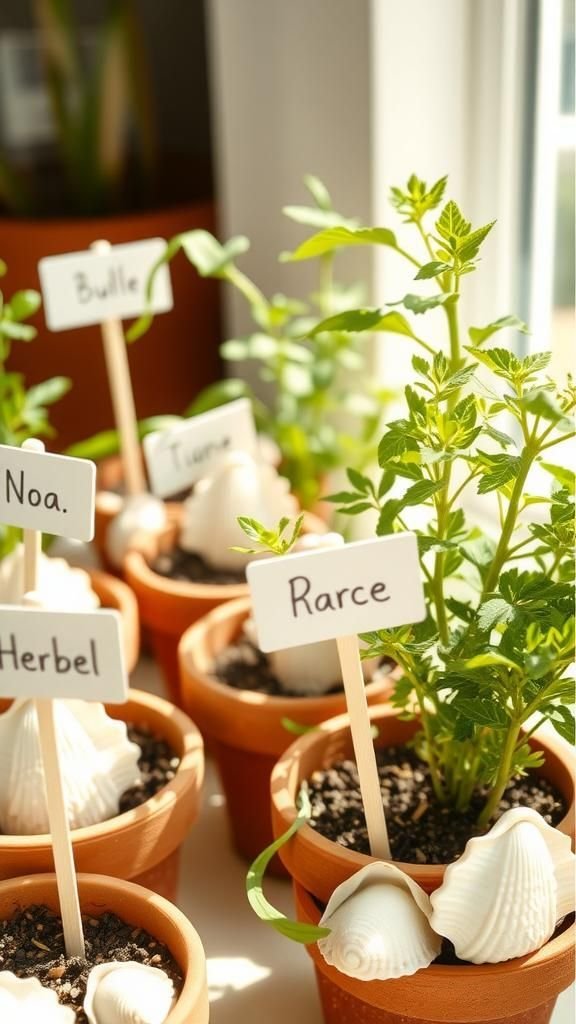
Seashells hold a whisper of ocean breezes, their inner curves sometimes still carrying a faint salt tang. The hard, smooth interior makes a neat surface for tiny script, and shells nestled on pot rims or in soil add a breezy coastal note to container plantings.
I like the way pale shells contrast with dark potting mix and how their pearly sheen changes under shifting light. Gathering shells on a beach walk adds an element of memory, and each labeled shell becomes a small postcard from that shoreline afternoon.
Steps
- Collect clean shells and ensure they are free of sand and debris.
- Write plant names on the inner surface with a permanent marker or fine paint pen.
- Optionally seal the writing with a clear coat to enhance longevity.
- Place labeled shells on pot rims or tuck them into soil near plants.
Mini chalk slates on slender stakes
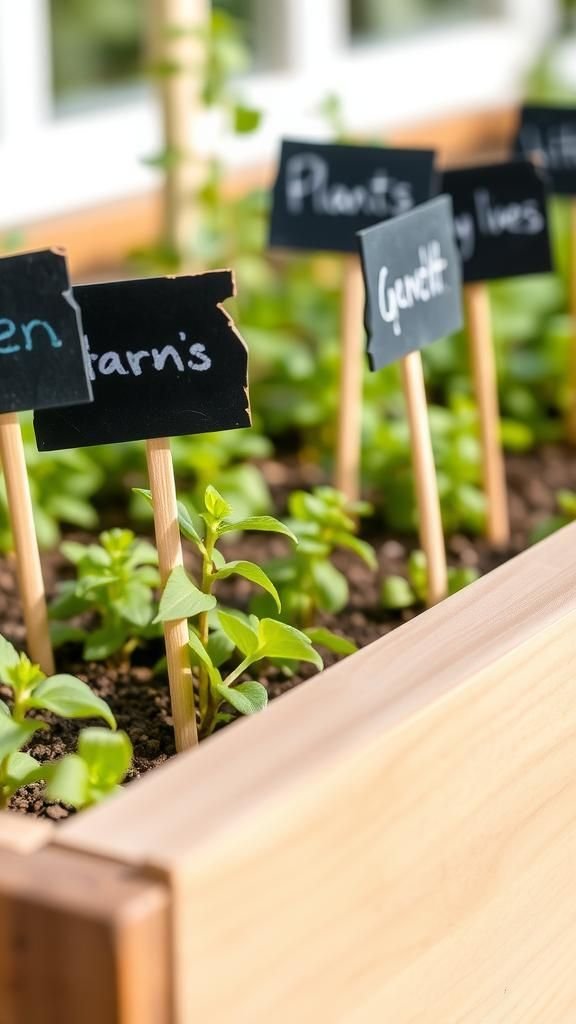
Tiny slate pieces hung on slender stakes have a cool heft and a dense dark surface that absorbs light in a pleasing way. The chalk marks leave a soft dusty trace that can be gently changed after a rain watch.
I like how the slate carries a slightly dramatic look among soft leaves, offering a modern contrast to rustic pots. When grouped together, the little dark rectangles create a mini gallery effect, and hands passing by often pause to read the small handwritten notes and smile.
Steps
- Cut small pieces of slate or source thin slate tiles and sand rough edges.
- Drill a small hole near the top for hanging and thread twine to form a loop.
- Mount the slate on a slender stake or hang so it hovers above soil.
- Write plant names using chalk and refresh as needed throughout the season.
Laser-cut acrylic signs with crisp lettering
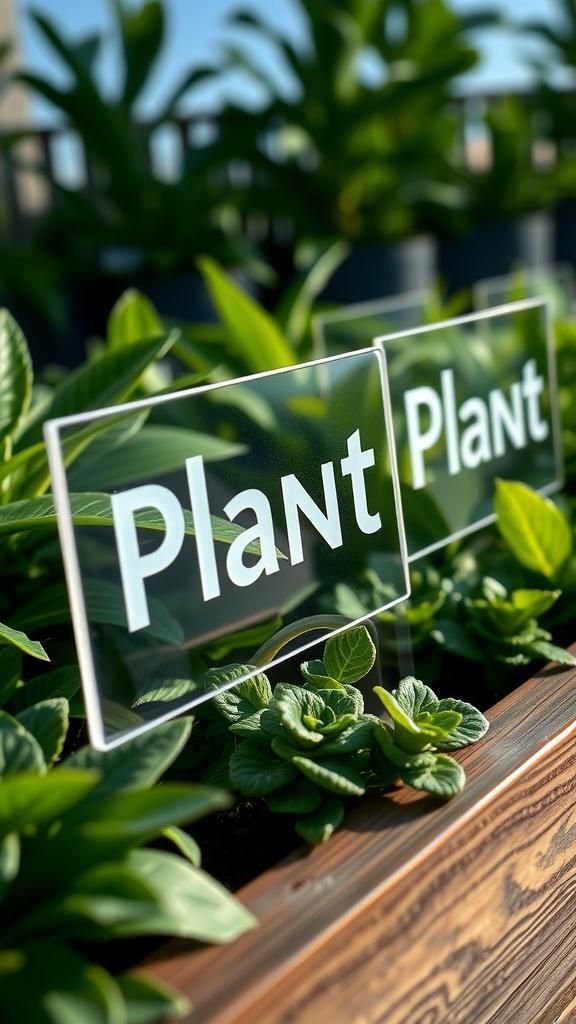
Smooth acrylic signs feel like a tiny modern sculpture, their edges precise and cool to the touch. Light skims across the polished surface and crisp lettering casts faint shadows on the material, giving a neat graphic look to plant rows.
I remember the satisfying clarity of a name cut cleanly from a sheet, the silhouette reminding me of a small gallery label set into earth. When placed amid layered foliage the signs add a contemporary punctuation, the glossy finish contrasting with matte leaves and rough bark around them.
Steps
- Design plant labels digitally and send files to a laser cutting service or use a home cutter.
- Choose outdoor-rated acrylic in durable thickness and cut letters or shapes as desired.
- Sand any sharp edges and optionally add UV-resistant coating.
- Mount signs on stakes or small posts and place in garden where visibility is best.
Fabric-wrapped sticks with playful tassels for pots
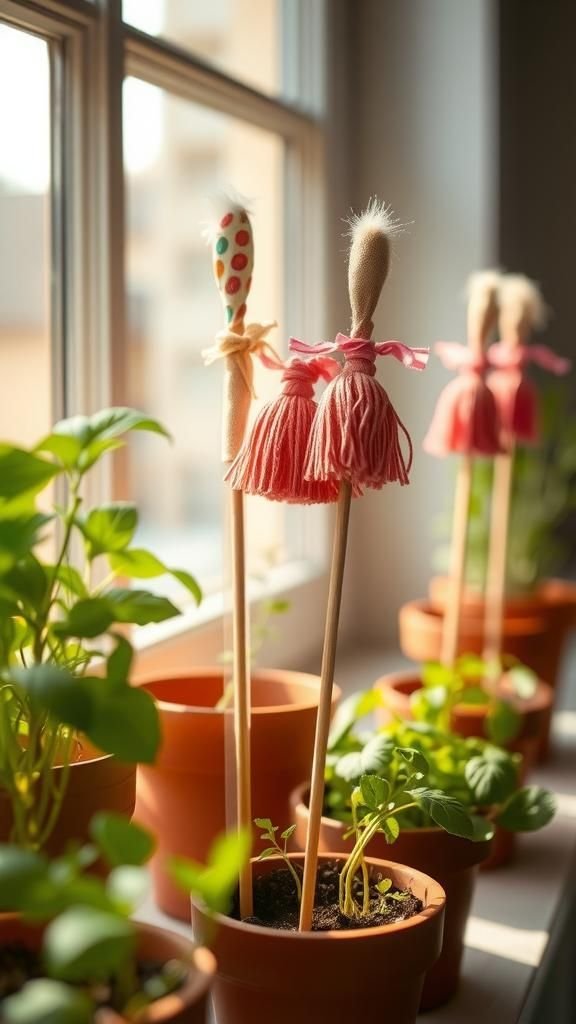
Thin sticks wrapped in colorful fabric feel soft and tactile, the fibers slightly fuzzy under fingertip. Tassels add a cheerful movement when wind passes, and the cloth brings a cozy, textile-rich contrast to clay pots.
I like the way bright patterns peek out at odd angles and how the wrapped surface absorbs a faint scent of rain after watering. These markers read like tiny flags at the edge of a container garden, lending warmth and a homespun personality to the nursery of seedlings on a sunny windowsill.
Steps
- Select straight sticks and tidy ends with a light sanding if needed.
- Wrap strips of colorful fabric around each stick tightly and secure with a dab of adhesive or stitch.
- Add small tassels at the top by tying fabric or thread bundles.
- Write plant names on a small tag and tie to the stick, then place in pots.
Bark slices engraved with rustic pyrography names
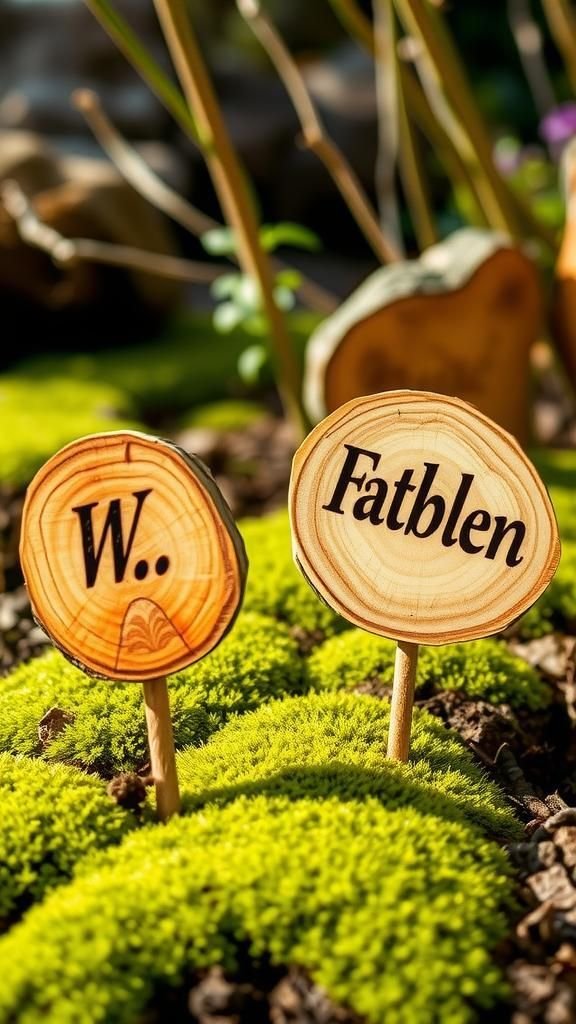
Thin slices of bark feel like tiny maps of a tree’s life, showing subtle ridges and a faint woody aroma. Pyrography lettering sits in warm brown tones that echo natural growth rings and the slightly rough bark edge lends a rustic frame to each name.
Placed along a path or tucked into a planter, the markers read like small woodland relics. I enjoy how rain and sun gently mellow the contrast over a season, the pieces blending further into the bed as if they had grown there.
Steps
- Collect bark sections from fallen branches and press flat under weight for a day.
- Sketch names lightly with pencil and burn lettering into the bark with a pyrography tool.
- Brush off debris and optionally apply a light coat of natural oil for preservation.
- Place slices on stakes or lay them on soil edges near plants.