Disclosure: This post contains affiliate links, which means we may earn a commission if you purchase through our links at no extra cost to you.
I have a soft spot for that first light of spring and the way the mantel becomes a small stage for seasonal moods. Over the years I stitched together quick ideas and slow afternoons of making, and those DIY spring mantel decor crafts kept turning up in photos and memory.
I still like arranging a mix of found branches, pastel accents, and little handmade touches that feel cozy without fuss.
These DIY spring mantel decor crafts are the kind of projects I reach for when I want the room to feel brighter and a little softer. Each idea here grew from an afternoon experiment, a thrifted find, or a walk home with something tucked under my arm, and they all bring a gentle touch of seasonality to the shelf.
Fresh foraged garland for a light spring mantel

I remember dragging in a handful of foraged branches after a windy walk, the leaves still damp and slightly fragrant. Draped along the mantel, the garland offered a sweep of green, broken by tiny white buds and a few pale blossoms.
The texture felt alive beneath my fingertips, a mix of glossy leaves and soft tips. In the late afternoon sun the shadows of the branches made a calm, lacy pattern on the wall.
It felt like bringing a quiet piece of the outside in, simple and lively at once.
Steps
- Gather flexible branches and soft greenery from a park or garden, trimming any woody snags for smoother draping.
- Lay the stems along the mantel, overlapping ends for a continuous flow and tucking smaller sprigs into gaps for texture.
- Add occasional focal blooms or tiny clusters of buds, pressing stems so they rest naturally among the leaves.
- Secure loose sections with floral wire hidden under the leaves and adjust spacing until the silhouette feels balanced.
A cluster of pastel mason jar vases lined up

I like the small clink when jars are nudged together, each one holding a different bloom or single stem. The pastel glass catches light in a way that feels playful but restrained, and the rim of each jar sometimes shows a stray petal or a little water bead.
The grouping brings rhythm to the mantel because every jar has its own height and personality, yet they read as a team. Sitting close to a window, the jars make a quiet parade of color, and I often find myself lingering to rearrange a single stem until it feels right.
Steps
- Collect mason jars in varying heights and wash them until they sparkle, leaving some with faint labels for texture.
- Tint jars softly using diluted glass paint or place pastel tissue inside for a gentle wash of color.
- Fill each jar with water and add single stems or small bundles of seasonal blooms with varied heights.
- Arrange jars along the mantel in an informal row, stepping back to tweak spacing and balance.
Paper flower bouquet with soft paper textures

There is a quiet pleasure in paper petals that hold their own shape and color even when the air is still. A bouquet of hand-shaped paper flowers sat on my mantel for weeks, catching curious glances.
The edges had a delicate papery rustle when I passed, and the layered petals created shadows that felt almost like real depth. Colors ranged from buttery cream to pale coral, and the stems had a slightly matte finish that contrasted nicely with glossy ceramic vases.
It felt like a permanent spring moment that never wilted or demanded care.
Steps
- Choose lightweight paper in spring hues and trace petal shapes of different sizes onto the sheets.
- Shape each petal by gently curling edges around a round tool, layering petals to form full blossoms on stems.
- Attach petals to floral wire stems using adhesive at the base and wrap stems for a finished look.
- Group the paper blooms in a vase with a mix of heights and tuck in a few paper leaves for contrast.
Charming bunny silhouette accents in muted tones

A pair of bunny silhouettes resting against an old book introduced a playful note without shouting. Their smooth cut shapes carried a childlike nostalgia, softened by muted chalky paint and a tiny dusting of pollen from nearby blooms.
When the light hits at an angle, the thin edges cast a friendly shadow, and the surface has that satisfying matte texture that invites a fingertip. They felt like small companions for the season, easy to move around, charming from every angle, and gentle enough to blend with more refined pieces on the shelf.
Steps
- Select thin wood or heavy cardstock and draw simple bunny silhouettes in complementary sizes.
- Cut the shapes carefully and sand edges of wood pieces for a smooth finish if needed.
- Apply two coats of chalky or milk paint in muted tones, allowing drying time between layers.
- Position the silhouettes on the mantel, leaning them against books or pottery for a relaxed look.
Mini bird nests with speckled eggs as focal points
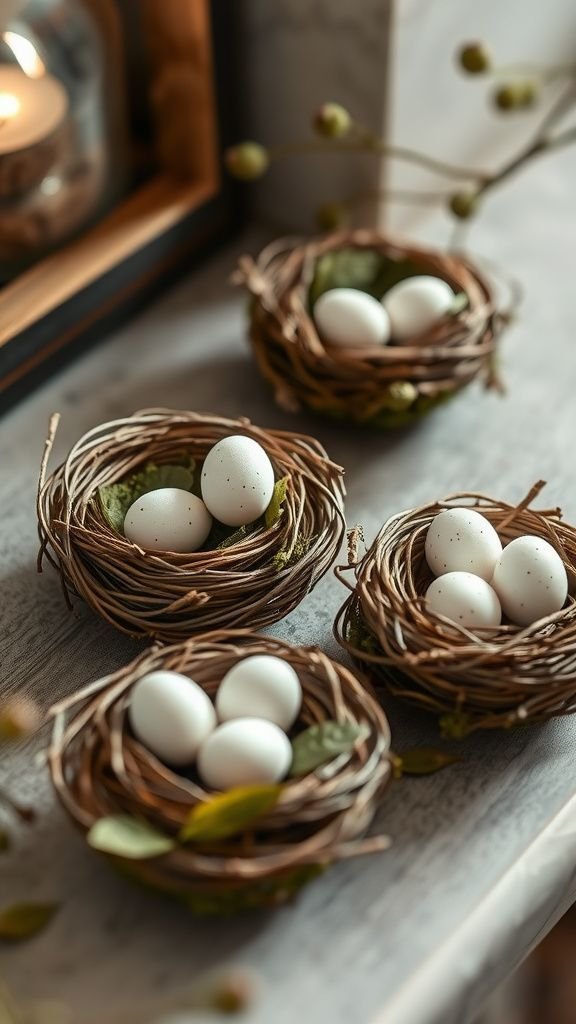
When I first placed a trio of tiny nests on the mantel, the texture stole the show — wisps of dried grass, the faint fuzz from a feather, the delicate speckling on small eggs. Each nest looked handcrafted, warm and protective, and the contrast of rough brown fibers against smooth, pale eggs drew the eye.
They felt intimate and slightly secretive, like a fragment of a garden paused for a moment. Arranged with soft moss and a little candle glow, they became a hush of spring on the shelf.
Steps
- Gather natural fibers such as dried grass, raffia, and small twigs, shaping them into small circular nests.
- Line each nest with a touch of soft moss or feather to suggest a cozy interior.
- Place handmade or store-bought speckled eggs into the nests, varying sizes for interest.
- Arrange the nests on the mantel with a bit of space between them and tuck in small sprigs for cohesion.
Moss-covered letters spelling out a soft spring word
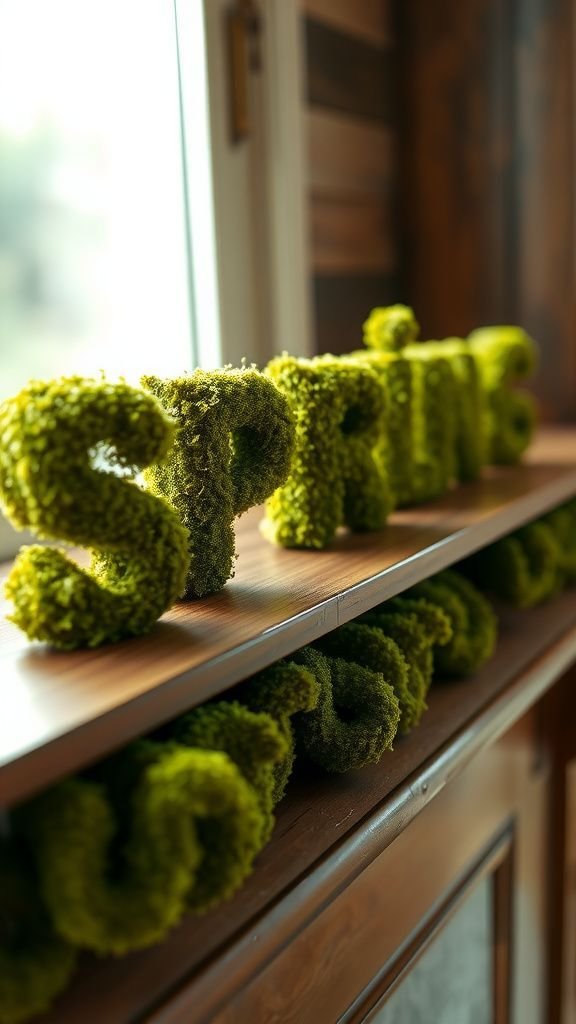
There was a moment when moss letters rested against the mirror above my mantel and the whole room softened. The green felt alive in a quiet way, plush under a fingertip and slightly cool to the touch.
The letters’ rough edges and tiny clinging bits of stem created an organic silhouette that felt playful without being fussy. In varied heights, the letters read like a whisper of the season, and the smell of fresh moss added an earthy undertone that made the mantel feel rooted in the outdoors.
Steps
- Choose large chipboard or wooden letters and press a layer of adhesive across the faces.
- Press preserved sheet moss onto each letter, ensuring even coverage and trimming overhang.
- Allow glue to set, then brush away loose bits and touch up thin areas with more moss.
- Lean the letters on the mantel, mixing heights and angling for a casual, layered look.
A stack of vintage books with botanical prints tucked in
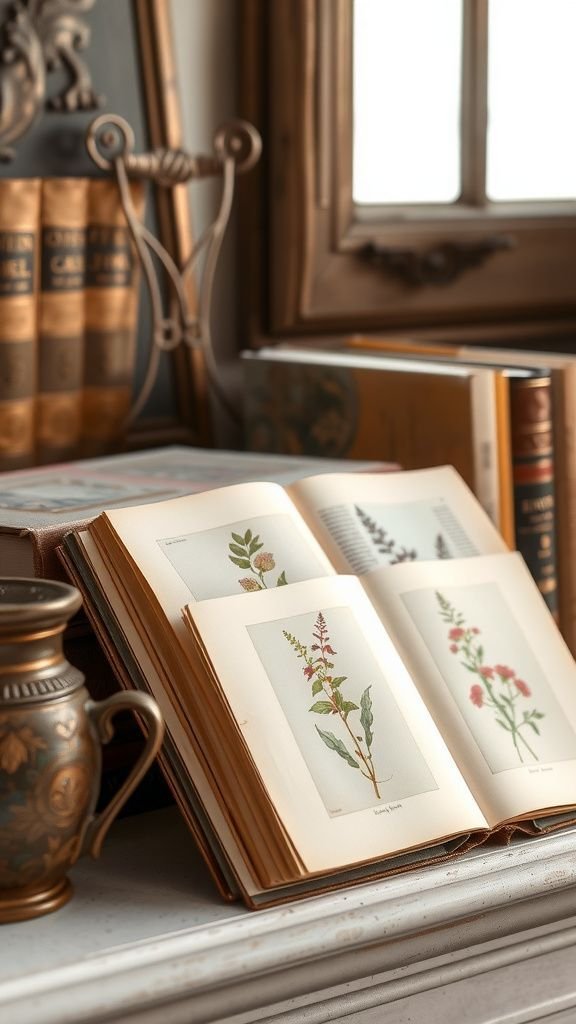
I often stack old books and slip a couple of botanical prints between the pages so that a corner peeks out. The faded cloth covers and softened pages add a warm, lived-in base for other spring pieces.
The botanical illustrations bring a whisper of scientific charm, their delicate lines and watercolor washes catching light with a mild sheen. Touching the covers feels comforting, and the small flutter when I pull a print just slightly reveals layers of time.
It reads like a borrowed piece of a gardener’s shelf, quietly personal and layered.
Steps
- Select a stack of vintage or thrifted books with textured covers and varied heights.
- Insert botanical prints or pressed flowers between select pages so a corner or edge is visible.
- Place the stack on the mantel and add a small object like a ceramic bud vase or a pine sprig atop the books.
- Adjust the tilt of the stack so the visible prints catch light and draw the eye.
Terrarium trio with succulents and smooth pebbles

Clear glass domes held tiny worlds on the mantel, each one with a different succulent tucked into sandy soil and a bed of smooth pebbles. The air inside felt cooler and slightly humid when I lifted a dome, and the light refracted off the curves with a gentle sparkle.
The mix of fleshy leaves and hard pebbles created a pleasant contrast, and the green tones ranged from pale mint to a deep blue-green. Grouped together, the trio delivered a modern, contained kind of spring that felt tidy and alive.
Steps
- Select glass terrarium containers of varying sizes and place a layer of small pebbles at the base for drainage.
- Add a thin layer of activated charcoal and a layer of succulent soil to each container.
- Plant small succulents into the soil, pressing gently around roots, and top with decorative pebbles.
- Place lids or domes back on where appropriate and arrange the terrariums along the mantel with space between each.
Dried lavender bundles tied with soft twine
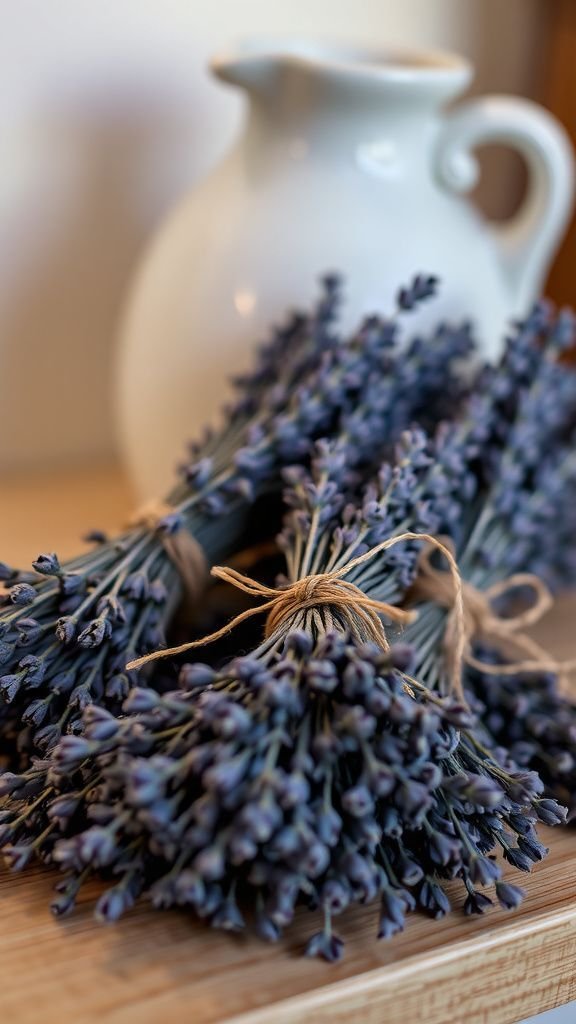
A few bundles of lavender rested against a ceramic jug, their stems lined up like a small, fragrant fan. The scent was the first thing that hit me — warm honeyed lavender with a dry backbone — and the texture of the tiny buds felt almost silky under the nose.
The faded purple and gray-green palette folded gently into a neutral mantel, offering an unobtrusive splash of color. They brought a calm rhythm and a faint memory of long afternoons, the kind that invite slow breaths and quiet conversation.
Steps
- Gather dried lavender stems and group them into small even bundles.
- Wrap the stems with natural twine near the base, tying a neat knot and trimming excess twine.
- Trim the bundle bottoms so they sit evenly and lean the bundles against a vase or frame on the mantel.
- Arrange two or three bundles at varied angles for a relaxed composition.
Hand-lettered chalkboard plaque with a gentle greeting

A small chalkboard plaque with a hand-lettered greeting felt like a whisper above the mantel. The chalk had that dusty, slightly grainy look that invites a second glance, and the rounded script leaned casual and friendly.
The surface bore faint remnants of earlier scribbles, lending a layered, human quality. In the morning light the chalk strokes caught tiny highlights, and the dark background made the softer decor around it pop.
It read like a tiny conversation starter between the room and anyone who paused to admire the shelf.
Steps
- Choose a small framed chalkboard and test lettering styles on scrap paper first.
- Sketch the greeting lightly with chalk, then retrace with steady pressure for clean lines.
- Blend and soften areas with a finger or cloth where a weathered look is desired.
- Place the plaque on the mantel, leaning it or anchoring it among other decorative objects.
Wreath of fabric scraps in soft, sun-faded hues
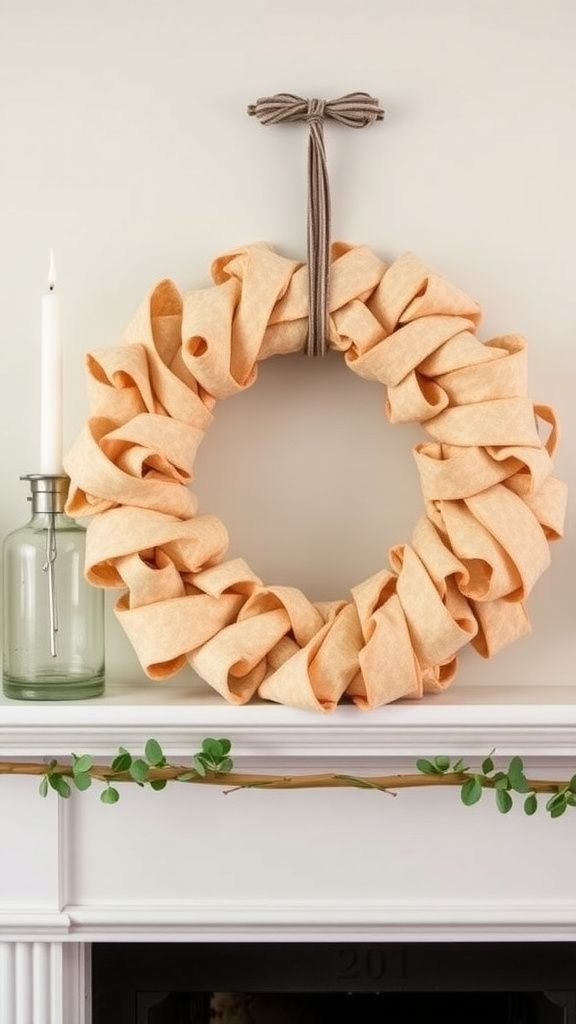
A fabric scrap wreath brought a quilted kind of cheer to the mantel. Each strip had a different mouthfeel — some were crisp cotton, others had a worn, soft drape — and every knot added a little rhythm to the circle.
The colors had the subtle fade of items that had been loved, a mix of washed pastels and faded prints. The overall effect was warm and homemade, tactile enough that I wanted to run a hand along the loops.
It sat like a friendly halo above a vase of simple blooms.
Steps
- Collect fabric scraps in complementary spring colors and cut them into even strips.
- Tie each strip around a foam or wire wreath form, keeping knots close together for full coverage.
- Fluff and rotate strips as needed to hide the wreath base and create an even silhouette.
- Lean the wreath on the mantel or hang it slightly forward for depth.
Eggshell planters with tiny green sprouts peeking out
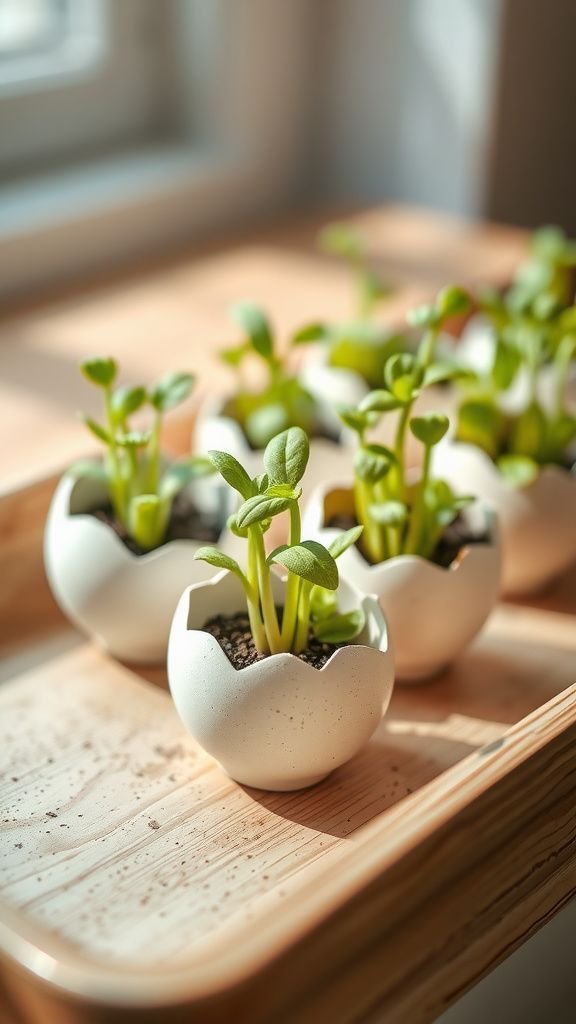
I once filled hollowed eggshells with a whisper of soil and tiny seedlings, and the mantel suddenly felt playful and delicate. The shells’ thin porcelain-like walls were cool to the touch, and the tiny green shoots looked impossibly brave emerging from such a fragile cup.
Each shell carried a slight variance in tone and a micro pattern from the original egg, giving a natural palette that matched small wooden trays and linen napkins nearby. It read as a hopeful little cluster, the kind of detail that makes people lean in close.
Steps
- Carefully open eggs and rinse shells, creating a small clean cavity for planting.
- Add a pinch of potting soil into each shell and nestle a tiny seedling or sprout gently into place.
- Arrange the filled shells in a shallow tray or egg carton and mist lightly to settle soil.
- Place the tray on the mantel where the seedlings will get bright, indirect light.
Ombre candle grouping with soft wax textures

A grouping of candles in ombre hues created a warm gradient along the mantel that felt gentle and modern. The wax surfaces bore tiny imperfections and the occasional soft drip, which added a lived-in charm.
In low light the candle glow softened paint edges and made the colors melt into one another. The scent was faint and comforting, more like warmed beeswax than anything sharp, and the overall silhouette read like a calm sunset.
It called for quiet evenings and the slow turning of pages while the room settled.
Steps
- Select pillar candles in a gradient from light to dark and test their heights for pleasing variation.
- Place candles on heat-safe trays or holders, ensuring stable placement on the mantel surface.
- Light the candles in low light to check the warmth and shadow they cast across nearby decor.
- Trim wicks as needed and monitor burn for even melting and safety.
Ribbon streamer backdrop that feels light and airy
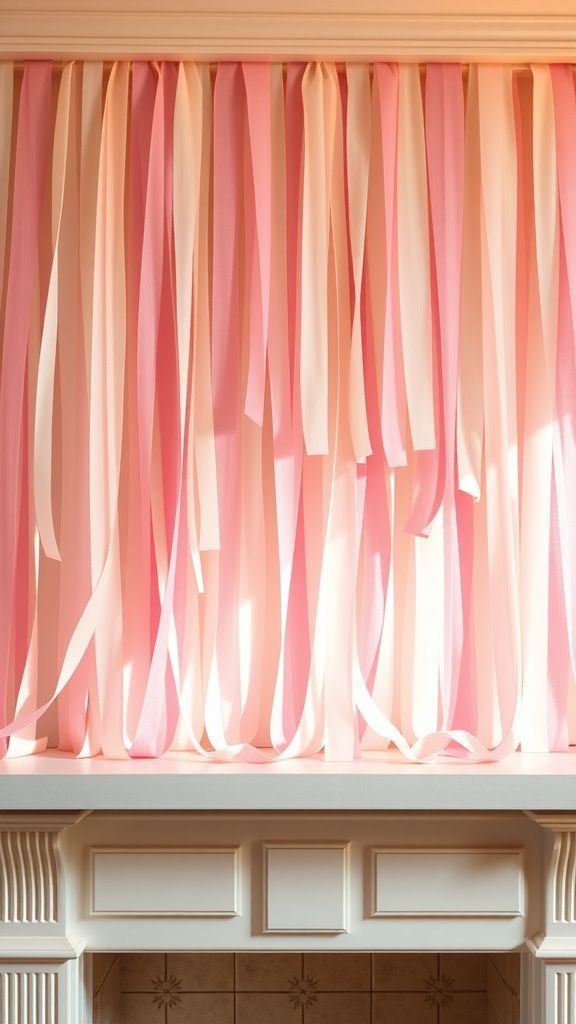
A cascade of ribbon streamers created a gentle vertical motion behind the mantel, each ribbon whispering as a draft passed. The materials ranged from gauzy chiffon to slightly satiny grosgrain, and together they formed a layered curtain of color and texture.
When sunlight hit at the right angle the ribbons shimmered faintly, and the interplay of transparency and opacity gave the whole mantel depth. It felt like a quiet festival, subtle rather than loud, and the soft rustle became a small, ongoing reminder of the season.
Steps
- Choose ribbons in complementary colors and textures, cutting lengths longer than the mantel height for drape.
- Attach ribbon tops to a slim wooden dowel or curtain rod with knots or discreet stitches.
- Hang the rod centered above the mantel and adjust ribbon spacing for an even visual flow.
- Trim ribbon bottoms for a uniform or tiered edge depending on the desired silhouette.
Felt garland of pastel shapes for a cozy look

A felt garland of little cloud-like shapes and soft circles brought a tactile softness to the mantel edge. Each felt piece had a dense matte texture that made colors feel rich but hushed, and the slight give under a fingertip was quietly satisfying.
The shapes bobbed gently when the door opened, creating a small, comforting movement. Strung along with natural twine, the garland read like a handmade banner, the kind that suggests a slow afternoon spent with scissors and a cup of tea.
It made the shelf feel personal and approachable.
Steps
- Cut simple shapes from thick wool felt in a range of pastel colors for a plush look.
- Pierce each piece near the top and thread them onto a length of natural twine, spacing as desired.
- Knot the twine ends and hang the garland along the mantel, adjusting shape orientation for balance.
- Fluff each felt piece gently to create a soft, dimensional appearance.
Painted branch mobile with dangling spring charms

A painted branch suspended above the mantel carried tiny charms that chimed during a breeze. The branch’s painted surface was matte with subtle brush strokes, and the charms — little wooden discs and feathered bits — added playful punctuation.
Watching them turn slowly felt like reading a slow clock; the motion was calming and unpredictable. The whole piece introduced a vertical element that connected ceiling to shelf, its shadows tracing delicate lines across the wall.
It felt lighthearted and a little offbeat, the kind of thing that makes someone pause and smile.
Steps
- Select a slender, curved branch and clean it, removing loose bark and debris.
- Paint the branch in a soft, neutral hue and allow it to dry fully before handling.
- Attach small charms to lengths of thread or thin ribbon and tie them at spaced intervals along the branch.
- Suspend the branch above the mantel with hidden hooks, adjusting charm lengths for pleasing movement.
Seed packet display in a rustic wooden tray
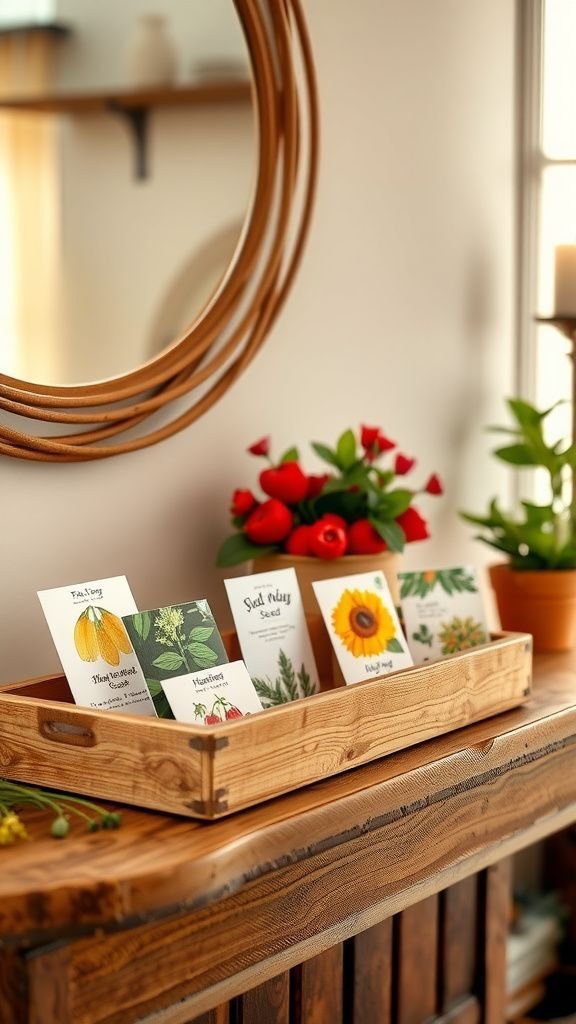
A neat arrangement of seed packets leaned in a shallow wooden tray, their illustrated fronts bright with tiny blooms and herbs. The paper had a papery whisper when turned, and the colors felt intensely hopeful — little promises of gardens yet to come.
The tray’s worn wood and a smudge of soil here and there gave the display an honest, used quality. It read as a small gardener’s nook on the mantel, inviting a quiet look at varieties and names, the kind of detail that hints at plans made over tea and seed catalogs.
Steps
- Collect seed packets with attractive illustrations and organize them by theme or color.
- Select a shallow wooden tray and stand packets upright within it for easy viewing.
- Add a few small gardening tools or labels as accents around the packets for texture.
- Place the tray on the mantel where light draws attention to the packet artwork.
Mini bunting flags strung across the shelf edge
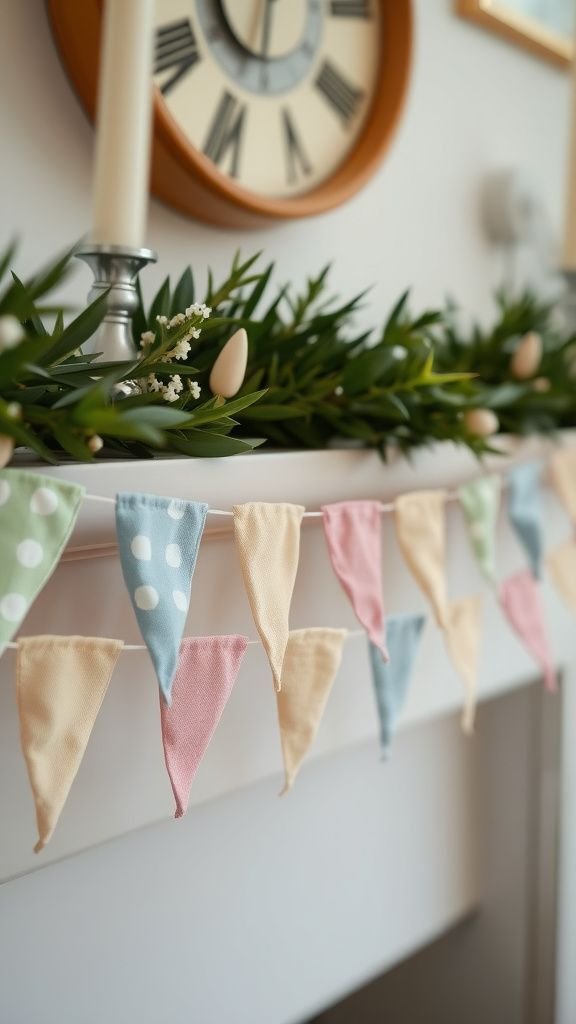
Little bunting flags in mixed fabrics created a rhythmic border along the mantel edge that made the whole room feel celebratory in a quiet way. The triangles had varied textures — linen, cotton, a soft knit — and the seams showed a handmade honesty that I adore.
When a breeze hit the window they tilted like tiny sails, casting small triangular shadows on the mantel. The colors were restrained, leaning toward washed pastels, and the overall effect was cheerful without being loud, an easy nod to seasonality that felt right for everyday life.
Steps
- Cut small triangular flags from different fabric remnants for textural variety.
- Attach flags to a length of thin twine or ribbon with stitches or glue, spacing evenly.
- Secure the bunting ends to the mantel or wall above with removable hooks or tape.
- Adjust flag spacing and angles so the line reads as playful yet balanced.
Floral foam centerpiece with mixed seasonal blooms

A low centerpiece with floral foam tucked into a shallow ceramic tray felt abundant yet contained. The blooms sprouted in a compact, almost painterly cluster, each color and shape chosen for contrast and flow.
The water had a faint floral scent that rose when the room warmed, and the petals ranged from glossy tulip cups to papery ranunculus layers. The whole arrangement read like a small bouquet turned landscape, lively and dense, offering a rich focal point that invited lingering conversation and close-up inspection.
Steps
- Soak floral foam thoroughly and place it in a shallow ceramic tray sized to the mantel.
- Trim stems at an angle and insert them into the foam, starting with larger focal flowers then filling gaps with smaller blooms.
- Rotate the tray as you work to maintain an even silhouette and check for balance.
- Top up water in the foam periodically to keep flowers fresh for longer.
A vintage pitcher brimming with late-spring branches
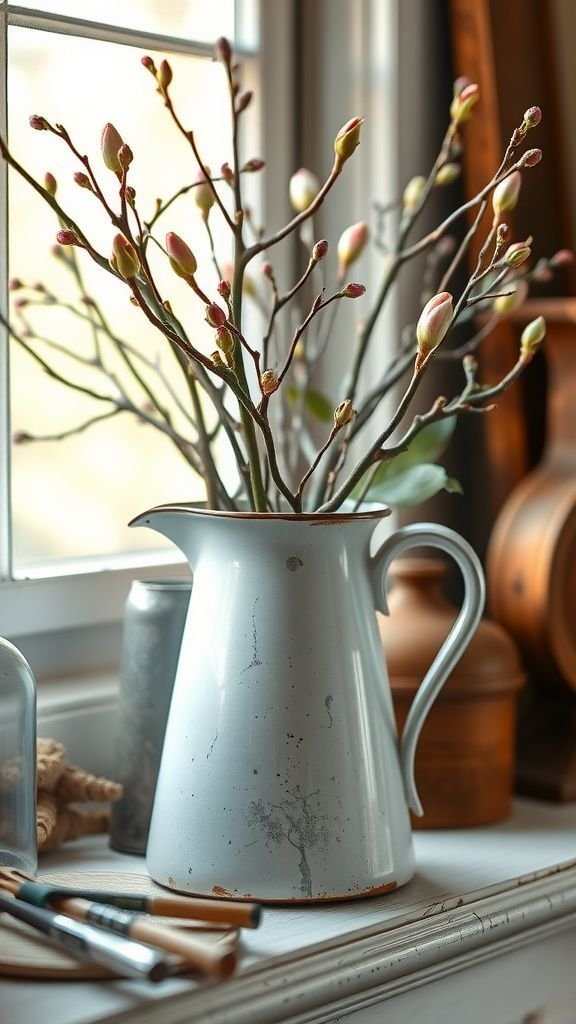
An old enamel pitcher took on new life as a vessel for late-spring branches, its chipped rim and warm patina adding character. The branches arced outward, some bearing tiny leaves, others dotted with early buds that caught light like small lanterns.
The contrast between the rugged metal and the delicate new growth was satisfying, a gentle reminder of seasons cycling. From a distance the arrangement read as bold and architectural, while close up the buds and tiny twigs offered an intimate, textural narrative that made the mantel feel anchored and alive.
Steps
- Select an aged pitcher or jug with enough depth to hold water and branches securely.
- Choose branches with interesting silhouettes and place them in the pitcher, arranging for balance and movement.
- Add water to the pitcher and adjust branch positions so key buds face forward.
- Place the pitcher slightly off-center on the mantel to create visual interest with surrounding pieces.
Layered tray scene with seasonal accents and textures

A layered tray on the mantel became a small stage for spring: a ceramic dish held a pile of smooth stones, a linen napkin softened one corner, and a small bud vase added a single vivid bloom. The mix of surfaces — rough wood tray, glossy ceramic, soft fabric — created a pleasant interplay under the hand.
Light bounced differently off each element, and the arrangement invited a slow second look at tiny details like a rusted nail head or a stray petal. It felt curated without fuss, the kind of vignette that makes the shelf feel collected over time.
Steps
- Choose a shallow wooden tray as the base and gather small objects in varied textures and heights.
- Place a small dish or bowl on one side and add natural elements like stones or seed pods.
- Add a bud vase with a single bloom and layer a folded linen napkin for softness.
- Step back and tweak object placement until the composition feels balanced and cozy.