Disclosure: This post contains affiliate links, which means we may earn a commission if you purchase through our links at no extra cost to you.
I always look forward to Earth Day as a chance to tinker with stuff that would otherwise end up in a bin. Turning scraps into something warm and useful feels a little like rescuing tiny stories from landfill, and this collection of Earth Day Recycled Crafts grew out of afternoons spent checking thrift bins and kitchen drawers for hidden potential.
Each idea here came from a mix of curiosity and small victories, like the pleasant surprise when a cracked jar became a candle holder or a faded tee found a second life as a braided rug. These Earth Day Recycled Crafts are playful and often oddly soothing.
Tin can planters with bright paint accents
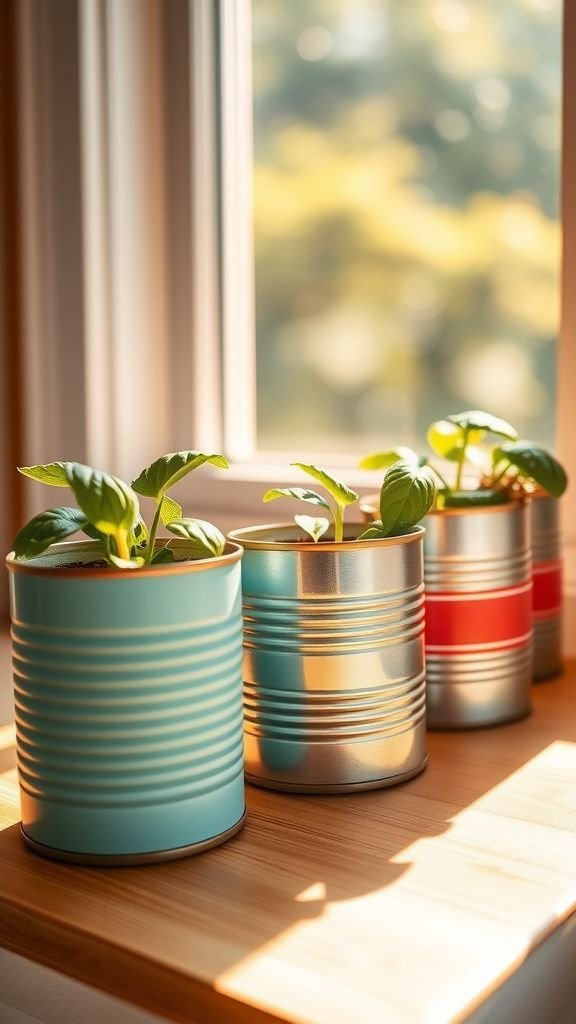
I love the modest clink of an old can and how its edges catch light after a rinse. When I place a group of these planters on a windowsill, the metal echoes a cool, industrial hum against the warmth of new soil and sprouting herbs.
Painted bands or soft pastel shades mellow the utilitarian feel, and the contrast between raw metal and smooth green leaves often makes me smile. The aroma of damp earth mingles with faint metallic tang, and seeing tiny green shoots in something salvaged feels quietly rewarding.
Steps
- Remove labels and wash the can thoroughly; dry it completely.
- Lightly sand any sharp edges and apply a coat of primer for metal surfaces.
- Paint the outside with chosen colors and let each coat dry fully before the next.
- Add drainage by making a small hole in the bottom; fill with potting mix and place a plant inside.
Plastic bottle bird feeder: will birds visit?

There is a gentle thrill in watching a small sparrow hover at a feeder once full of seeds. The transparent curve of a recycled bottle gives the feeder a cozy, sheltered feeling, like a tiny glass cafe for visiting birds.
From my porch chair I notice how light refracts through the plastic and how wind makes the bottle sway with a soft whisper. The scatter of tiny seeds provides a steady soundtrack of pecks and flutter, and the unexpected visitors lend a lively energy that turns ordinary afternoons into small celebrations.
Steps
- Clean a plastic bottle and remove any labels to reveal a clear surface.
- Create feeding holes along the sides and insert small perches beneath each opening.
- Fill the bottle with mixed birdseed and hang it from a sturdy branch or hook.
- Replenish the seed as birds thin the supply and watch for feathered visitors.
Mason jar luminarias that glow at dusk

When evening slides in, a row of glass jars with warm flicker feels like tiny lighthouses along a path. The cool weight of each jar in my hands combined with the slight stick of wax makes the ritual of placing them oddly calming.
The low light spills in amber pools across stone and grass, casting moving shadows that turn a yard into a quietly enchanted nook. The scent of beeswax or soy from the candles is faint but comforting, and the glow encourages hushed conversation and slow breathing.
Steps
- Clean jars and remove labels so the glass shines clearly.
- Place a tea light or small candle inside each jar and stabilize with sand or pebbles if needed.
- Group jars along walkways or on a table and light them as dusk settles.
- Extinguish candles safely after use and allow jars to cool before storing.
Denim pocket organizer from old jeans
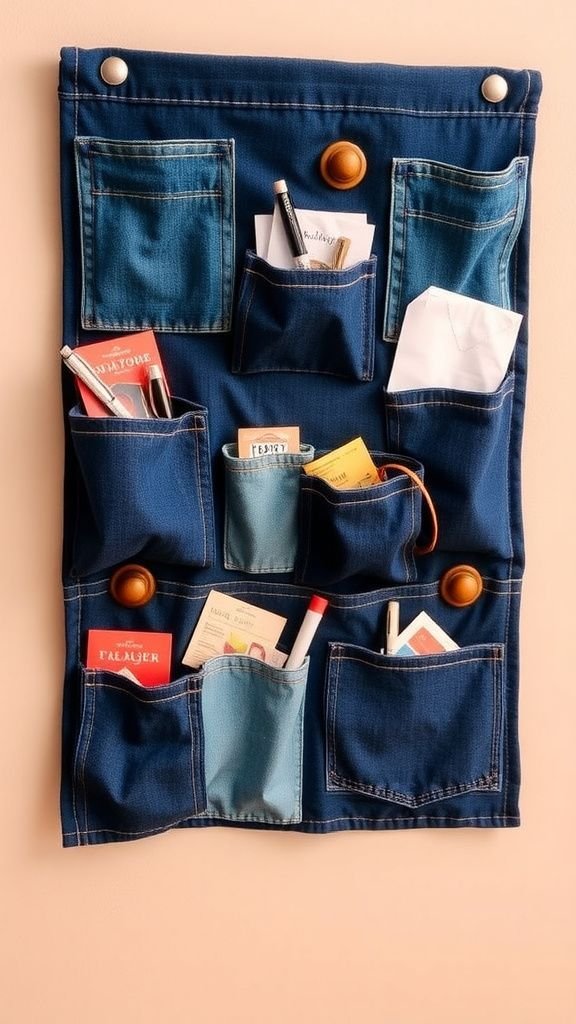
Old jeans have always felt like objects with stories stitched into them, and the rounded weight of a back pocket carries a memory of things once kept there. When I hang a pocket panel on the wall, it becomes a small map of textures; the denim retains that familiar, comforting stiffness while the stitching and rivets add charming punctuation.
Keys and pens slide into the worn indigo like friendly secrets, and the faint scent of laundry reminds me of weekends spent sorting clothing. The overall effect is practical yet quietly nostalgic.
Steps
- Cut the back pockets and a rectangular panel from old jeans, leaving seams intact where possible.
- Arrange pockets on a fabric backing and sew or secure the edges to anchor them.
- Add a loop or strip at the top for hanging on a hook or nail.
- Fill pockets with small tools, stationery, or seed packets for easy access.
CD mosaic coaster set with broken shine

Shards of mirrored CDs catch light in a way that makes me grin; there is a playful flash whenever a coaster is tipped. The cool glint contrasts with warm tabletop wood, and the tiny rainbows that dance across the surface feel like accidental confetti.
Running a finger along the finished edge reveals the mix of smooth resin and sharp sparkle beneath, which always prompts me to add another layer until the surface feels just right. The finished coasters sit in a neat stack, reflecting coffee steam and afternoon light with a sly wink.
Steps
- Crack or break old CDs into small pieces with care, collecting glittering shards.
- Arrange the pieces on coaster blanks and pour clear resin to cover the surface.
- Allow the resin to cure fully and sand edges gently if necessary.
- Buff the top for a smooth, glossy finish and stack the coasters neatly.
Wine cork stamps for playful patterning

There is an oddly satisfying firmness to a wine cork between my fingertips, and the porous texture takes ink in a friendly way. Pressing a cork down leaves a cheerful dot or circle, and a small collection makes a rhythm of repeated marks across paper or fabric.
The smell of cork carries a faint woody, resinous note that makes the craft feel earthy. When I see a sheet filled with little stamped suns or abstract dots, it looks like a tiny field of ideas, each impression holding a small, handmade character.
Steps
- Gather clean wine corks and carve simple shapes into one end if desired.
- Press cork ends into ink pads or craft paint and apply even pressure to paper or fabric.
- Repeat to create patterns, re-inking as the impression lightens.
- Allow the ink or paint to dry completely before handling.
Paper bead garlands with glossy recycled magazines

Turning glossy strips into beads has a rhythm that feels almost meditative; sliding a slender triangle and watching the paper spiral creates a small, private delight. The beads catch light differently depending on the paper sheen, so a garland made from magazine pages gleams with jewel tones.
When draped across a mantel, the colors and patterns tell little stories of travel ads and bold photography. The garland moves in a soft, paper rustle when someone passes, and that quiet sound adds a gentle liveliness to a room.
Steps
- Cut magazine pages into long triangular strips and apply a thin adhesive along the wide edge.
- Roll each strip tightly around a thin dowel, sealing the tip with a dab of glue.
- Coat the finished beads with clear varnish for durability and let them dry.
- String beads onto twine or thin cord to create a garland of chosen length.
Egg carton seed starters for tiny green beginnings
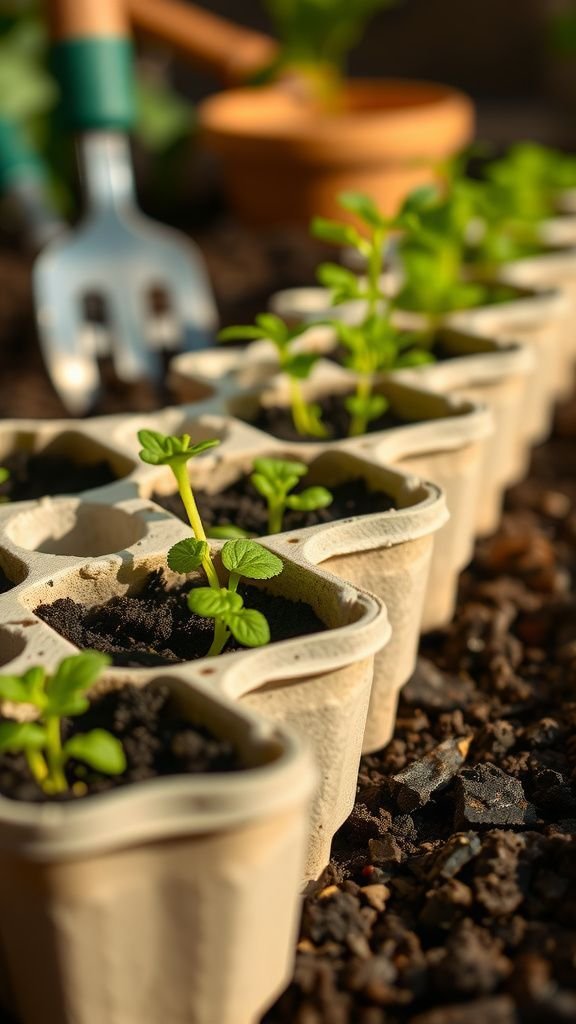
The soft papery texture of an egg carton holds small pockets of soil that feel reassuringly snug. Filling each well seems like tucking a tiny seed into a miniature nest, and watching pale shoots push up through damp earth offers a small, repeated thrill.
The faint smell of clean soil on my fingers and the cool dampness around each germinating seed make the morning ritual of checking growth quietly satisfying. A cluster of green casualties slowly becomes a hopeful patch of life that invites gentle tending and quiet pride.
Steps
- Separate the egg carton cups and fill each with a light potting mix.
- Press seeds gently into the soil and cover with a thin layer of mix.
- Water lightly to moisten and place the carton in a bright spot with indirect light.
- Transplant seedlings into larger pots when roots begin to show through the base.
Mosaic bottle lamp from broken glass pieces

A lamp assembled from broken glass feels like holding captured starlight; each shard throws a soft shard of color when the bulb warms the surface. The roughness of uneven edges sits against the smoothness of a lamp base, creating a tactile contrast I find appealing.
When switched on, the room takes on a quiet, speckled glow that resembles a tiny night sky. The scent of warm metal and old glass is faint but present, and the gentle hum of electricity mixed with that light always quiets conversation into contemplative tones.
Steps
- Collect colored and clear glass shards and clean them thoroughly.
- Apply adhesive to a lamp base or bottle and press glass pieces into place, creating a mosaic.
- Grout between shards if desired, wiping excess for a clean surface.
- Install a bulb and shade, then enjoy the lamp’s warm, patterned glow.
Cardboard desk organizer with layered texture

Corrugated cardboard has a pleasant rustle and a layered cross-section that looks almost architectural when stacked. A desk organizer built from salvaged boxes gives a comforting, handmade look among pens and notebooks.
The neutral brown tones lend calm to a cluttered surface, and the subtle shadows between layers create a sense of depth that feels studied. Picking up a pencil from one compartment feels like interacting with a small sculpture, and the faint cardboard scent ties the piece back to afternoons spent sorting deliveries and discovering potential in packaging waste.
Steps
- Cut pieces of cardboard into panels sized for compartments and walls.
- Glue or secure panels together to form pockets and dividers for the organizer.
- Reinforce edges and joints for sturdiness and add a base for stability.
- Optionally cover with decorative paper or fabric and arrange on a desk for supplies.
Tin can lanterns with punched patterns

Hanging a row of metal lanterns with tiny pinprick patterns turns a backyard into a constellation map. The metal gives a faint clink when moved, and the cool touch contrasts with the warmth of candlelight inside.
When dusk falls, the punched holes turn ordinary surroundings into patterned light and shadow that feel cinematic. I often linger nearby to watch the slow animation of light across patio bricks, as if the cans are whispering small stories.
The smell of burnt wick is minimal and the atmosphere is quietly celebratory.
Steps
- Clean and dry tin cans, then create a pattern of holes using a sharp nail and hammer.
- Smooth any rough edges and add a handle by attaching wire to the rim.
- Place a candle or LED light inside and hang the lanterns at varying heights.
- Light them in the evening for patterned light across outdoor seating areas.
Bottle cap magnets with tiny collage scenes

Tiny bottle caps feel like little frames, and tucking a sliver of vintage paper or a pressed flower into one creates a private vignette. The weight of a cap on the fridge holds postcards and lists with a modest, satisfying click.
When I reach for one, the smooth metal rim and the slightly convex interior give a compact, finished sensation. The small collages catch the eye without shouting, and the collection often sparks friendly questions from visitors who linger at the kitchen door, pointing at the tiny images.
Steps
- Gather bottle caps and clean them thoroughly before crafting.
- Create tiny collage pieces from paper, photos, or pressed flowers to fit inside caps.
- Adhere the collage into the cap and seal with a clear resin or glossy varnish.
- Attach a small magnet to the back and display on a metal surface.
Toilet paper roll napkin rings with floral trim

A ring of cardboard suddenly seems elegant when wrapped in ribbon or paper and trimmed with dried flowers. The hollow eco-friendliness of a recycled roll feels pleasantly light in the hand, and the textures of paper and dried petals play beautifully against linen napkins.
Setting a table with these little rings adds a whimsical, homemade flourish that invites smiles at dinner. The dry, faint fragrance of pressed flowers suggests quiet afternoons spent arranging petals, and the rings themselves offer a modest sense of ceremony to everyday meals.
Steps
- Cut toilet paper rolls into uniform rings and press them flat gently.
- Wrap each ring with decorative paper or fabric and secure the ends.
- Glue or tuck dried flowers and small trims onto the surface for embellishment.
- Slide rings over folded napkins to dress a table setting.
Plastic bag braided rug for cozy floors
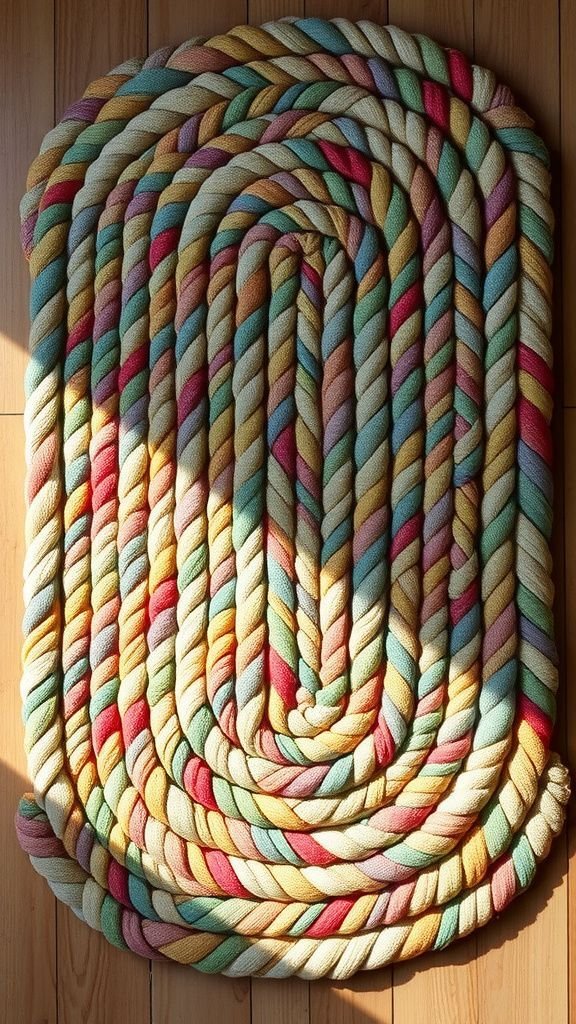
A braided rug made from plastic bags has a surprising squish underfoot and a gentle crinkling that feels oddly comforting during barefoot mornings. The blend of transparent and colored strips creates a marbled pattern that gleams when sunlight hits it just so.
Rolling the finished rug feels like compressing memories of grocery runs and neighborhood pickups into a tidy, tactile object. The sturdiness of the weave resists spills, and the cool plastic contrasts with warm wooden floors in a way that feels homegrown and practical.
Steps
- Cut plastic bags into long strips and knot them to create continuous lengths.
- Braid three strands together tightly, forming a long rope of braided plastic.
- Coil the braid into a circular or oval shape and stitch or glue the layers together.
- Trim stray edges and place the rug in a low-traffic area for use.
Jar terrarium: tiny ecosystems inside glass

Peering into a jar terrarium feels like entering a miniature forest; the close humidity, jewel-like mosses, and a tiny canopy create a private world. The glass envelope holds moisture and scent in a hush that makes the moss feel lush and protected.
I find myself checking these small ecosystems with the kind of tender curiosity reserved for pets, noting changes in leaf color or the slow unfurl of new shoots. The gentle condensation on the glass in the morning lends a misty, enchanted quality that is hard to resist.
Steps
- Place a layer of small stones or pebbles at the bottom of a clean jar for drainage.
- Add a thin layer of activated charcoal, then a layer of potting mix suitable for terrarium plants.
- Arrange small plants, moss, and decorative elements inside, keeping space for growth.
- Close or partially cover the jar and place it in bright, indirect light, monitoring moisture levels.
Pallet herb planter with rustic charm
A reclaimed pallet holds a row of little gardens that smell of basil, thyme, and rosemary on warm afternoons. The wood grain, faded and weathered, tells of past journeys while the green shoots point toward new beginnings.
I enjoy brushing my hand across the rough slats and feeling the contrast between splintered texture and soft leaf undersides. The vertical arrangement saves space and creates a living wall that changes with seasons.
Every time I reach for a sprig, the mix of plant fragrance and sun-warmed wood feels quietly satisfying.
Steps
- Clean and prep a pallet by sanding rough spots and ensuring structural stability.
- Line pallet pockets with landscape fabric and fill with potting soil.
- Plant herbs or small plants into each pocket and press soil gently around roots.
- Lean or hang the pallet in a sunny spot and water consistently until established.
Old sweater mittens with soft felted lining
There is a cozy satisfaction in slipping hands into mittens that once were a familiar sweater. The worn knit remembers fingers and warmth, and the felted lining adds an extra hush of softness that makes cold mornings gentler.
The muffled sound of fabric moving and the faint scent of wool conjure winter afternoons and warm mugs. Holding a mitten up to the light reveals tiny loops and pilled textures that map past wear, and when I slide them on, the memory of the sweater is carried forward in a quiet, wearable embrace.
Steps
- Choose a clean, thick sweater and trace a mitten shape onto a sleeve panel.
- Cut two matching panels for each mitten and sew the sides together, leaving the cuff open.
- Turn mittens right side out and add a felted lining or extra fabric for warmth.
- Finish the cuff edge and wear on chilly days.
Glass jar spice rack from recycled bottles

A line of matching jars filled with spices becomes a silent promise of future meals. The smell of ground pepper, cumin, and cinnamon rises in small, pleasant waves when a lid is twisted, and the clear glass showcases colors that range from dusty ochres to deep browns.
Mounting jars on a simple shelf keeps the kitchen tidy and invites spontaneous cooking experiments. I enjoy rearranging labels and watching how the palette of spices looks like an artist’s paint set, ready to lend brightness or warmth to whatever ends up in a skillet.
Steps
- Clean recycled glass jars and remove any remaining labels for a clear view of contents.
- Fill each jar with a chosen spice and seal lids tightly to preserve aroma.
- Arrange jars on a mounted rack or shelf, labeling each for easy identification.
- Refill jars as spices are used to maintain the collection.
Newspaper woven basket with subtle gray tones

The crinkle of newspaper passing through fingers has a papery music that I find oddly soothing. Rolling and weaving strips transforms printed pages into a vessel with calm gray patterning and the faint ghost of headlines.
The finished basket holds magazines or knitting yarn and sits with an unassuming personality on a shelf. Its slightly rough texture and muted color harmonize with a living room palette without demanding attention.
Each strip preserves a piece of time, and the woven result feels like a gentle archive of everyday life.
Steps
- Roll newspaper strips tightly into sturdy rods and secure the ends.
- Weave the rods together in a coil pattern to form the base and sides.
- Shape the basket by adjusting tension while weaving upwards, finishing the rim neatly.
- Apply a clear sealant for durability and let it dry before use.
Old sweater coasters with variegated knit color

Small circles of sweater fabric sitting under mugs have a homely, reassuring presence. The knitted stitches and blended yarn colors look like tiny landscapes, and the fabric resists heat with a gentle, insulating hush.
When a coaster soaks in a ring of coffee, it feels like a friend absorbing life’s little spills, and washing it returns a soft, renewed texture. I like arranging these coasters in a lazy fan on the table, each one whispering a different pattern and carrying the subtle scent of hand-washed wool.
Steps
- Cut felted sweater fabric into uniform circles and back them with sturdy felt if desired.
- Stitch around edges to prevent fraying and add a decorative border.
- Layer two pieces for extra thickness and sew them together securely.
- Place coasters under cups and launder gently when needed.
Bottle greenhouse for seedling warmth

Snug clear domes of cut bottles create tiny greenhouses that trap warmth and make seedlings feel pampered. The subtle hum of trapped warmth and the magnified view of tiny leaves beneath the plastic give a sense of protected growth.
Morning dew beads on the inside and refracts light into miniature rainbows that make the seedlings look as if they live in a jewel box. I enjoy checking each dome for condensation and the quick upward surge when a seed decides it’s time, like a small personal triumph on an otherwise ordinary day.
Steps
- Cut the tops off clear plastic bottles and smooth the edges for safety.
- Place the bottle tops over seedling pots to form protective mini-greenhouses.
- Tilt or vent the tops occasionally to regulate moisture and prevent overheating.
- Remove the domes as plants grow and require more air circulation.