Disclosure: This post contains affiliate links, which means we may earn a commission if you purchase through our links at no extra cost to you.
I remember dragging a sun-bleached pallet into the garage and feeling oddly excited by the rough texture and knots. That single afternoon of sorting boards and imagining small projects turned into a habit of tinkering on weekends.
Easy Pallet Wood Craft Projects became a way to unwind, sketching quick plans on scrap paper while the porch filled with dust and the scent of dry wood.
Over time the experiments moved from tiny things to pieces that lived in the house. The tactile grain, the little nail holes, and the imperfect edges gave each item a gentle character that made the process feel rewarding and friendly.
Low Rustic coffee table from pallet wood

I still recall the thrill of setting a reclaimed pallet slab on hairpin legs and watching the porch light catch every knot. The surface felt pleasantly uneven under my palm, with ridges that invited a slow hand pass.
The color varied from pale ochre to warm brown, and a few faint circular stains turned into charming quirks. It settled into the living room with an easy, lived-in look that made guests linger over cups.
The table seemed like a patient piece, quietly collecting books and the soft scuff marks of daily life.
Steps
- Select a pallet with straight boards and remove loose nails and staples.
- Saw boards to a matched tabletop length and align boards for a pleasing grain flow.
- Fasten boards together with screws through hidden cleats on the underside for stability.
- Smooth edges with fine-grit abrasive paper and finish with a penetrating wood stain for warmth.
Wall-mounted floating shelf with weathered charm
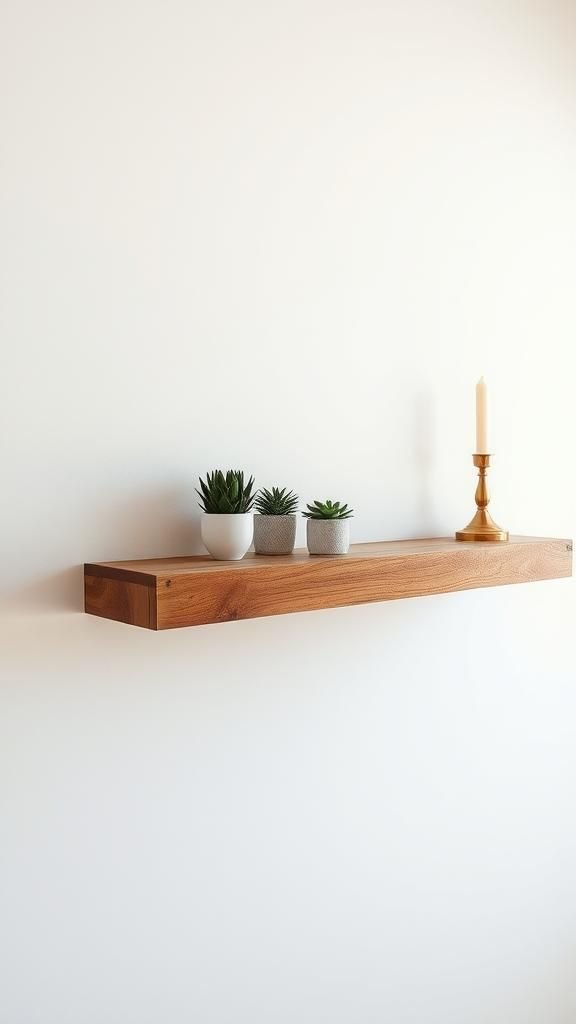
A wall shelf cut from an old pallet brought the kind of warmth that makes a hallway feel personal. The face showed thin stripes of grain and tiny dents from past life, each imperfection adding a familiar note.
I liked the way it caught the light at different hours, sometimes glowing amber, sometimes cool and grey. Small potted succulents and a slim row of postcards found a cozy home up there, while the shelf itself read as a quiet accent rather than a loud statement in the room.
Steps
- Choose a long, relatively straight pallet board and detach any protruding nails.
- Trim the board lengthwise to desired depth and plane edges for a cleaner profile.
- Install concealed brackets along the back and fasten the shelf securely to a wall stud.
- Wipe surface with a soft cloth and apply a light wood stain to enhance grain contrast.
Pallet wood planter box for a sunny balcony
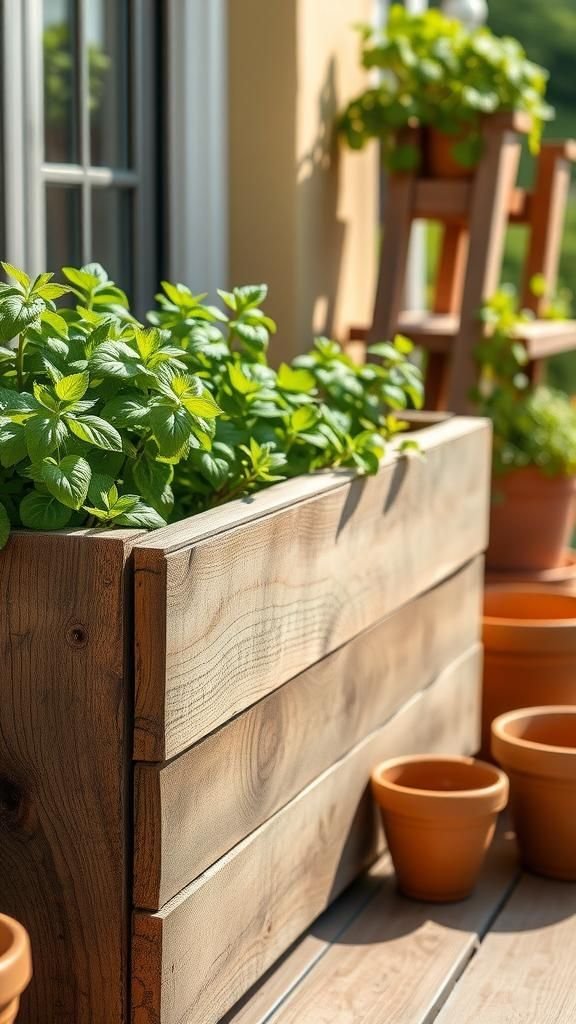
I remember lining a pallet planter with burlap and feeling pleased at how the rough boards softened against creeping herbs. The scent of earth mixed with the dry woody aroma produced a comforting garden smell.
The corners had a slightly irregular join that read as handmade rather than factory neatness. Over the summer the herbs rubbed leaves against the weathered wood and tiny green stains formed where morning dew collected, a reminder of the planter’s quiet role in the small daily rituals of watering and snipping.
Steps
- Select sturdy pallet boards with minimal rot and remove surface nails.
- Cut boards for base and sides and align panels to form a rectangular box shape.
- Fasten corners with exterior-grade screws and reinforce the bottom with slats for drainage.
- Line the interior with breathable fabric and fill with potting mix and chosen plants.
Compact entryway shoe rack with slatted personality

There was something satisfying about sliding a pair of muddy boots onto a slatted pallet shelf and hearing a soft scrape against weathered wood. The rack felt honest and practical, low enough to catch stray shoes yet light enough to shift along the hallway.
The slats allowed air to move freely, and the mix of warm and cool tones in the boards added a little visual rhythm. It settled into daily use without fuss, soaking up rain drops and glimpses of life at the threshold in a quietly useful way.
Steps
- Choose pallet planks of similar width for consistent slat spacing and remove old fasteners.
- Cut side panels to desired height and drill pilot holes for stronger joins.
- Fasten slats across the side frames with screws, keeping even gaps for ventilation.
- Test stability with a few pairs of shoes and adjust fastenings if needed.
Pallet wood headboard with rustic plank appeal
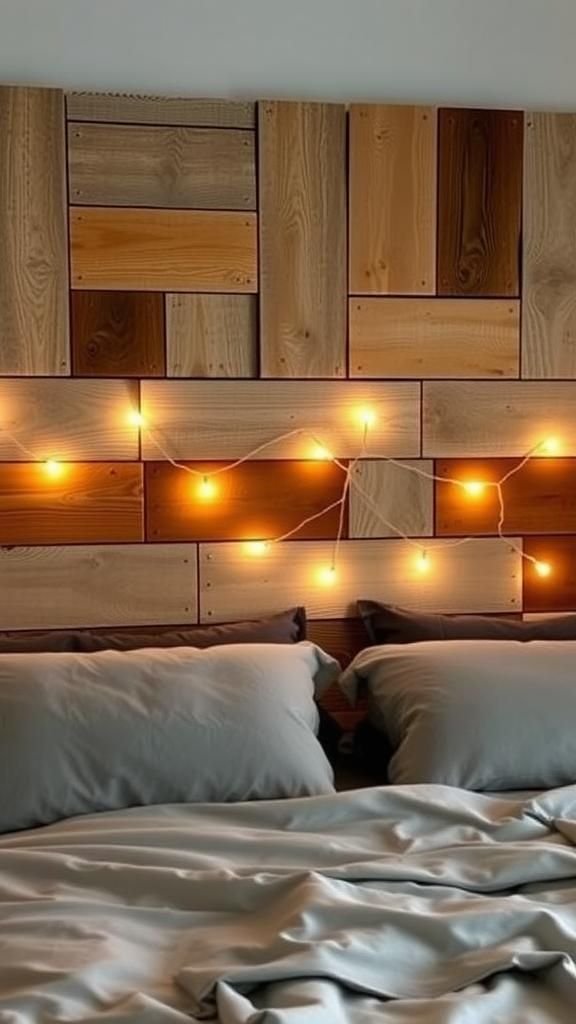
Creating a headboard from staggered pallet planks felt like arranging a wood collage above the bed. The mix of widths and tones produced a cozy backdrop that softened the whole room.
Running a hand along the top revealed small ridges and tiny dents that felt friendly, like hand-me-down furniture. By night, fairy lights tangled along the seams and created a gentle glow against the varied grain.
The headboard had a casual elegance that invited leaning back with a book and lingering for a few extra pages.
Steps
- Sort pallet boards by color and grain to plan a pleasing staggered layout.
- Trim planks to a consistent height and plane rough edges for alignment.
- Join the planks on a sturdy backing board with screws along the rear rails.
- Mount to the wall or bed frame using heavy-duty brackets anchored to studs.
Garden vertical herb rack with layered planters

I enjoyed seeing a narrow pallet section turned into a vertical band of herbs against a sunny fence. The staggered pockets held basil and thyme like mini terraces, and the vertical arrangement compressed a lot of green into a small footprint.
Morning sun highlighted the rough texture of the boards while droplets clung to leaves and edged the wood with tiny dark spots. It read like a living tapestry that changed subtly through the season, shedding leaves and sprouting new ones alongside the mellowing of the pallet’s color.
Steps
- Select a pallet face with evenly spaced slats and remove any loose fasteners.
- Create planter pockets from short boards and attach them across vertical slats with screws.
- Reinforce the upper section with a horizontal brace and hang the unit securely on a fence.
- Fill pockets with potting mix and plant chosen herb seedlings.
Simple pallet wood picture frame with rustic grain
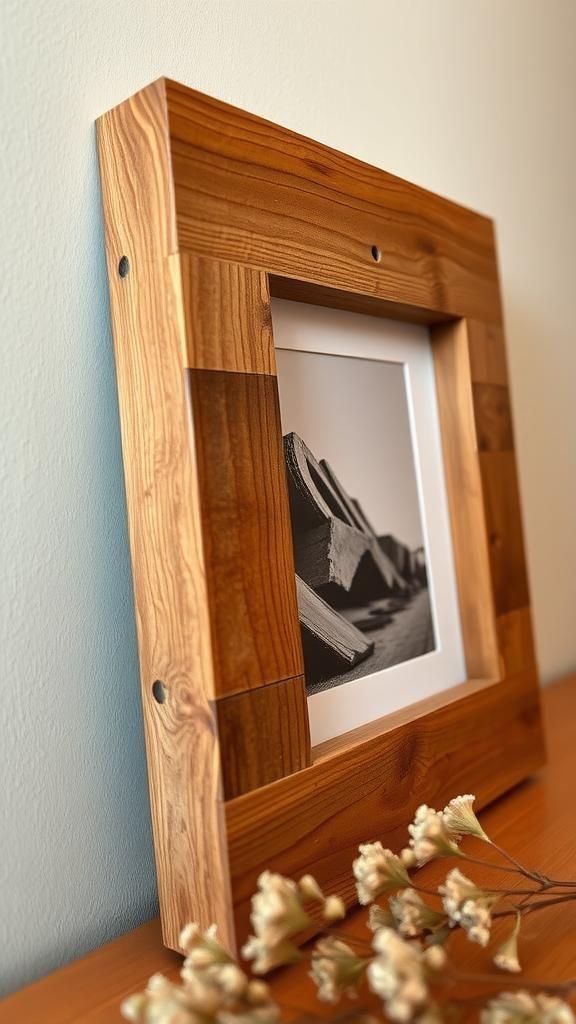
That little picture frame made from a salvaged pallet felt unexpectedly tactile in hand. The narrow face displayed a collage of grain lines and tiny nail dents that framed a photo without shouting.
The wood had a faint grey wash near the edges from time outdoors, which paired nicely with a black-and-white print. When hung, the frame lent a casual sincerity to the image, like a familiar note pinned on a fridge.
Passing by, I often paused longer than I expected, tracing the gentle grooves with my fingertip.
Steps
- Select narrow face boards and trim them to match the photo dimensions.
- Mitre the corners at forty-five degrees for neat joints and join with small screws or nails.
- Back the frame with a thin panel and secure the print inside with tabs.
- Add hanging hardware and position the frame on a wall with even alignment.
Rustic wine rack for countertop or wall display
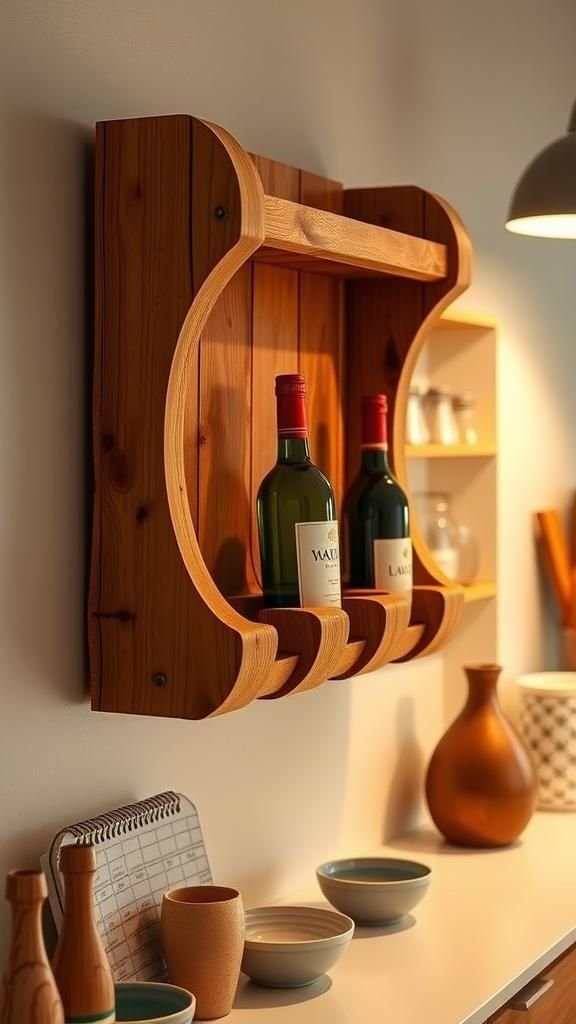
I built a compact wine rack that cradled bottles at a slight angle, and the result had a friendly, shop-made quality. The curved grooves in the slats gave each bottle a gentle cradle, and the dark rings of the cork ends peeked through like punctuation.
The wood tone warmed the kitchen counter and invited a casual pour during late afternoons. Each notch felt hand-tuned, and the whole piece wore a finish that emphasized the grain without hiding its original roughness, making the rack feel like a quiet companion for relaxed evenings.
Steps
- Choose thick pallet planks for strength and mark out bottle cradle positions along the length.
- Cut shallow arcs into slats with a jigsaw to form bottle supports.
- Fasten the support slats to a rear board with screws and ensure even spacing.
- Mount on a wall or place on a countertop and load bottles gently into the cradles.
Narrow bookshelf with staggered pallet shelves
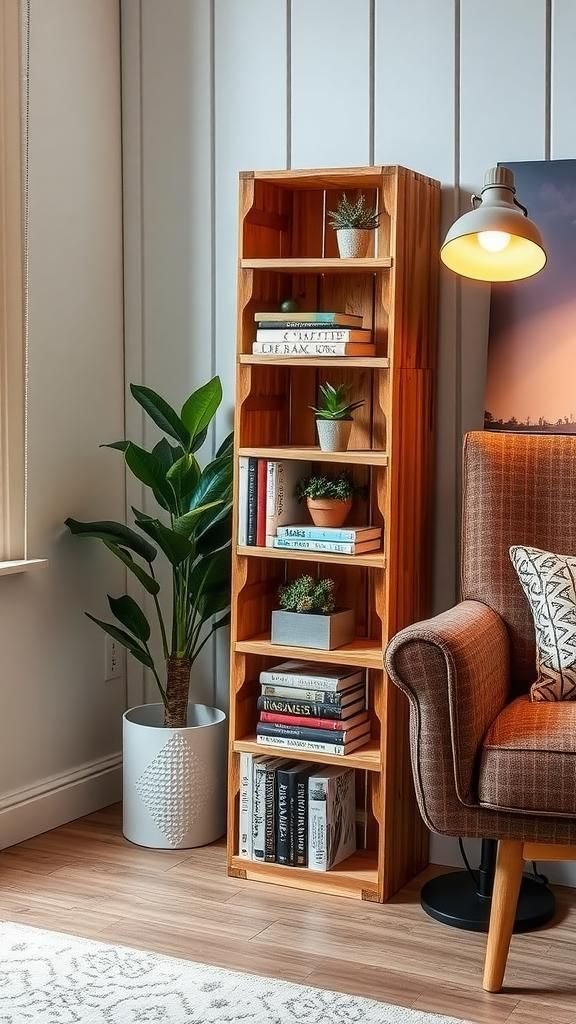
A slim bookshelf made from pallet boards fit snugly beside a reading chair, its staggered shelves creating a playful zigzag for paperbacks. The texture was tactile, with subtle ridges and pale streaks where the wood weathered.
Books leaned against one another on uneven planes, giving the shelf a relaxed, human rhythm. It gained a faint scent of old paper and tea over time, blending with the wood.
Visitors often reached for a spine and commented on the shelf’s modest presence, as if it had quietly always belonged in that corner.
Steps
- Gather boards for vertical sides and staggered shelf pieces and remove old hardware.
- Trim shelf pieces to varied lengths and plane the faces for smooth stacking.
- Secure each shelf to the side panels with screws, keeping a consistent stagger pattern.
- Sand any rough edges and apply a light wood stain to harmonize tones.
Outdoor bench with slatted comfort and charm

An outdoor bench assembled from a few long pallet planks became the go-to spot for coffee on cool mornings. The slatted seat allowed rain to pass through and dried quickly in the sun, leaving faint water rings that evaporated into the grain.
The bench wore tiny scars from garden work and bird visits, which only made it feel more rooted. Sitting on it, the roughness under a palm was balanced by a smoothness in the arm height that matched my elbows perfectly.
It aged into a calm presence on the patio.
Steps
- Select long, straight planks for the seat and stout boards for the legs and supports.
- Cut the leg components to matching heights and notch them to accept the seat slats.
- Fasten slats to the supports with weather-resistant screws and check for evenness.
- Position the bench on level ground and test for any wobble, tightening fasteners as needed.
Small decorative tray with reclaimed wood grain
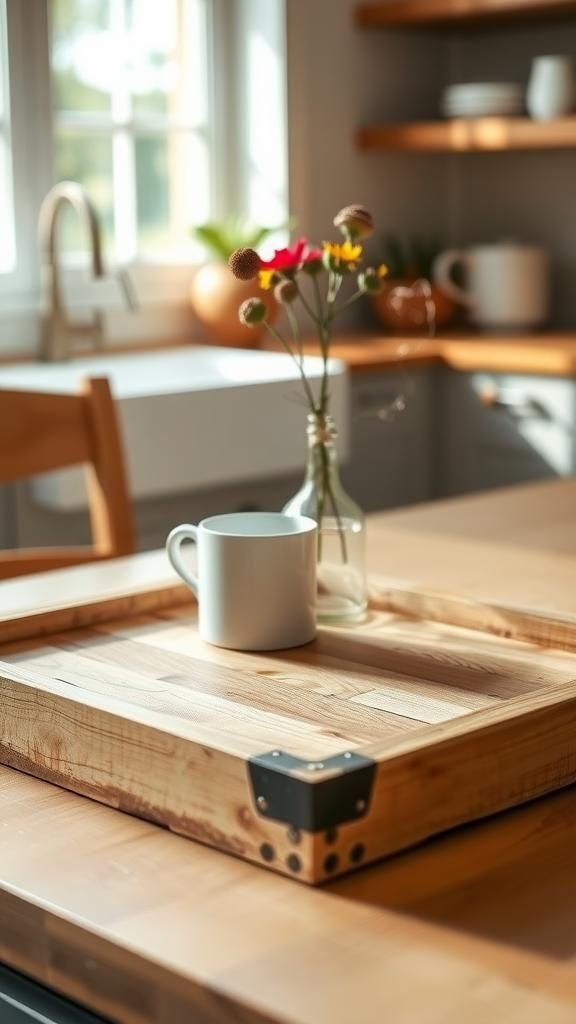
I enjoy the feel of a small tray carrying a teacup and a little vase across the kitchen island. The tray’s shallow lip was shaped from a narrow pallet board, and the wood’s tiny pits and rings added a gentle character.
When set in sunlight, the grain popped into high contrast and the tray looked almost like a small landscape. It held odds and ends neatly without pretending to be perfect, and the warmth under a hand carried a quiet reassurance on lazy afternoons spent between chores and a moment of rest.
Steps
- Choose a flat, even pallet board and trim it to a rectangular tray dimension.
- Cut slightly raised side rails and join them to the tray base with screws from beneath.
- Round the inner corners lightly with sandpaper and wipe away dust with a cloth.
- Finish with a light oil or stain to enrich the wood grain and protect from spills.
Pallet wood candle holder row with cozy glow

A line of small candle wells routed into a narrow pallet board became an evening ritual for me. The glow pooled in the shallow hollows, casting warm circles onto the wood and highlighting grain patterns.
The edges carried a faint charcoal from casual sanding, giving contrast to lighter streaks. I liked how the scent of wax married with the faint woody perfume during quiet nights.
It felt like making a small stage for simple light, and the play of shadow and texture turned ordinary moments softer and slower.
Steps
- Select a narrow pallet board and plan evenly spaced wells for tea lights.
- Rout shallow pockets to accept candle tins and sand the wells smooth.
- Seal the interior of each pocket with heat-safe finish and set candles in place.
- Light candles and enjoy the soft ambient glow, monitoring flame safety at all times.
Compact serving caddy with uplifting handle detail

A little serving caddy carried lemon slices and napkins between kitchen and porch, and it felt pleasantly balanced in the hand. The handle cutout framed fingers with a soft curve where grain runouts met small dents, and the base held a faint pattern left from pallet aging.
When I carried cool drinks across a sunlit yard, the caddy’s modest heft and the scrape of wood against table edges felt grounding. It became an easy way to bring hospitality into short visits and quiet afternoons without much fuss.
Steps
- Choose matching pallet boards for the base and sides and cut them to compact dimensions.
- Create a central handle by cutting a smooth oval and rounding the grip edges.
- Fasten side panels to the base with countersunk screws, ensuring square corners.
- Lightly sand exposed surfaces and apply a protective oil to bring out the grain.
Rustic mirror frame that warms any hallway space
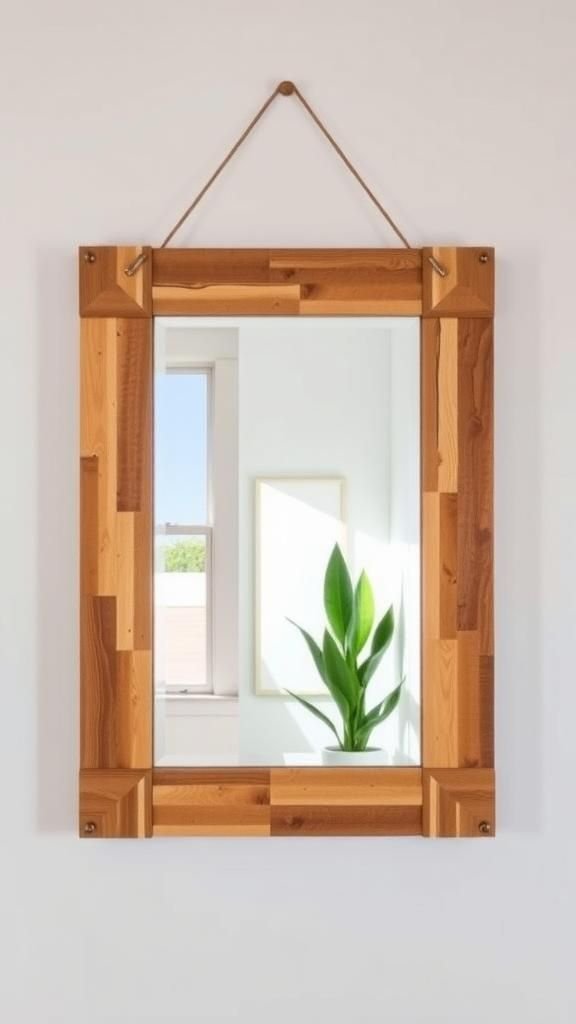
Framing a simple mirror with pallet wood transformed a plain reflective surface into a warm focal point. The frame’s surface offered a tapestry of thin lines and tiny nail divots that caught light differently across its face.
Passing by the hallway, I liked watching the mirror reflect slivers of sky while the frame kept memories of past weather. The tactile roughness invited a quick hand sweep before heading out, and the whole piece read as approachable rather than formal, adding a friendly nod to the daily routine of checking hair and jacket.
Steps
- Select wide pallet planks and trim them to create matching frame sides.
- Mitre the corners and join with screws and wood glue for strength behind the frame.
- Fit the mirror into the rabbeted back and secure with tabs.
- Add hanging hardware and position the mirror at a comfortable height.
Pallet wood dog bed platform with cozy corners

This low platform made from pallet slats became a simple bed base that felt stable under the weightiest sleepers. The gaps between slats allowed airflow and left little impressions from dew when moved outdoors.
The corners showed a gentle rounding from filing, which softened the overall look and made it inviting to nestle into. Placing a thick cushion on top turned it into a loyal nook that matched the house rhythms.
Watching an afternoon nap there, the wood beneath made a soft creak that felt like the house breathing slowly.
Steps
- Select a flat section of pallet bed and trim to the desired platform size.
- Reinforce the underside with cross supports and fasten securely with screws.
- Smooth the top slats to remove rough edges and round the corners slightly.
- Place a comfortable cushion on top and position the bed in a cozy spot.
Pallet wood spice rack with narrow bottle slots

A narrow spice rack cut from thin pallet strips sat above the stove and kept favorite jars handy. Each slot held a tiny tin snugly, and the horizontal grain provided a pleasing backdrop to labels in faded colors.
Steam from cooking darkened the wood a touch over time, which blended into the mellow palette. Reaching for an herb jar felt effortless, as if the rack had learned the rhythm of weekday dinners.
It added a domestic warmth to the kitchen without demanding attention, quietly supporting small rituals of seasoning and tasting.
Steps
- Choose straight pallet slats and measure spacing for spice jars or tins.
- Cut a shallow ledge and back panel and assemble with screws from the underside.
- Create dividers if desired to keep jars from tipping and ensure even spacing.
- Mount the rack at a convenient height near the cooking area.
Hanging pot rack with slatted rustic aesthetic

Transforming a pallet board into a hanging pot rack gave the kitchen a relaxed, lived-in feel. Hooks ran along a dark strip and held a few cast items, their rounded silhouettes punctuating the linear grain.
The wood smelled faintly of smoke from a previous life, which mingled oddly well with the scent of simmering soup. The rack seemed to map the kitchen’s movements, each hanging pot holding memories of dinners past.
It made reaching for a pan simple and added a vertical rhythm above the stove that felt quietly organized.
Steps
- Select a long pallet plank and reinforce its underside with a sturdy brace.
- Install evenly spaced hooks along the face and predrill holes for stronger anchoring.
- Suspend the rack from the ceiling with chain or heavy rope anchored to joists.
- Hang pots and check that the weight distribution is balanced across the suspension points.
Small toy chest with hinged lid and charm

A little chest built from pallet panels held a pile of toy cars and fabric animals, its lid scraping open with a soft, familiar sound. The wood bore playful scratches and faint marker smudges that read like a growing history.
The lid fit with a satisfying edge and the interior smelled faintly of sun-warmed wood. It became a quiet treasure box that encouraged tidying without fuss, and the small dents and scuffs were badges of play rather than flaws.
Closing it over a scattered floor felt like tucking in the small day.
Steps
- Gather pallet boards for sides, base, and lid and trim to desired chest dimensions.
- Join the sides and base with screws and reinforce corners with corner braces.
- Attach the lid with piano hinges and add a simple front catch if desired.
- Smooth the lid edges and optionally apply a light oil to protect the interior.
Desk organizer with cubbies and vintage flair

On my cluttered desk, a pallet organizer with small cubbies took the place of scattered papers and pens. The wood’s thin grooves and small nail marks offered a tactile backdrop to sticky notes and a favorite pen.
Sunlight from the side carved shadows into the cubby depths, making each slot feel like a little shelf of possibility. It gave the workspace an anchored presence that encouraged short pauses and clearer stacks.
Holding pens, business cards, and a few mementos, it turned desktop chaos into a modest, approachable order.
Steps
- Cut small panels from pallet boards for cubby dividers and a back panel for stability.
- Assemble the cubby grid with screws, ensuring square interfaces and even spacing.
- Fasten the cubby assembly to a base board and check for wobble.
- Place on the desk and arrange supplies within the compartments for easy reach.
Pallet wood bike rack for tidy yard storage

A simple bike rack fashioned from a thicker pallet beam kept bicycles upright and off the lawn, creating a small, ordered cluster at the back gate. The slots held tires with a satisfying click and the wood took small scuffs that mapped familiar parking habits.
Rain left tiny darker lines where water pooled for a moment, and the rack aged into a friendly outdoor fixture that welcomed quick rides. Sharing a quiet moment while locking a helmet to a rung, I appreciated the practical comfort of a stable place that didn’t shout its presence.
Steps
- Choose a solid pallet beam and plan wheel slot spacing to fit the bicycle tires.
- Cut vertical slots wide enough to cradle tires and smooth slot edges.
- Secure the beam to a ground board or wall stud with heavy screws or bolts.
- Position bikes into the slots and verify stability under typical load.
Bathroom shelf with towel ledge and soft texture

A small shelf above the sink carved from a pallet board became a home for soaps and a neatly folded towel. The wood’s surface reacted to steam with a slight darkening that felt like it was settling into the room.
The ledge held a hand towel with a corner draped casually, and the smell of cedar-like notes mixed with soap. It brought an approachable warmth to the bathroom and made morning routines feel a touch gentler.
I liked slipping a finger along the edge and feeling the tiny ridges that told a short story.
Steps
- Select a straight pallet board and cut to a compact shelf length suited for a bathroom wall.
- Shape a shallow ledge for towels and smooth any rough areas with fine abrasive paper.
- Attach the shelf to wall studs with sturdy brackets and ensure level alignment.
- Arrange toiletries and hang a towel on the ledge for easy access.