Disclosure: This post contains affiliate links, which means we may earn a commission if you purchase through our links at no extra cost to you.
I still remember the first time a hot glue gun left a glossy, stringy trail across my kitchen table and somehow turned into something charming. There is a playful tension in watching liquid adhesive cool into raised lines and little domes, and that tactile surprise turned a lazy afternoon into a string of creative experiments.
Hot Glue Gun Craft Projects have a hands-on, slightly messy energy that makes them great for quick experiments and small decorative pieces. I enjoy how the finished bits carry fingerprints, tiny bubbles, and that faint warm scent of melted adhesive, which always feels oddly comforting.
Drippy candle holder with textured adhesive shell

I made a candle holder where the hot adhesive pools and hardens into a rippled shell around a glass jar. The surface captures light in a playful way, with glossy ribs catching flickers and casting soft shadows.
The adhesive cooled with tiny trapped air pockets that look like tiny fossils, and there was a faint chemical warmth in the air while working. Holding the finished piece, the tactile ridges feel oddly soothing under the fingertips, and the contrast between the smooth jar and the textured shell makes evening light feel cozier than before.
Steps
- Gather a heat-safe glass jar, a hot glue gun, clear glue sticks, and some protective paper.
- Warm the gun and apply strands of hot adhesive around the jar edge so drips form down the side, varying height and spacing for a natural look.
- Let the adhesive cool fully before moving the jar, then trim stray strings with sharp scissors and sit a candle inside the holder.
- Light the candle only in a safe area and enjoy the soft shadows made by the textured shell.
Faux stained glass panel made from melted glue

I remember tracing a simple floral shape onto clear acetate and filling the lines with molten adhesive to create a stained-glass effect. The edges of the adhesive lines held a slightly raised profile while the interior pools cooled to a slightly cloudy finish that scattered light like thin frosted glass.
Sunlight through the finished piece made soft color reflections when alcohol inks were layered beneath the acetate; there was a sweet, domestic warmth while waiting for each section to solidify. The whole panel felt lightweight yet rigid, and it leaned beautifully against a sunny window.
Steps
- Place a sheet of clear acetate over a floral sketch and outline the pattern with hot adhesive to form lead-like ridges.
- Fill each outlined cell with hot adhesive until level, allowing gentle pooling for a frosted look, and let sections cool between pours.
- Add drops of alcohol ink beneath the cooled adhesive cells to introduce color, then let the panel rest until fully set.
- Hang the finished panel near a window so light filters through the colored cells.
Textured plant pot makeover with molten ridges

A plain terracotta pot became something tactile after I layered adhesive in concentric bands and little pebble clusters. Each cooled ridge had a hard, slightly glassy feel and created shadows that changed as I moved the pot.
There was a faint earthy aroma from the clay mingling with the warm scent of adhesive while I worked. Handling the finished pot felt satisfying because each ridge gave grip and personality, and the cluster areas caught stray soil like miniature valleys.
The overall result felt both rustic and glossy, a contrast I hadn’t expected to enjoy so much.
Steps
- Select a clean terracotta pot and a selection of hot glue sticks, then heat the glue gun.
- Apply concentric rope-like bands of adhesive around the pot body and add clustered mounds for texture, varying thickness for interest.
- Allow the adhesive to cool fully, then gently remove any thin strings and place a plant inside the pot.
- Position the pot where the ridges can catch light and shadow for visual interest.
Geode-style coaster with colored glue pockets

I experimented with circular silicone molds and filled small wells with warmed adhesive, tinting sections with mica powders to mimic crystalline cores. The finished coaster had a glossy central pool surrounded by layered translucent rings that caught the table light, and the mica shimmer shifted with each angle.
There was a satisfying coolness when the piece was picked up, a contrast to the warm-making process. The edges had a slightly irregular, natural look that felt jewel-like resting under a coffee mug.
The tactile weight and glossy sheen made it a surprisingly handsome tabletop companion.
Steps
- Prepare silicone coaster molds and heat a hot glue gun with clear glue sticks.
- Drop small amounts of adhesive into the mold center, adding mica powder for color and creating concentric rings by adding more adhesive around the center.
- Allow each layer to set before adding the next to build depth, then let the entire coaster cure fully.
- Pop the coaster from the mold and buff any rough edges for a smooth finish.
Delicate lace-inspired doily made from adhesive

I once layered loops and tiny connecting strands of hot adhesive on a nonstick surface to create a lace-like doily. The pattern cooled into a supple, slightly flexible web that felt delicate in the hand yet surprisingly sturdy.
Picking it up produced a faint crackle as the adhesive flexed, and the pale amber color caught light like old sugar glass. Laying it beneath a teacup introduced a whimsical contrast between the soft teacup glaze and the glossy, textured doily.
The whole exercise felt a little daring, almost like freezing a warm moment into a decorative relic.
Steps
- Use a silicone baking mat and a hot glue gun to draw interconnected loops and filigree patterns in a circular arrangement.
- Build layers gently to reinforce key connection points, allowing areas to cool slightly before adding adjacent strands.
- Once fully cooled, peel the doily from the mat and allow it to rest so it reaches room temperature.
- Place under a light teacup or frame for display.
Statement pendant necklace with molten sculpture

I made a pendant by pouring adhesive into a small metal bezel and embedding tiny beads while the surface was still tacky. The cured piece had a warm, glassy lens over the beads that magnified their iridescence and trapped flecks of color.
Wearing it felt almost theatrical because it caught light differently as I moved, and the slight weight against the collarbone was comforting. The edges of the bezel held a faint residue where adhesive bubbled and cooled, which I found charming rather than flawed.
It became a quiet conversation starter when friends noticed the unusual texture.
Steps
- Set a small jewelry bezel on a heat-safe surface and heat a hot glue gun.
- Fill the bezel with adhesive, drop in tiny beads or mica flakes while still tacky, and smooth the surface lightly.
- Let the pendant cool completely before removing any overflow and attaching a jump ring and chain.
- Wear the pendant and enjoy how light interacts with the embedded elements.
Quick decorative magnets with glossy focal blobs
I played with small silicone molds and dollops of hot adhesive to create glossy blobs that served as tiny tableaux for miniature objects. Each magnet had a shiny domed surface that pressed small charms just beneath the glassy dome and held a faint, warm shine.
The little pieces felt like polished pebbles and made a cheerful clinking sound when the fridge door shut. I enjoyed the way these toothy little shapes contrasted with the cold metal surface, and how they brightened a cluttered refrigerator with small, tactile accents.
Steps
- Place small decorative charms in silicone molds and heat a hot glue gun.
- Pour adhesive over the charms to form a domed surface and allow the pieces to cool fully.
- Remove the domed blobs from molds and affix small round magnets to the backs with more adhesive.
- Arrange the magnets on a metal surface and enjoy the visual pop.
Rustic picture frame with raised adhesive ornament
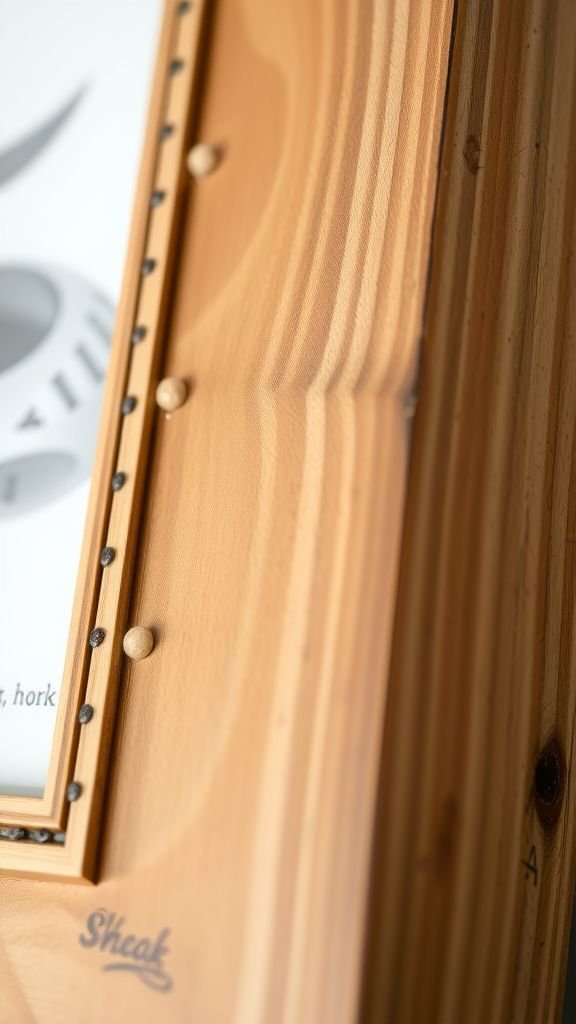
A plain wooden frame was revived by tracing scalloped ridges and ornamental flourishes with hot adhesive along the inner edge. The cooled lines had a tactile, almost carved look that contrasted with the wood grain, and paint was later added to highlight the raised pattern.
Scuffing the high points yielded a charming worn quality. The process left a faint scent of warmed resin in the room and a sense of quiet craft time.
Holding the finished frame felt like holding a small heirloom; the added texture made the photograph inside feel like a contained memory.
Steps
- Select a wooden picture frame and heat a hot glue gun with appropriate glue sticks.
- Pipe ornamental ridges and flourishes along the inner frame edge, varying line thickness for depth.
- Allow the adhesive to cool completely, then apply paint or patina to emphasize raised areas.
- Let finishes dry before inserting the photo and hanging the frame.
Whimsical bookmarks with engraved adhesive accents
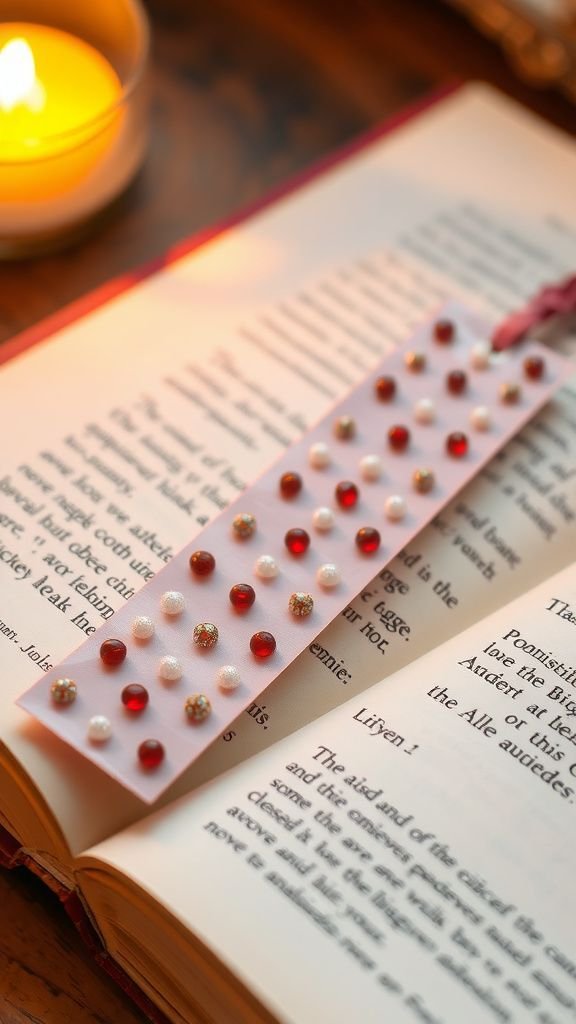
I experimented with long strips of adhesive molded into sinuous lines and tiny embedded beads to make bookmarks that felt sculptural. The cooled strips had glossy ridges that caught the edge of a page and left a slight, pleasant bump when flipping through a book.
Holding one between chapters felt oddly satisfying; the smooth warmth of the adhesive contrasted nicely with paper. Each bookmark carried a faint amber glow and a slight weight at the tassel end where decorative elements were set, making reading pauses feel ritualistic and unexpectedly luxe for a homemade piece.
Steps
- Lay strips of parchment paper on a flat surface and heat a hot glue gun.
- Create long decorative bands of adhesive, embedding tiny beads near one end for weight and interest.
- Let the strips cool fully, then peel them from the parchment and trim any stray edges.
- Add a ribbon or tassel through a small hole and use the bookmark in a favorite book.
Miniature cityscape with glossy adhesive silhouettes

I sketched a skyline and then built tiny adhesive silhouettes on a dark backing to create a miniature cityscape. The glossy adhesive edges reflected point lights placed behind the piece, and the skyline cast crisp layered shadows that added depth.
The surface held tiny ridges and occasional trapped bubbles that gave the work character, like weathering on an old map. Late-night work on this piece felt cinematic; the sizzle of molten adhesive and the quiet ticking of cooling forms made the whole process meditative.
Displaying it against a lit backdrop turned the tiny buildings into something cinematic.
Steps
- Draw a skyline silhouette on sturdy black cardstock and heat a hot glue gun.
- Pipe adhesive along the drawn lines to build raised silhouettes and allow each section to set.
- Mount the cooled adhesive skyline onto a backing with small supports, and place soft LED lights behind for backlighting.
- Position the scene on a shelf so the layered shadows create depth.
Faux leather wallet embellishment using hot glue
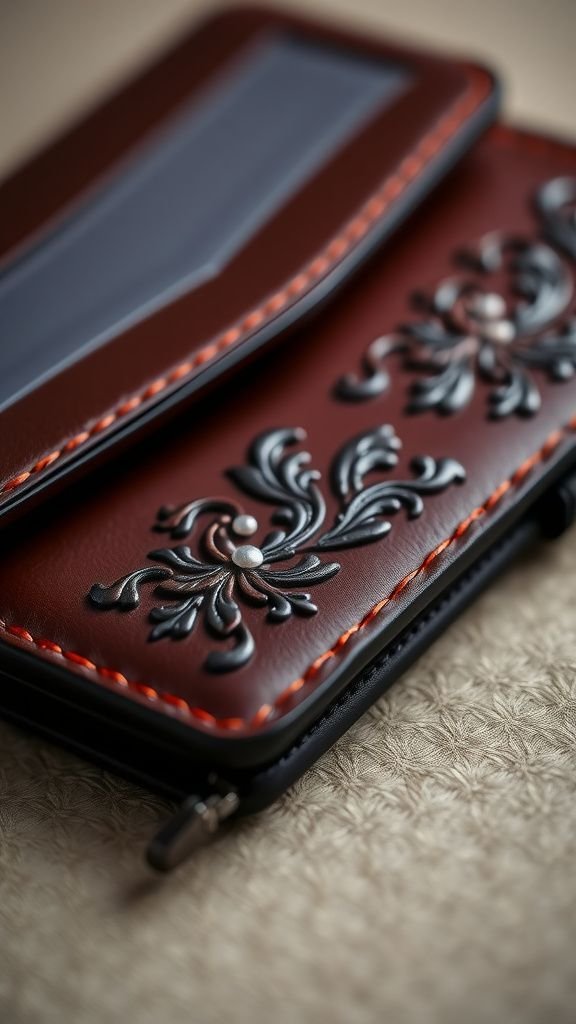
I added adhesive filigree to a plain faux leather wallet, building raised motifs that looked like pressed ornamentation. The cooled adhesive had a hard gloss that contrasted with the soft matte of the faux leather, and running a fingertip across the pattern produced a satisfying tactile click.
The scent in the room while working was warm and domestic, and the small raised elements made the wallet feel tailored and personal. It became a pocket-sized piece of craft that collected the faint scuffs of daily use, which only deepened its character over time.
Steps
- Place a faux leather wallet on a protected surface and heat a hot glue gun.
- Pipe decorative filigree patterns onto the exterior, varying thickness to create dimensional motifs.
- Allow the adhesive to set fully, then gently smooth any rough edges with fine sandpaper if needed.
- Carry the wallet and enjoy the tactile ornamentation that develops a patina with use.
Holiday ornament collection with sparkling glue cores

I created ornaments by layering adhesive into round molds and adding glitter or tiny sequins before the surface set. The finished baubles had a candy-like gloss and a faint sparkle that twinkled under tree lights.
Each piece felt pleasantly cool and smooth, with little imperfections that made them feel handcrafted rather than mass-produced. There was a festive sound when ornaments clicked together in a box, and unwrapping them each year brought a warm nostalgia.
Hanging them on the tree turned simple light into playful points of shine that felt joyful in a low-key way.
Steps
- Prepare round silicone molds and heat a hot glue gun with clear glue sticks.
- Pour adhesive into the molds, sprinkle in glitter or sequins while the surface is tacky, and let them cool.
- Remove the hardened ornaments from molds and attach ornament hooks using more adhesive if necessary.
- Hang ornaments on the tree and enjoy how they catch the lights.
Textured coatrack with adhesive pebble accents
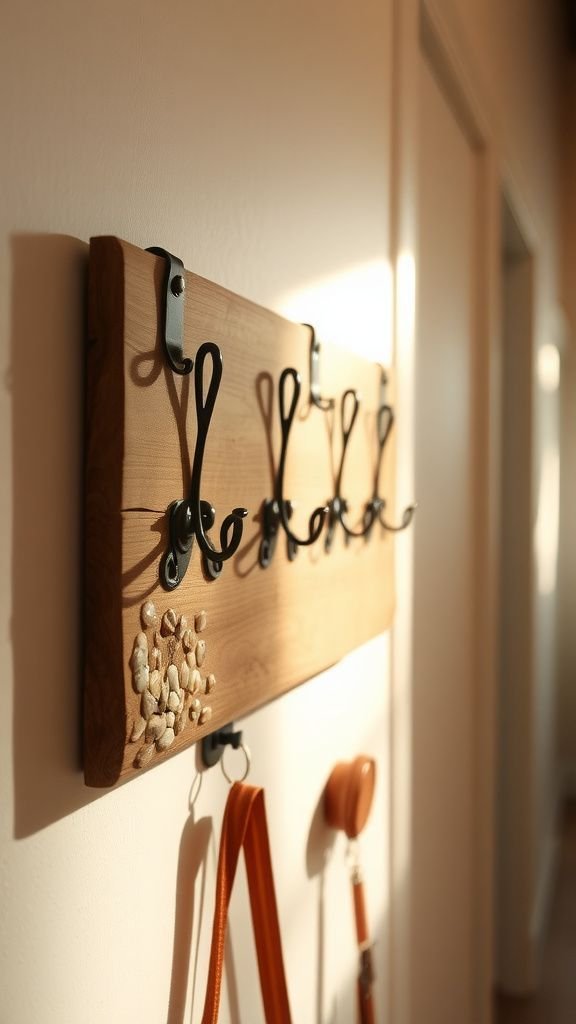
A simple wooden plank took on personality when I added adhesive pebble clusters where hooks would be mounted. The pebbles hardened into glossy nodules that felt substantial under a hand while hanging coats.
The finish caught the hallway light and hid small scratches from regular use, and the slight unevenness of the clusters felt friendly rather than rigid. There was a small, satisfying thud when a jacket met the rack, and the rippled adhesive surfaces caught dust in a way that made the piece look lived-in.
It turned an entryway into a tactile welcome spot.
Steps
- Select a wooden plank and sand lightly, then plan hook spacing before heating the hot glue gun.
- Create adhesive pebble clusters at each planned hook location to act as decorative bases, allowing them to cool fully.
- Drill or screw in coat hooks through the adhesive bases into the wood for added stability.
- Mount the rack on the wall and test with light garments.
Custom phone stand with molded adhesive cradle
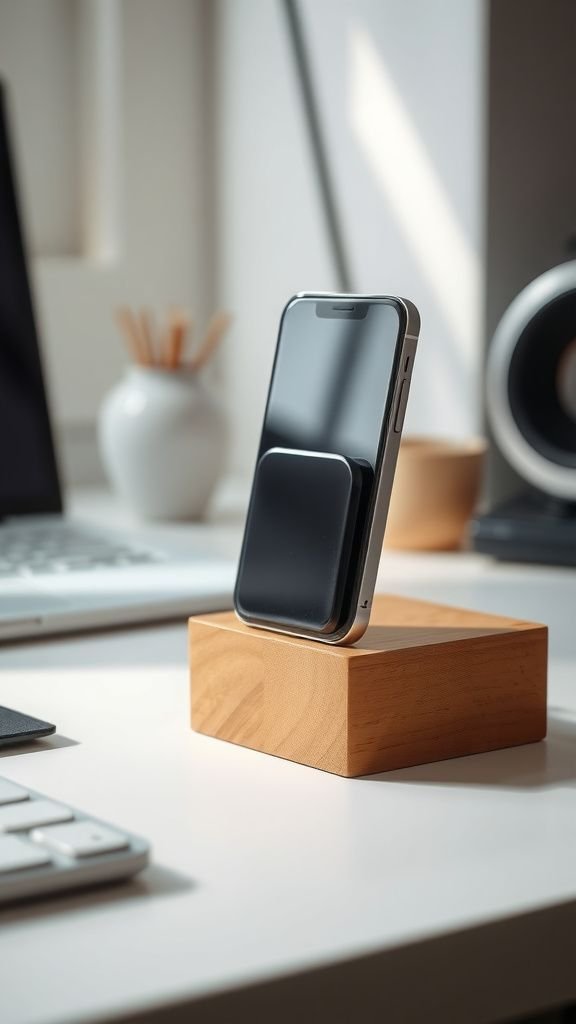
I made a compact phone stand by building a curved adhesive cradle on a small wooden block. The adhesive cooled into a smooth, glossy surface that clung to the phone without slipping, and the angle that resulted felt surprisingly comfortable for quick video checks.
The piece had a faint amber tone and a tiny weight that kept it stable on the desk. There was a small, domestic satisfaction in setting the phone down and hearing the soft click as it settled into the adhesive curve.
It turned a cluttered workspace into a little organized nook.
Steps
- Choose a small wooden block as the base and heat a hot glue gun.
- Build a curved adhesive cradle on the block, layering glue to achieve a gentle angle suitable for holding a phone.
- Allow the adhesive to cool completely, then test the fit with a phone and adjust by adding small amounts of adhesive if needed.
- Place the stand on a desk and use it for video calls or quick viewing.
Whimsical wall hooks with crystal-like adhesive knobs

I experimented with hot adhesive to form crystal-like knobs that were mounted onto small wooden pegs. The knobs had angular facets and trapped tiny bubbles that glittered under light, resembling polished rock crystals.
Each knob felt pleasantly cool and offered a tactile hook for light scarves or keys. There was a satisfying heft when picking up one of the knobs, and the whole set looked like a small collection of found objects mounted on the wall.
The result brought a playful geology lesson to a hallway without the need for actual minerals.
Steps
- Create crystal-like knobs by pouring adhesive into small molds, letting facets form as the glue cools.
- Affix the cured knobs onto wooden pegs or dowels with additional adhesive and allow to set.
- Mount the pegs on a board or directly to the wall with screws or anchors for support.
- Hang lightweight items like scarves or keys on the finished knobs.
Embossed greeting card with raised glue motifs

A stack of plain cards turned festive after piping adhesive into floral and script motifs on the front panels. The raised designs cooled into glossy accents that felt like tiny sculptures against matte paper.
I noticed how inked pens slid differently over the raised areas, and the slight resistance when pressing the card added a pleasing tactile element. The warm room aroma while working made the project feel like a cozy afternoon ritual.
Each card felt personal, and recipients often commented on the unusual texture, which made mailing a handwritten note feel special once again.
Steps
- Fold high-quality cardstock into cards and prepare a hot glue gun for fine piping.
- Pipe raised motifs such as florals or words onto the card fronts, keeping lines steady for clear shapes.
- Allow the adhesive to cool fully, then lightly add watercolor or ink washes if desired.
- Write your message and send the cards with care.
Mini terrarium accents with glossy adhesive stones

Tiny adhesive stones created in silicone molds became miniature landscape accents within a glass terrarium. The tiny pieces had a glossy finish and caught the terrarium lamp light like wet pebbles, enhancing the little plant world.
Handling the glass bowl with the tiny glossy stones inside felt like tending a small island; the adhesive shapes added a sense of scale and playfulness. There was a small, private thrill in arranging them among moss and miniature houses, and the reflective surfaces made the whole terrarium feel a touch more magical on cloudy days.
Steps
- Create small adhesive pebbles using silicone molds and a hot glue gun, allowing each to cool completely.
- Arrange the finished pebbles inside a clean glass terrarium among moss, small plants, and miniature accessories.
- Adjust placement until the miniature landscape feels balanced, then seal the terrarium lid if applicable.
- Place the terrarium in indirect light and enjoy the tiny reflective accents.
Modern art wall piece with layered glue textures

I built a rectangular panel with layered adhesive ribbons and small beads to make a tactile modern art piece. The surface had repeated glossy bands interrupted by matte voids where air had caught, giving a rhythm to the composition.
Observing it from different angles revealed subtle color shifts and shadow play, and the piece had a faint, warm aroma from the creation session. Cleaning the panel was easy because the raised bands repelled dust, and the overall presence felt sculptural without being imposing—an approachable piece that animated a quiet wall.
Steps
- Prime a wooden panel and plan the rhythmic layout for adhesive ribbons before heating the glue gun.
- Pipe layered adhesive bands across the panel, adding beads or mica flakes in places for texture.
- Allow each layer to set sufficiently before adding adjacent bands to prevent collapse.
- Once fully cured, mount the panel on the wall and adjust lighting to highlight the textures.
Key fob charm with embedded colorful elements
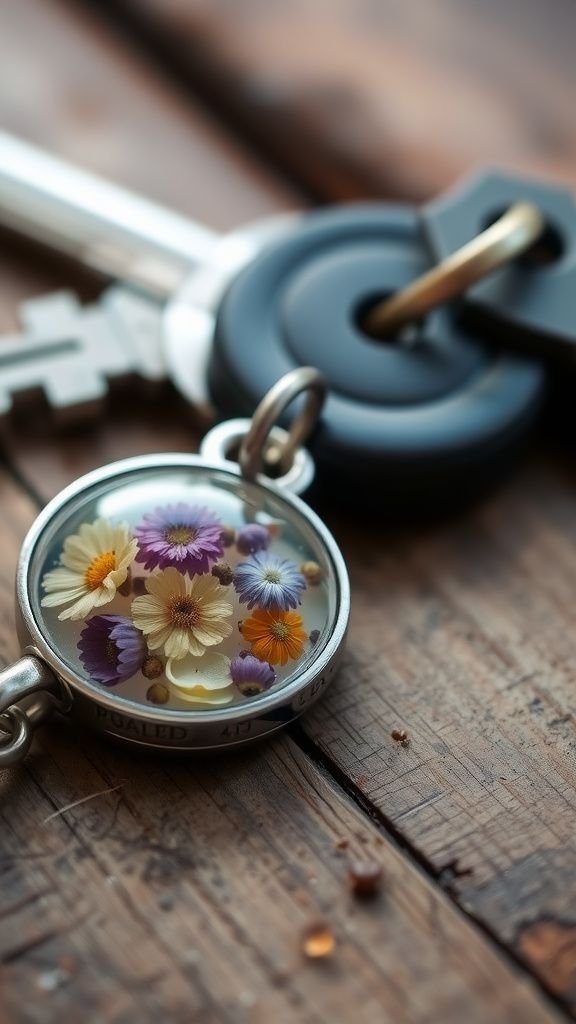
A small oval charm made from adhesive served as a home for tiny pressed flowers and confetti. The clear dome over the inclusions magnified them gently, and the charm clicked pleasantly against keys when carried.
Each tiny bubble and fleck of color felt like a memory frozen in resin-like gloss, and the charm developed faint scuffs that made it feel lived-in. Reaching for keys became a little ritual because the charm was tactile and warm after pockets, and friends often paused to look more closely at the tiny scenes trapped beneath the glassy surface.
Steps
- Use a small oval mold and heat a hot glue gun to create a clear charm base.
- Place tiny pressed flowers or colorful confetti into the mold and pour adhesive over them to form a dome.
- Allow the charm to cool completely, then attach a metal key fob ring to finish.
- Carry the charm on a keyring and enjoy the miniature scene.
Sculptural tabletop bowl with organic glue waves

I formed a small bowl using layered adhesive waves inside a shallow mold, creating a rippled interior that felt like miniature ocean swells. The bowl had a glossy interior that reflected light in soft pools and a slightly matte exterior where thin skin formed.
Placing small trinkets inside produced delightful contrasts between metal and glassy adhesive, and the whole piece felt like a little found treasure. Lifting it produced a faint clicking sound from the ridged interior, and its tactile curves begged to be cradled gently in both hands during quiet moments.
Steps
- Choose a shallow mold and heat a hot glue gun, preparing to layer adhesive for structure.
- Pour and layer adhesive waves inside the mold to build up the bowl shape, allowing layers to cool intermittently.
- Once the bowl is sturdy and fully cooled, remove it from the mold and smooth any rough edges.
- Use the bowl to hold trinkets or display on a tabletop.
Personalized desk nameplate with raised letters

I crafted a small nameplate by piping raised adhesive letters on a painted wooden base, creating a sleek, glossy type that popped from the muted background. The tactile letters were smooth and glossy, and tapping them made a small hollow sound that felt oddly satisfying.
The coolness of the letters against a warm palm when picking up a pen was a tiny sensory pleasure, and the contrast between matte paint and shiny typography gave the desk a polished, handmade touch. Visitors often ran a finger over the letters, commenting on how the texture made the name feel more present.
Steps
- Paint a small wooden strip for the base and let it dry completely before starting.
- Heat a hot glue gun and pipe raised letters slowly to spell a name, building up thickness for clarity.
- Allow the letters to cool fully, then seal lightly with a clear finish if desired.
- Place the nameplate on a desk as a personalized accent.