Disclosure: This post contains affiliate links, which means we may earn a commission if you purchase through our links at no extra cost to you.
I have a soft spot for the clack of beads and the whisper of feathers after an afternoon spent at a parade. Making Mardi Gras Mask and Bead Crafts has always been a way for me to keep that carnival energy at home, with small bursts of color and texture scattered around the house.
These projects are the sort that let me sit with a cup of coffee and tinker without pressure.
From glitter-shadowed eye pieces to chunky bead garlands, Mardi Gras Mask and Bead Crafts bring a bit of street music and confetti to the living room, and I love how each piece tells a short, bright story.
Feathered classic mask with velvet highlights

This mask sits on the table like a small parade float, feathers fanning out in purple, green, and gold. The velvet trim feels plush under fingertips and the beads threaded along the edge catch late-afternoon light like tiny coins.
I remember running my palm across the feathers and smiling at how the colors sang together. The interplay between the soft pile of velvet and the airy lift of plumes creates a rich contrast that feels festive without shouting.
It feels like a comfortable secret from a night of confetti and brass.
Steps
- Choose a sturdy mask base and lay it flat on a protected surface.
- Arrange feathers along the upper edge and secure them with quick drying adhesive.
- Trim velvet trim to fit the mask contour and affix it along the edge for a soft border.
- String beads on thin cord and glue them along the trim to create a shimmering outline.
- Allow everything to set fully before gently fluffing feathers for a finished look.
Glitter eye mask with layered bead fringe
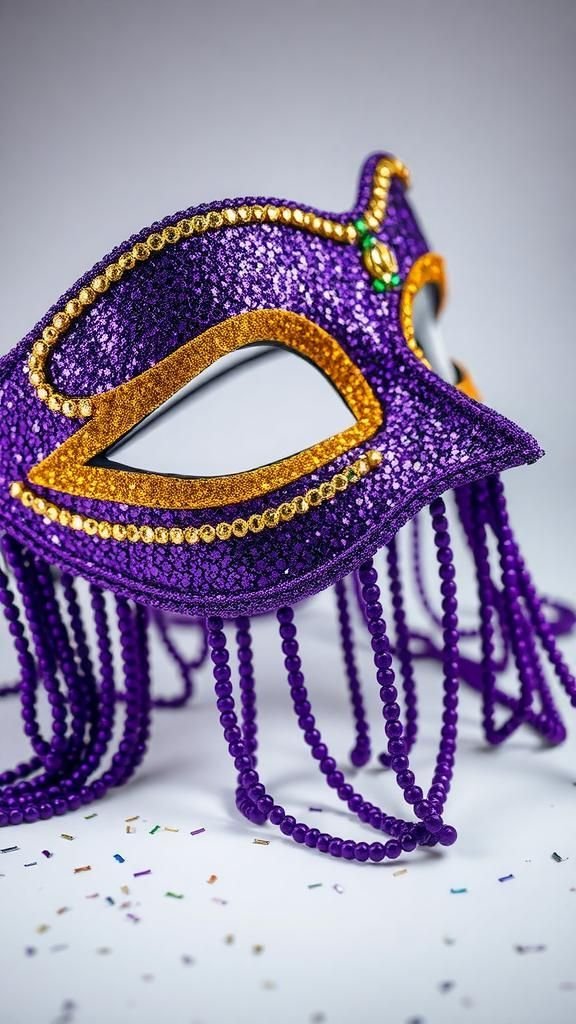
The surface sparkles like a nighttime river when light hits the glittered face of this mask. Delicate fringe made from slender bead strands brushes the cheekbones and adds a playful rhythm with every tilt.
I loved the small sound the beads made when they swayed, a tiny percussion that felt oddly comforting. The glitter creates a textured sheen that plays with shadow while the fringe adds movement, so the mask never feels still.
It rests like a secret smile, bright and slightly mischievous, ready for a doorstep photo or a table centerpiece.
Steps
- Lay a plain eye mask face down and apply a smooth layer of craft adhesive to the front.
- Sprinkle fine glitter over the adhesive, tapping off excess once covered.
- Cut lengths of beading wire and thread glass beads to form multiple fringe strands.
- Secure the tops of the bead strands to the lower edge of the mask using adhesive.
- Let all components cure fully and gently test the fringe movement.
Paper-mache mask with hand-painted motifs
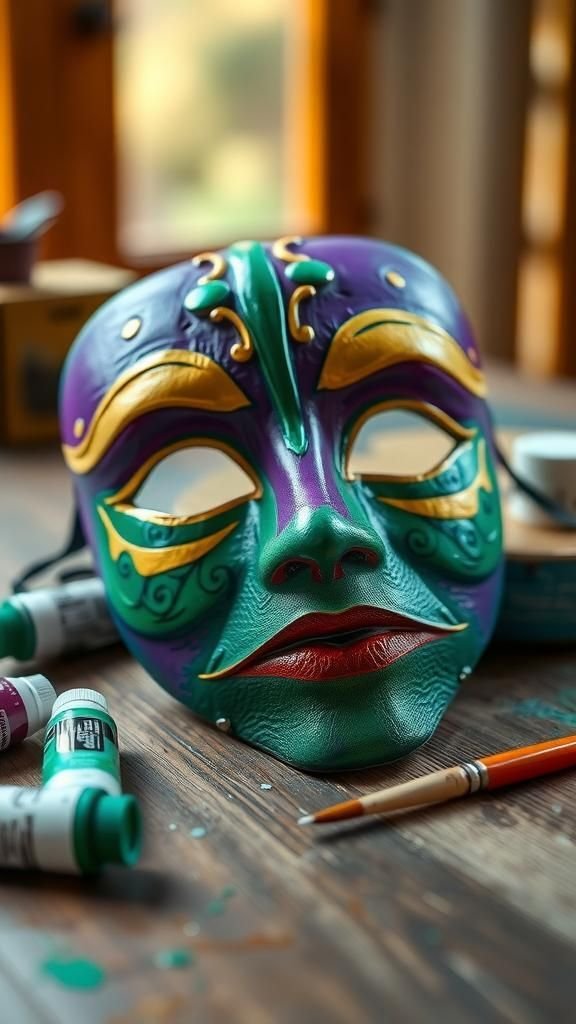
This paper-mache mask carries the little fingerprints of its maker across a curved surface, the faint bumps and ridges telling a quiet making story. Hand-painted flourishes twist across the cheeks in jewel tones, the brushstrokes lending a human heartbeat to the design.
There is a faint smell of paper and paint that always takes me back to afternoons in a sunlit kitchen. The paint sits in thin layers, sometimes pooling and drying with a tiny ridge that gleams under light.
It feels like a piece that aged nicely overnight into something wearable and slightly theatrical.
Steps
- Inflate a small balloon to mask size and layer paper-mache strips dipped in paste until the desired thickness is achieved.
- Allow the paper-mache shell to dry fully and then gently pop the balloon and remove it from the inside.
- Sand any rough edges lightly and apply a base coat of acrylic paint across the surface.
- Paint decorative motifs using fine brushes and jewel-tone paints, adding highlights and shadows for depth.
- Seal the painted surface with a matte or satin sealer and add ribbon ties to finish.
Bead chandelier from reclaimed necklaces
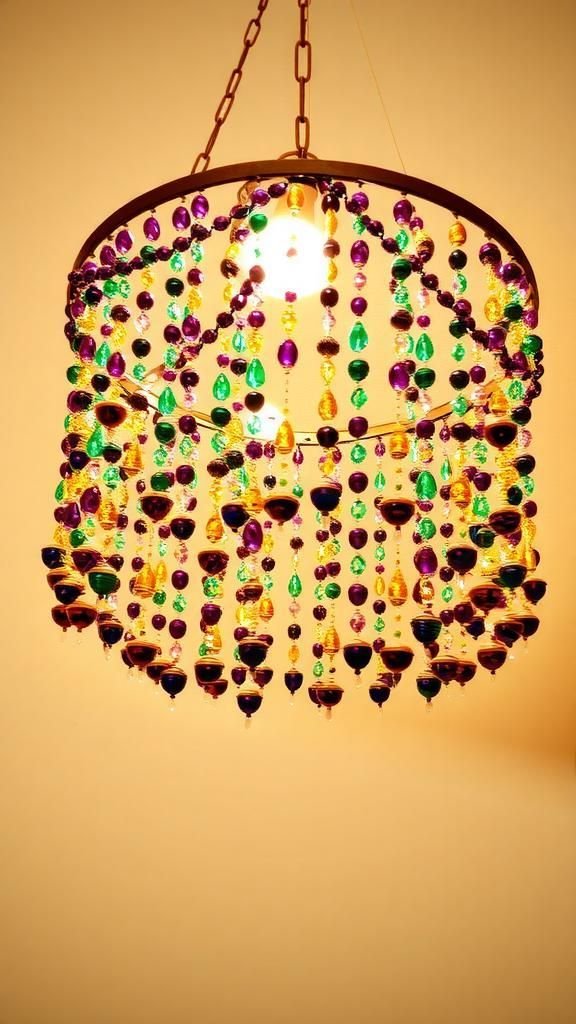
Strands of old beads hang like a mini city of lights when this chandelier sways. Each necklace has its own rhythm and tone, clinking softly against neighbor strings.
The reclaimed nature gives it character; some beads are glass, others are plastic with tiny surface scuffs that catch light in different ways. I remember sorting through a basket of tangled strands and feeling a quiet excitement as new patterns emerged.
When lit from above, the colors spill onto nearby walls, creating playful reflections that feel like a small indoor parade.
Steps
- Select a sturdy hoop or ring as the chandelier base and gather assorted bead necklaces for visual interest.
- Cut each necklace from its clasp if needed and arrange lengths around the hoop to achieve balanced coverage.
- Attach each strand to the hoop with strong thread or thin wire, spacing them for an even curtain effect.
- Hang the hoop from a secure ceiling hook and add a central light or LED puck above for illumination.
- Adjust strand lengths and spacing until the light reflects through beads in pleasing patterns.
Mini mask garland for mantel or window
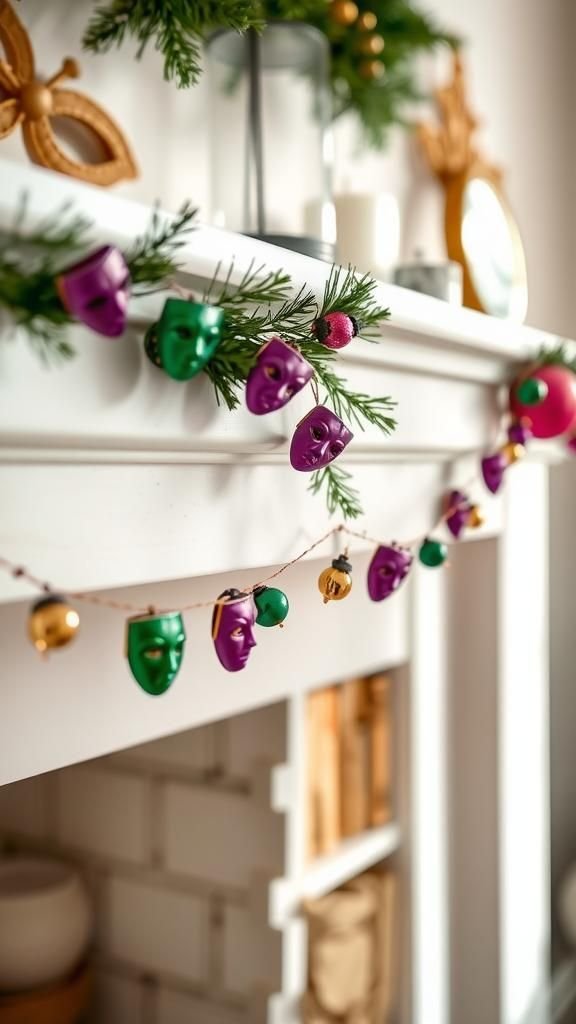
Tiny masks strung together make a playful garland that bounces gently when a draft passes. Each mini piece has its own little personality, some feathered, others glittered, and a few with a single bead dangle.
I enjoy how they give a mantel a steady wink, small faces that seem to gossip when the blinds rattle. The garland threads across the room in a casual arc, color punctuating neutral shelves.
It has a homemade charm, like a row of paper dolls grown up for a night of music and beignets.
Steps
- Gather small mask bases and decorate each with feathers, glitter, beads, and trims according to personal taste.
- Measure a length of sturdy cord and lay out where each mini mask will sit to ensure even spacing.
- Secure the backside of each mini mask to the cord with adhesive or by tying thin ribbon loops.
- Add loops at each garland end for hanging and gently drape across a mantel or window frame.
- Step back and tweak spacing or decorations until the garland presents a balanced flow.
Bead-wrapped candle holders with carnival glow

Beads wrapped around a glass jar create a warm, flickering collar when a candle glows inside. The light sifts through the gaps and picks out tiny imperfections in old glass, giving the whole piece a lived-in warmth.
I like the slight rattle when the table is nudged and how the bead pattern reads differently from across the room versus up close. The texture invites touch, and the color palette can lean playful or restrained.
It makes an ordinary candle feel like a memory from a summer street fair held under strings of lights.
Steps
- Clean a clear glass jar and select bead strands that complement each other in color and size.
- Apply a thin band of adhesive around the jar where beads will sit to anchor the first rows.
- Wrap bead strands around the jar, pressing gently into the adhesive and trimming excess ends.
- Allow the adhesive to set fully before placing a tea light inside, using a battery-powered candle for safety if preferred.
- Place the holder on a reflective surface to amplify the candle glow through the beads.
Mask-in-a-frame shadow box display idea
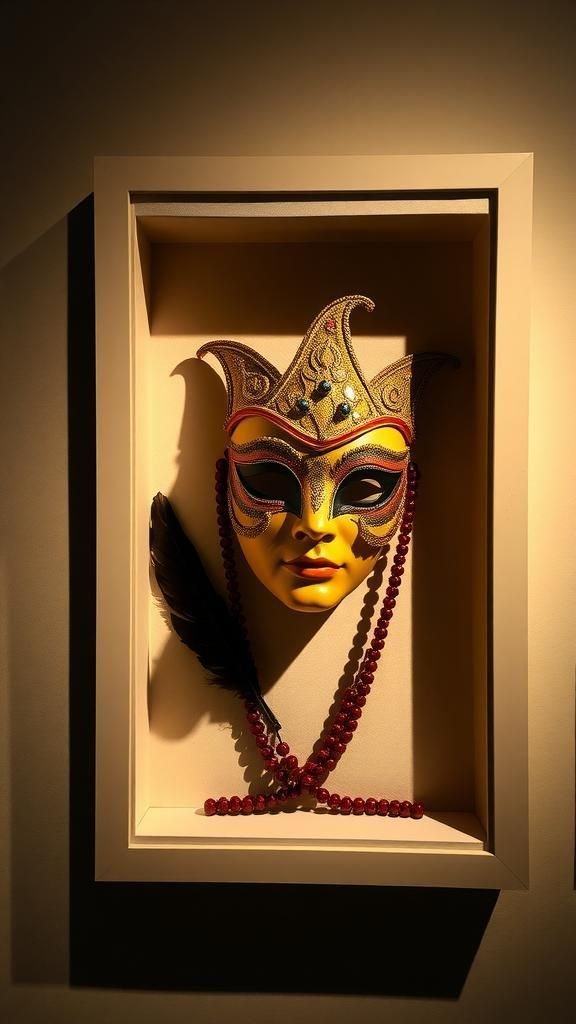
A shadow box gives a single mask the room to breathe, turning it into a little shrine of color. The mask sits slightly away from the glass, casting a soft shadow that moves with the room light.
I often press a small bead cluster into the corner of the box, a tiny relic that hints at the story behind the piece. The boxed display makes the mask feel curated, like a snapshot of a night that can be revisited.
It brings texture to a wall and invites a closer look from anyone passing by.
Steps
- Select a shadow box slightly deeper than the mask thickness and choose a backing material that complements the mask colors.
- Mount the mask to the backing with secure fasteners or adhesive so it sits off the backing surface for shadow depth.
- Add small embellishments inside the box, such as loose beads or a feather tucked into a corner for added interest.
- Close and seal the shadow box, then hang it on the wall at eye level for best viewing.
- Rotate or reposition the box lighting to create appealing shadows that highlight the mask contours.
Beaded headband that whispers parade rhythm

A headband threaded with beads sits light on the brow, catching every tilt of the head. The tiny clinks are discreet, more like a remembered refrain than a loud melody.
I remember wearing a similar piece and feeling like part of a walking vignette; strangers would smile as if they recognized a shared memory. The beads warm against skin in sunlight and look cool under evening bulbs.
The balance between sparkle and weight makes it comfortable and confident, a piece that complements a laugh or a quiet conversation.
Steps
- Select a plain metal or fabric headband as the base and pick bead types that balance in weight and color.
- Thread beads onto fine wire in short segments and wrap these segments around the headband, securing ends neatly.
- Space the beaded segments to allow the headband to flex comfortably and to highlight focal clusters.
- Tuck or cover any rough wire ends with small ribbon or felt strips for comfort.
- Try the headband on and adjust bead placement to ensure even visual flow and balance.
Bead tassel earrings for playful flair
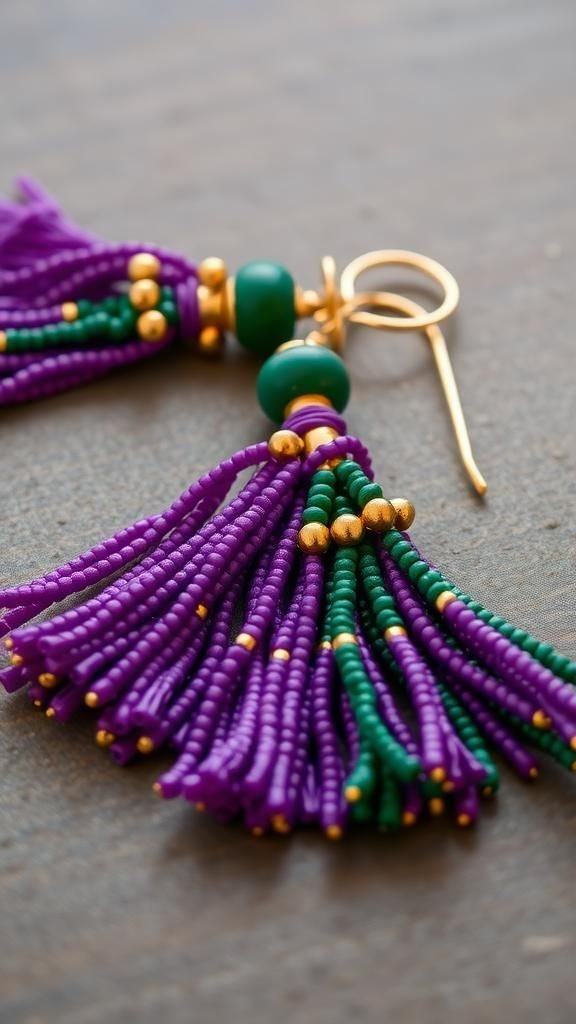
Tassel earrings made from tiny beads sway with movement and fluoresce in parade light. They have a delicate weight that feels nice against the neck and an audible whisper when I turn my head.
The bead strands catch sun and streetlamp alike, throwing tiny highlights across cheekbones. I like how they add a note of fun without demanding attention; they are conversation starters that nod to color and rhythm.
Hanging from small hoops, they feel both casual and celebratory, perfect for an evening where music spills into the night.
Steps
- Cut several lengths of beading thread and knot one end to form neat tassel tops.
- String beads onto each thread length until the desired tassel fullness is reached and tie off the ends.
- Gather the beaded threads and secure the tops together with thread or a small metal cap.
- Attach the assembled tassel to an earring hook or hoop with a jump ring.
- Repeat to create a matching pair and lightly press tassels into shape if needed.
Mask brooches for lapels and bags

A tiny mask pinned to a jacket lapel feels like a wink you can wear all day. These brooches are often compact, with a focused splash of beads or a single feather plume.
I have a memory of tacking one to an old denim jacket and feeling instantly lighter, like I carried a sliver of the parade with me. The brooches invite touch; people often pause to point them out.
They fit into pockets and corners, small enough to hide yet bold enough to be noticed, a neat little declaration of festival spirit.
Steps
- Trim a small mask base to a compact size suitable for a brooch and decorate with beads, paint, or miniature feathers.
- Glue a brooch pin to the backside, ensuring a strong bond and centered placement for balance.
- Allow the adhesive to set thoroughly and test the pin on a scrap of fabric to confirm hold.
- Optionally add a protective felt backing to shield clothing and cover adhesive.
- Wear pinned to jackets, bags, or hats and adjust placement for best visual effect.
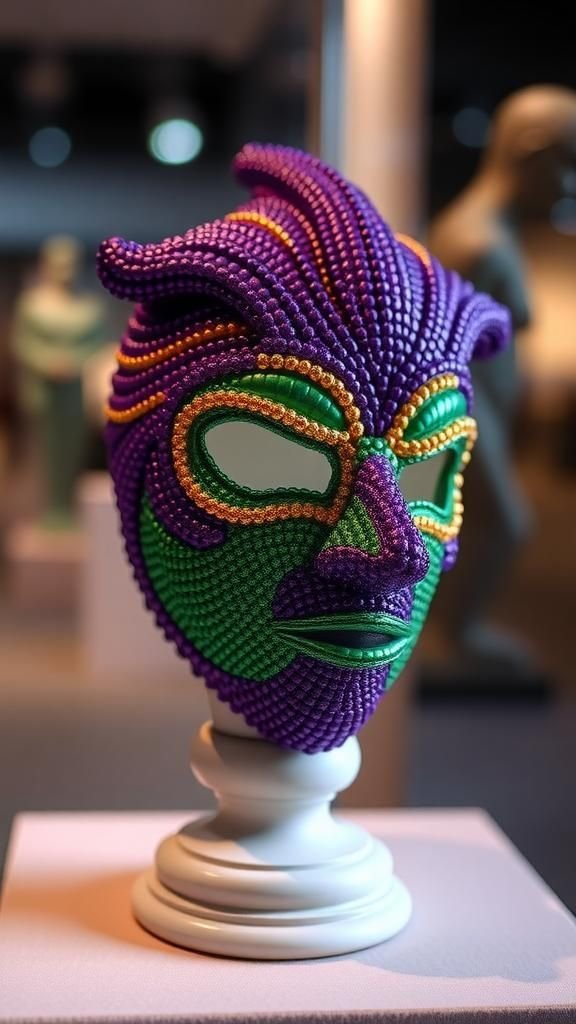
Bead mosaic mask with textured surface detail
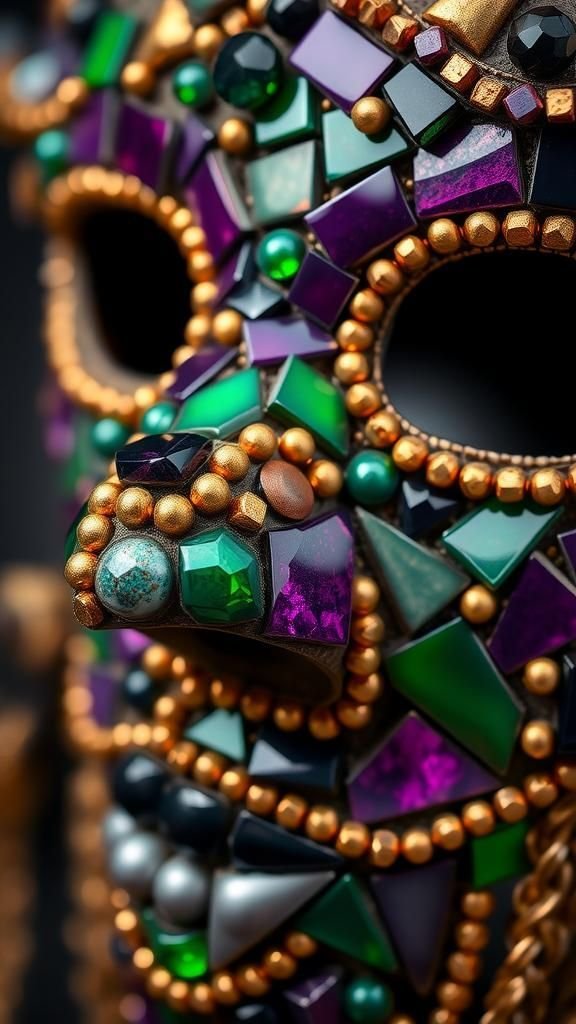
A mosaic mask assembled from cut beads and cabochons reads like a tiny tiled map across the face. Each small piece contributes a gleam or a matte pocket that makes the surface feel intentional and layered.
I enjoy how the light plays differently across glass shards and flat-backed gems, creating a patchwork of reflections. The tactile surface invites fingertips to trace patterns without a need for explanation.
It sits like a relic on a shelf, every tile holding a small memory of where the bead came from and how it found its place.
Steps
- Sketch a pattern on a mask base to guide mosaic placement and select beads, cabochons, and flat-backed gems for texture.
- Apply a strong adhesive to small areas and press beads into place according to the sketched design.
- Work around the mask, allowing sections to dry so pieces stay secure, and fill gaps with smaller beads for cohesion.
- Once all tiles are set, apply a grout or clear finish between pieces to unify the surface if desired.
- Clean any residue from gems and polish the mask for a finished sheen.
Wreath of beads for a front-door welcome
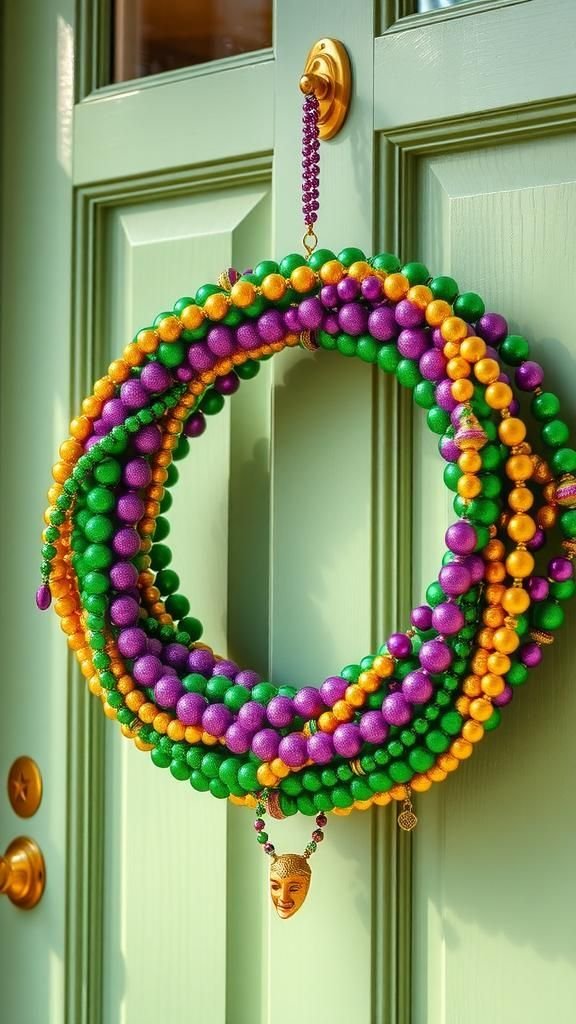
A bead wreath hangs on the door like a permanent invitation to festivity, a circular chorus of color. When I walk past it, the sunlight bounces off strands in a gentle stutter that feels cheerful.
The mix of bead sizes gives the wreath depth, while occasional dangling charms add a playful heartbeat. It makes even a simple entryway feel ready for an evening of music.
I often imagine strangers smiling when they see it, a small town gesture that says the house holds good stories and a comfortable seat for visitors.
Steps
- Select a foam or wire wreath base and sort bead strands into color groups for a balanced arrangement.
- Secure the start of a bead strand to the base and wrap it around, layering strands to achieve desired fullness.
- Add charms or small mask ornaments intermittently to create focal points within the wreath.
- Attach a sturdy ribbon loop for hanging and trim any loose ends for a tidy appearance.
- Hang on the door and adjust placement until the composition feels visually pleasing from the sidewalk.
Sewn fabric mask with sequined accents
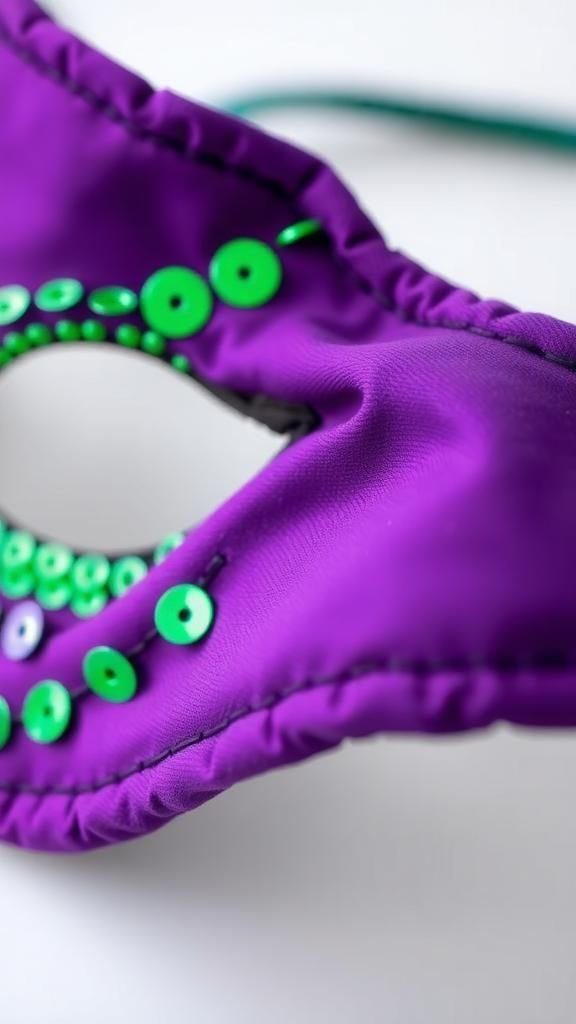
A fabric mask with sequins has a supple warmth compared to stiff bases, and it folds into a pocket easily. The sequined accents catch light in a soft, dancing way, never too loud but always present.
I like how the cloth breathes and how seams create subtle lines that follow facial curves. Wearing or displaying one feels domestic in a good way, like something made on a rainy afternoon with a radio playing in the background.
The fabric edges soften the silhouette and make the whole piece feel quietly wearable.
Steps
- Cut two fabric pieces in a mask pattern and sew them together with right sides facing for a neat edge.
- Flip the sewn mask right side out and press seams gently so the mask sits smoothly.
- Hand-stitch sequined accents along the upper edges or around the eye openings for sparkle.
- Add soft ties or elastic loops at the sides for wearing comfort or display purposes.
- Try the mask on a mannequin or hang it to check silhouette and sequin placement.
Bead-embellished clutch for evening strolls
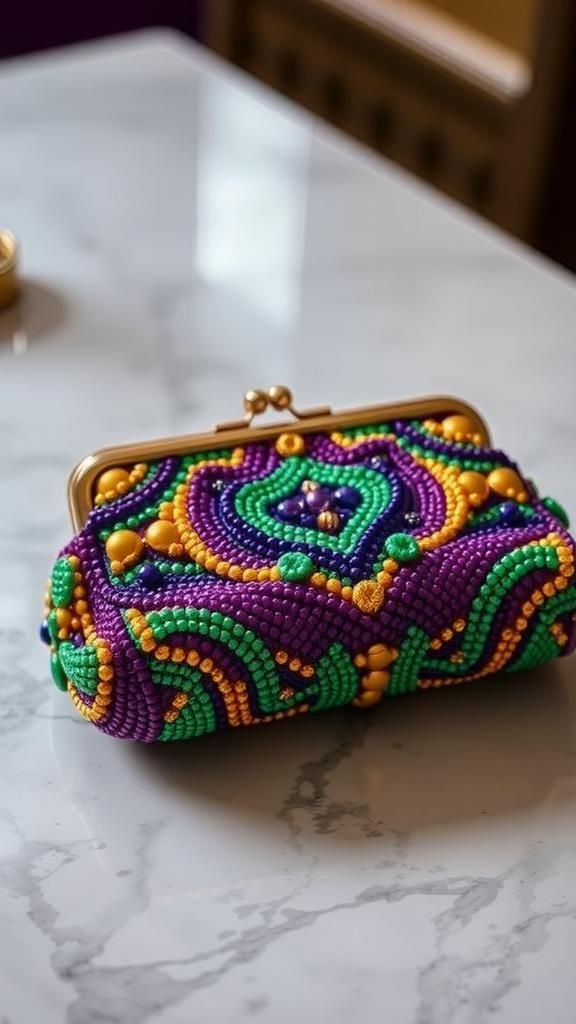
A small clutch strewn with beads becomes a handheld memory carrier, catching tiny lights as it swings. The beads add a pleasing weight and a tactile rhythm that feels grown-up and playful at once.
I recall carrying one to an informal parade, watching the beads reflect streetlamps and puddles. The close-up detail of beadwork holds miniature scenes, like a fabric map dotted with tiny treasures.
It suits a night where pockets are light and music is a few steps away, adding a whisper of festivity to a simple outfit.
Steps
- Choose a clutch with a fabric or leather surface suitable for beadwork and plan a bead pattern.
- Thread beads onto strong beading thread and tack them to the clutch surface with small, secure stitches.
- Work in sections until the design is completed, reinforcing any high-stress areas with extra thread.
- Secure thread ends neatly on the inside and add a lining patch if needed to protect the interior.
- Allow the clutch to rest so all stitches settle before carrying it out for an evening.
Mask-mounted centerpiece for festive tables
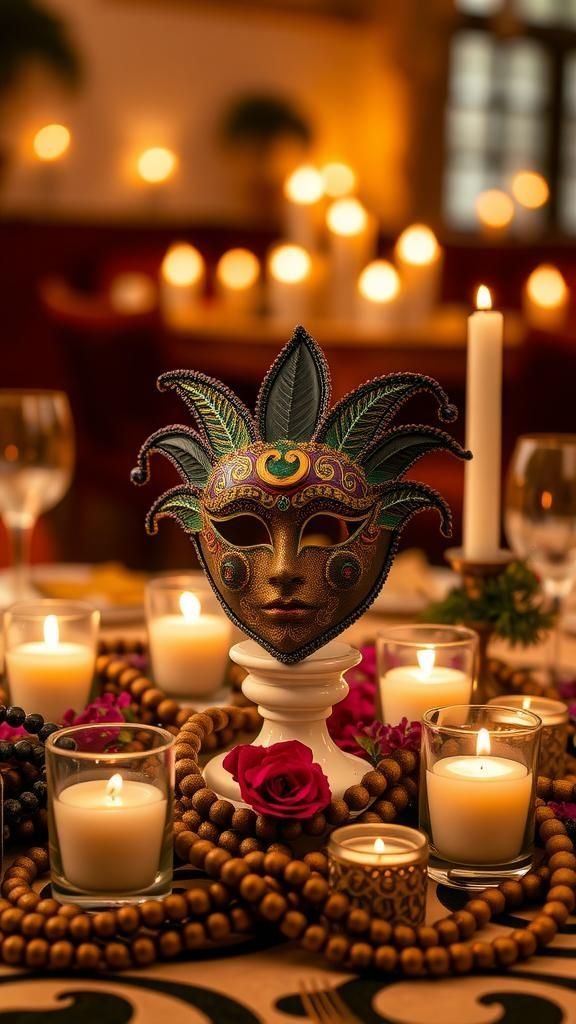
A centerpiece that features a mask at its heart turns a table into a tiny stage, with candles and beads arranged like supporting actors. The mask anchors the composition, while bead garlands spill outward, catching candlelight.
I have set one on a wooden table and watched the room shift toward it as conversation settled into comfortable rhythm. The scents from candles mix with the sight of sparkling beads, creating a full sensory moment.
It feels ceremonial in a casual way, an invitation to linger and exchange small stories between courses.
Steps
- Select a decorative mask as the focal point and place it on a low pedestal or decorative plate.
- Arrange bead garlands and small candle holders around the mask to create a balanced composition.
- Add fresh or faux floral accents tucked among the beads for color and texture contrast.
- Ensure candles are placed safely with heat-resistant holders and keep flammable materials at a safe distance.
- Step back to adjust spacing and symmetry until the centerpiece feels harmonious with the table setting.
Beaded bookmark with delicate charm drop
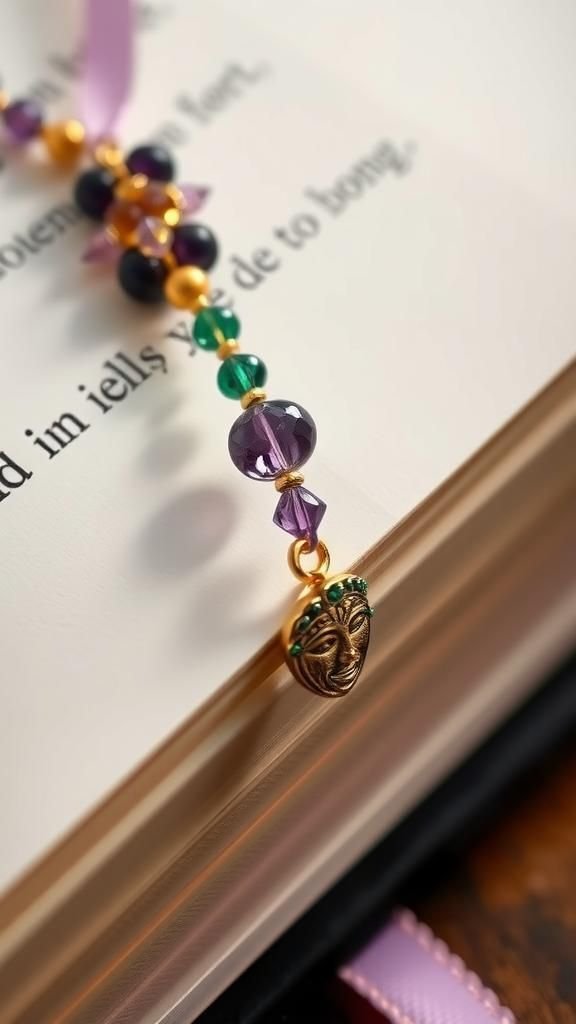
A beaded bookmark feels like a private pleasure slipped into a book, with a small charm dangling beyond the page. The beads divide the line between utility and ornament, offering a tactile pause whenever the book is opened.
I enjoy catching sight of it peeking from a coffee table stack, a gentle reminder of a recent read and a recent celebration. The bead weight helps the bookmark sit well within thick pages, and the charm can be a tiny mask or a bell that rings softly when the book is moved.
Steps
- Cut a length of thin ribbon or cord and select beads that complement its color and width.
- String beads onto both ends of the ribbon, finishing each strand with a small knot or crimp bead to secure them.
- Attach a tiny charm or miniature mask to one end for a decorative drop.
- Trim any excess ribbon and seal edges if needed to prevent fraying.
- Slip the bookmark between pages and enjoy the tactile detail each time the book is opened.
Upcycled bead coasters with glossy finish
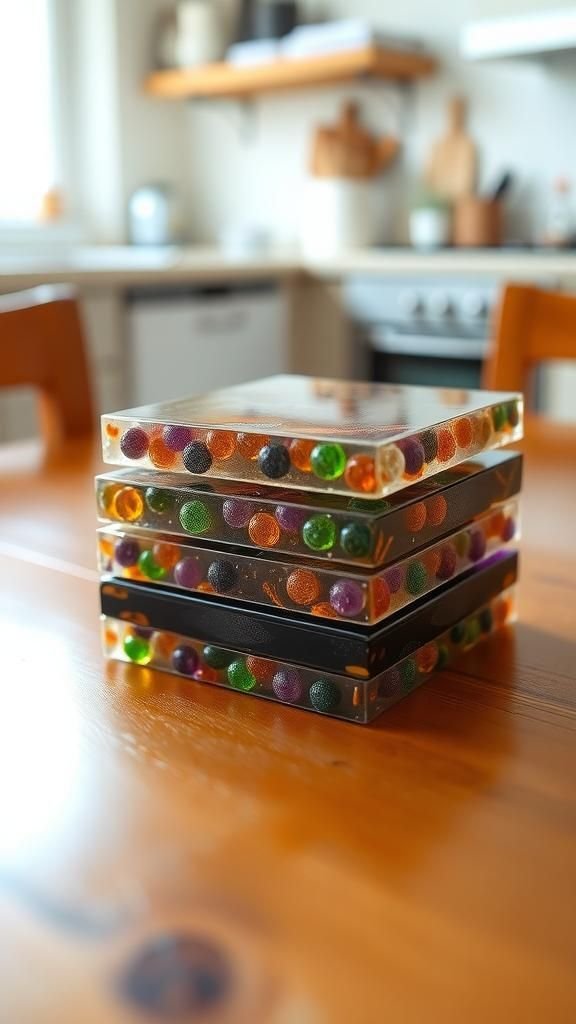
Layers of beads set into a coaster make cups look like they sit on tiny carnival stages. The glossy finish smooths the surface into a resistant sheen while preserving the bead colors beneath.
I like how each coaster becomes a little narrative, with mismatched beads forming accidental patterns. The tactile contrast between the smooth resin top and the textured bead underside is satisfying to touch.
They protect the table and keep the festival energy close to everyday habits, a playful reminder to slow down and enjoy small rituals like tea or coffee.
Steps
- Prepare a silicone mold suitable for coasters and arrange bead pieces inside to form an appealing pattern.
- Mix a clear casting resin according to manufacturer instructions and pour slowly over the beads to avoid air bubbles.
- Allow the resin to cure fully in a dust-free area, following recommended cure times.
- Demold the coasters and sand any rough edges gently before polishing for a smooth finish.
- Place soft pads on the bottom to prevent scratching surfaces and enjoy the finished pieces.
Tiny mask magnets for fridges and lockers

A row of miniature mask magnets on a fridge brings a parade to the everyday. They interrupt grocery lists and postcards with bright splashes of color and cheeky eyes.
I arranged a few by the calendar and enjoyed how they made even dull reminders feel like invitations. The magnets are small enough to gather into little clusters and can be traded among family members like tiny trophies.
They feel like friendly interruptions, the kind of thing that prompts a short laugh whenever someone reaches for the milk.
Steps
- Trim small mask shapes from lightweight material and decorate each with paint, beads, or tiny feathers.
- Glue small disc magnets to the backside of each mask, ensuring centered placement for good balance.
- Allow the adhesive to set fully and test magnet strength on a metal surface.
- Arrange magnets on a fridge or locker in playful patterns and switch them up often for variety.
- Replace magnets that lose hold and refresh decorations over time to keep the display lively.
Bead garland with feather and tassel accents
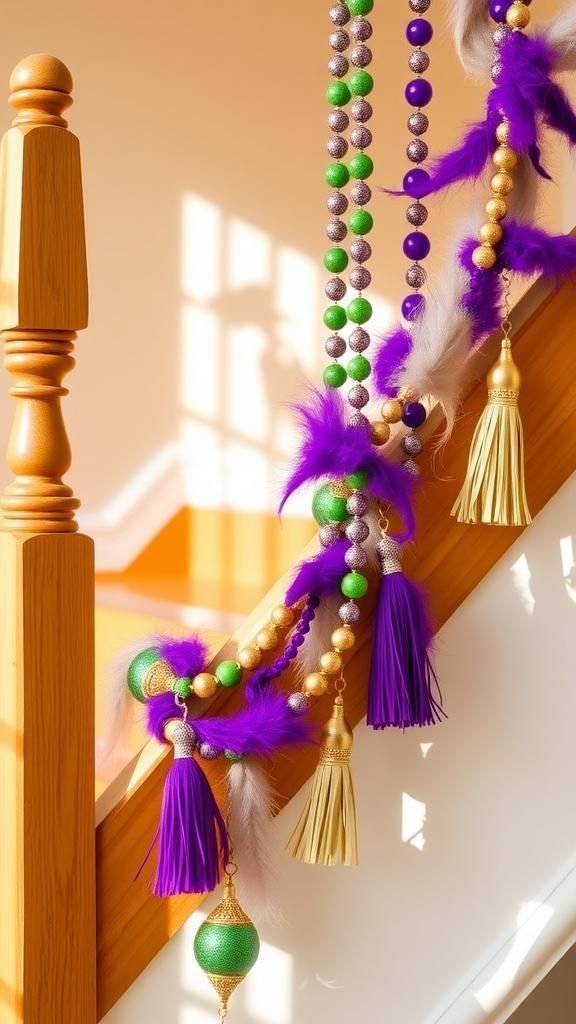
A long bead garland threaded with feather and tassel accents feels like a slow-moving melody along a banister or mantel. The feathers add soft moments between the bead clusters while tassels provide visual punctuation.
I like the way it unfurls across surfaces, the colors stepping down in a friendly rhythm. Draped casually, it suggests movement even when still.
The texture changes along its length keep the eye traveling, discovering new bits of shine and softness. It makes a room feel gentle and ready for laughter without needing to shout.
Steps
- Select a durable cord and thread bead clusters onto it, leaving space for feather or tassel attachments.
- Secure each feather by wrapping its base with thin thread or small bead caps and tie it to the cord.
- Attach tassels at intervals by looping their tops around the cord and knotting securely.
- Check tension along the garland so beads and accents sit comfortably without crowding.
- Drape the garland along a banister, mantel, or doorway and adjust accents for pleasing balance.
Mask crown for a playful parade leader

A crown built around a central mask feels ceremonial in a lighthearted way, like appointing someone king for the night. The mask sits at the front, framed by bead-studded peaks and feather plumes that lift the silhouette.
I once placed such a crown on an unsuspecting friend and watched them adopt an instant, theatrical posture that had everyone chuckling. The piece balances bravado with silliness, beads jangling faintly with movement.
It works as a photo prop or a mantel showpiece, bringing a quick, borrowed grandeur to casual gatherings.
Steps
- Choose a flexible crown base and center a decorative mask at its front for the focal point.
- Embellish the crown base with beaded trims, sequins, and small accent pieces for shine.
- Secure feather plumes and bead-strung peaks to create height and dynamic silhouette.
- Line the crown interior with soft fabric for comfort when worn and reinforce any high-stress joins.
- Try the crown on and fine-tune balance, trimming accents if needed for comfortable wear.
Bead-sculpted mask for table-top display
A bead-sculpted mask rises like a miniature statue, beads layered so the form reads as much by touch as by sight. The surface has a tactile topography that invites fingers to trace the ridges and valleys.
I placed one on a side table and found it drew quiet attention, complicit in its small, crafted pride. Light moves across it in short intervals, each bead throwing a little highlight.
The piece holds up well to close inspection, rewarding peeks into its tiny construction with a sense of craft and careful patience.
Steps
- Build a simple mask armature from wire or a lightweight base to support bead placement.
- String and attach beads directly to the armature, layering in rows to define contours and facial features.
- Continue adding beads until the desired sculptural depth is achieved, reinforcing joins as needed.
- Finish with a protective coating or sealant if desired to stabilize bead surfaces.
- Mount the completed mask on a small stand or base for stable table-top display.