Disclosure: This post contains affiliate links, which means we may earn a commission if you purchase through our links at no extra cost to you.
I’ve always had a soft spot for empty jars cluttering shelves, each one promising a tiny project and a pleasant afternoon. Mason jar craft ideas became my go-to when I wanted something simple that still felt personal, whether that meant a glowing jar by the porch or a little herb nook on the windowsill.
Over the years I learned that a single jar can shift moods in a room, carry a memory on a bedside table, or hold a bright cluster of blooms.
These Mason jar craft ideas are about small pleasures and hands-on curiosity.
Solar-lit jar for soft evening glow

I love how a Mason jar can turn a dusky porch into a cozy nook. The glass catches warm amber light and throws gentle reflections across a wooden table.
There is a quiet satisfaction in seeing the jar come alive at twilight, the faint hum of the small solar panel like a secret. Touching the cool glass in the evening, the light feels like a tiny captured sunset.
It sits steady against night sounds, a modest beacon that makes outdoor nights feel friendlier and calmer.
Steps
- Place a small solar garden light into the jar with the light facing upward.
- Secure the solar panel to the jar lid and fasten the lid onto the jar.
- Position the jar where it receives direct daylight so the solar panel charges during the day.
- Bring the jar outside at dusk and let the light illuminate the surroundings automatically.
Mini herb garden in a mason jar

There is a small delight in opening a jar to find basil leaves brushing my fingertips. Soil smell is earthy and fresh, a contrast against the cool rim of the glass.
Watching new green shoots press against the jar walls feels almost like catching a private growth show. The jar’s transparency makes the soil layers and root tips visible, which turns a simple plant into a tiny ecosystem to observe.
Placing a cluster of these jars on a sunny sill brings a lively green edge to a kitchen corner.
Steps
- Fill the bottom of the jar with drainage gravel and a layer of potting soil.
- Nestle a small herb seedling into the soil, gently firming it around the roots.
- Place the jar on a bright windowsill and water lightly when the topsoil feels dry.
- Rotate the jar occasionally so the plant grows evenly toward the light.
Layered sand art with colorful bands

Creating layered sand in a Mason jar felt like making a tiny desert landscape that fits in my palm. The dry sound of sand pouring into glass has a pleasant, almost musical hush.
Each color band settles with crisp lines, and tilting the jar shows how the layers shift and play together. The combination of bright pigments and the jar’s clear walls makes the colors pop in sunlight.
Keeping one on my desk made the whole space feel more playful, with a meditative quality as I traced the bands with my eyes.
Steps
- Pour a small amount of colored sand into the jar to form the first layer.
- Gently add contrasting sand colors in thin layers until the jar is nearly full.
- Tap the jar lightly to settle the layers and remove air pockets.
- Seal the lid to preserve the design and display the jar upright.
Terrarium jar with moss and tiny stones

The first time I peered into a terrarium jar I felt like a giant peering at a tiny landscape. The air inside carried a faint, damp earth smell that was oddly comforting.
Soft moss, pale pebbles, and a miniature fern combine beneath the glass lid into a lush, contained world. Watching dew form on the walls in the morning felt like witnessing weather on a minute scale.
It became a calming focal point, a little pocket of green that tugged me to slow down and look more closely.
Steps
- Layer small stones at the bottom for drainage followed by a thin charcoal layer.
- Add a loose layer of potting soil and press gently to create a planting surface.
- Place small mosses and tiny plants into the soil, arranging them visually.
- Close the lid partially to maintain humidity and place the jar in bright, indirect light.
Candle lantern jar for cozy nights

There is an old-fashioned charm to a candle glowing inside a jar. The flame casts flickering patterns that dance across nearby walls, bathing the room in a warm, honeyed tone.
The glass rim often catches a tiny golden halo, and the scent of beeswax or soy adds a layer of comfort that feels homely. Carrying a lit jar from room to room brings a sense of ritual, a slow kind of comfort.
I find that a cluster of these jars on a table makes conversation feel softer and more intimate.
Steps
- Place a small pillar or votive candle on a heat-safe stone inside the jar.
- Light the candle and keep the jar lid off to allow airflow.
- Set the jar on a stable, heat-resistant surface away from flammable materials.
- Extinguish the flame carefully before leaving the area or going to sleep.
Pressed flower memory jar keepsakes

I keep a jar of pressed blooms from special days, and every glance back at it brings a small smile. The petals, flattened and velvety, sit like pressed paper art against the glass.
Their muted tones and delicate veins feel nostalgic, as if time has been hushed inside the jar. The collection smells faintly of old paper and sun-drying afternoons, mixing softness with silence.
It makes for a gentle way to hold onto moments, a little visual diary that catches light and memory in equal measure.
Steps
- Arrange pressed flowers flat against the inner walls of the jar for display.
- Layer additional pressed petals or small mementos to fill the jar aesthetically.
- Close the lid to keep the contents dust-free and store the jar in a cool, dry spot.
- Rotate the jar occasionally to view different angles of the pressed blooms.
Rustic button lamp with stitched charm

A jar filled with a jumble of old buttons always felt like a small treasure box. The tactile mix of smooth plastic, rough metal loops, and tiny stitched threads gives the jar depth.
When lit from within the colors soften and little shadows form between buttons, creating a textured glow. Picking out a favorite button from the pile became a tiny ritual, a pause that felt oddly soothing.
The whole piece reads like a personal collage of domestic history, each button holding a whisper of someone else’s garment.
Steps
- Insert a battery-powered light into the center of the jar surrounded by assorted buttons.
- Arrange buttons around the light to create layered color and texture.
- Secure the jar lid and switch the light on when a soft glow is desired.
- Display the jar lamp on a shelf where the button shadows add visual interest.
Chalkboard label jar for pantry charm

Writing on a small chalkboard label stuck to a jar always brought a tiny thrill of order. The matte label contrasts pleasantly with the shiny glass, and the chalk line has a satisfying powdery look.
Seeing a row of labeled jars on a shelf turns storage into a little display, where oats, spices, and dried fruits become visually cozy. The act of swapping out labels or smudging a word felt like simple housekeeping that also felt creative.
The jars add calm to a kitchen shelf, a tidy collection with personality.
Steps
- Stick a small chalkboard label onto the jar and press it flat to adhere.
- Write the contents on the label with a chalk marker or chalk stick.
- Wipe and rewrite the label as needed when the jar contents change.
- Arrange labeled jars neatly on a pantry shelf for easy identification.
Snow globe mood jar with winter scene

Shaking a jar that holds a tiny winter scene always brought a quiet, childlike thrill. Snow-like flakes swirl around miniature trees and perhaps a small house, creating a brief soft flurry that settles into stillness.
The glass circle refracts the little landscape, making it feel like a fleeting, captured storm. Breath fogging on the jar sometimes added to the illusion of cold.
Sitting it by a lamp, the tiny scene looked almost cinematic, a brief pause of spectacle that felt both private and cheerfully nostalgic.
Steps
- Secure a small waterproof figurine to the jar lid with a strong adhesive.
- Fill the jar with distilled water and add a tiny amount of glycerin and glitter.
- Screw the lid on tightly and invert the jar so the scene rests upright.
- Gently shake the jar to create a sparkling snowfall effect and let it settle.
Hanging jar chandelier for soft overhead light

Suspending jars overhead changed a room’s scale for me; the ceiling felt friendlier and lower in the best way. The glass jars acted like small lanterns, each one casting a gentle pool of light beneath it.
On windy nights the slight clinking sound of glass became part of the room’s rhythm. The sight of multiple jars at staggered heights created a lively skyline that felt crafted and personal.
Walking beneath those lights always made the space feel intimate and thoughtfully arranged, like stepping under a cloud of warm glass.
Steps
- Fit battery-operated fairy lights or small bulbs into several jars and secure lids.
- Attach sturdy twine or metal hooks to the lid rings for hanging support.
- Suspend the jars at varying heights from a ceiling beam or overhead fixture.
- Adjust spacing so the jars form a balanced cluster that illuminates the area.
Painted ombre jar as a soft color study

I once kept a painted ombre jar on my desk and would rest my eyes on the soft color fade when I needed a pause. The painted bands melt into one another like watercolor on glass, and the matte paint finish contrasts with the jar’s shiny rim.
Running fingertips along the surface revealed a slight texture that made the jar feel handcrafted. Light hitting the gradient produced changing tones that lifted whatever lived inside.
The jar became a low-stakes way to play with color that felt quietly pleasing and personal.
Steps
- Choose a set of paint shades and apply them from the jar base upward, blending edges.
- Allow each painted section to dry before applying the next to create smooth transitions.
- Seal the paint with a clear matte spray to protect the finish once fully dry.
- Place the jar on display where the gradient catches natural light.
Rustic twine-wrapped jar with coastal feel
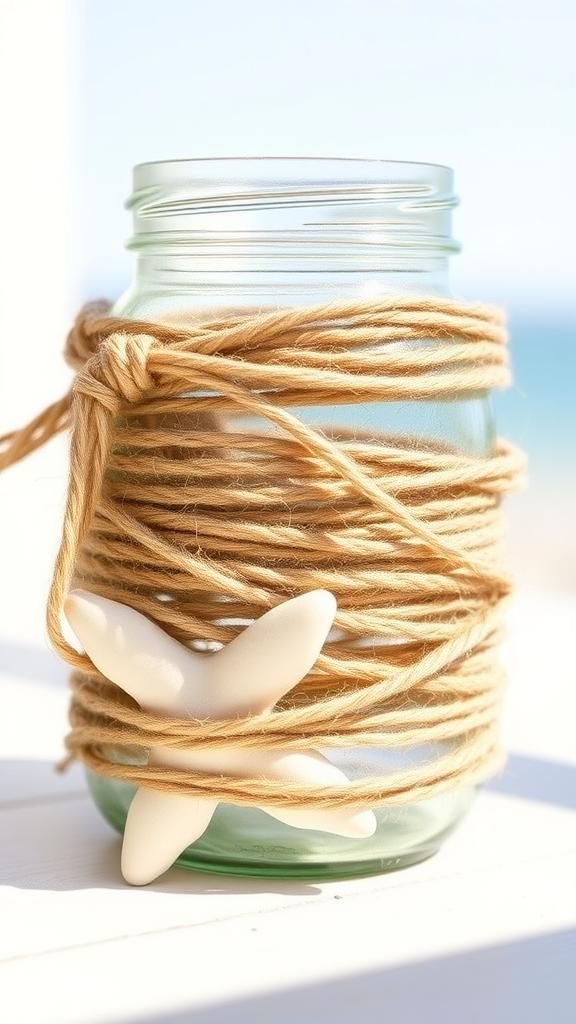
Wrapping twine around a jar gave it a tactile, shoreline mood that I enjoyed running my thumb over. The fibrous texture paired with the cool glass created a pleasing contrast.
A cluster of these jars felt like collected driftwood and small glass bottles on a shelf, carrying a hint of salt and sun in the imagination. Light filtering through the uncovered glass sections mingled with the shadowed twine to create an interesting pattern on nearby surfaces.
The overall effect was quietly relaxed, a little handcrafted souvenir of imagined shores.
Steps
- Begin wrapping natural jute twine around the jar from the base upward, snugging each coil.
- Continue wrapping until the desired height is covered and secure the end of the twine.
- Trim excess twine and tuck the end neatly to prevent unraveling.
- Display the jar on a shelf or table to enjoy the textured contrast with glass.
Cookie cutter snow lanterns for winter evenings

Pressing cookie-cutter shapes into rimmed jars filled with frosted glass spray created a playful, frosted effect that reminded me of holiday mornings. The layered frost diffused light so that candles or small bulbs cast soft silhouettes of shapes across a table.
The tactile feel of the frosted glass was velvety to the touch, and the shapes brought a whimsical note to the glow. Lining a row of these along a windowsill produced a gentle nighttime spectacle, with each jar telling its own little story in shadow and light.
Steps
- Attach a simple cookie-cutter shape temporarily to the jar exterior as a stencil.
- Spray the jar with frosted glass spray evenly and let it dry before removing the stencil.
- Place a candle or LED light inside to create soft silhouettes through the frosted areas.
- Arrange multiple jars along a windowsill for a charming illuminated display.
Beach memory jar with sand and tiny shells
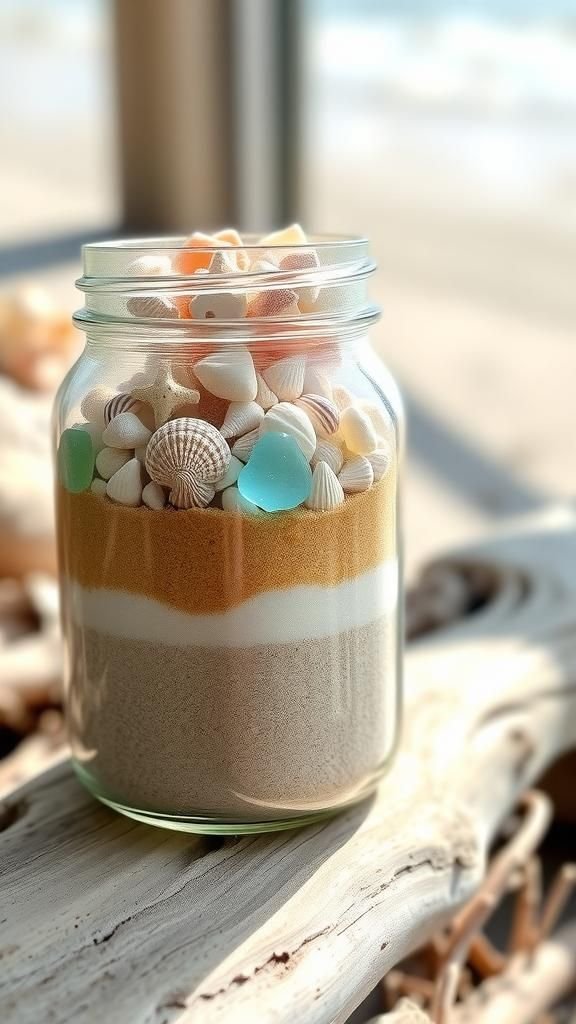
A jar of beach sand and tiny shells always felt like a pocket memory of a sunlit day. The sand had a warm, granular quality and the little shells made a faint clinking when the jar was moved.
Seeing the range of tiny colors and textures together was quietly satisfying, and it transported me back to salt air and the steady rhythm of waves. Placing the jar on a shelf among books made the whole room feel sunnier, a small keepsake that held the feel of sand between toes and the hush of shoreline quiet.
Steps
- Layer collected beach sand into the jar and press to create a smooth surface.
- Nestle small shells and tiny sea glass pieces atop the sand for visual interest.
- Seal the jar to protect the contents from moisture and dust.
- Display the memory jar on a shelf where it can evoke seaside recollections.
Herb drying jar with breathable lid cover

Watching herbs dry in a jar carried a faint grassy aroma that drifted into the room. The leaves slowly browned and crinkled into fragile lace, and peering through the glass made me aware of the slow change in texture.
The jars collected gentle scents rather than bold ones, and each held a hint of kitchen seasons. Seeing a row of these jars made a pantry feel like an apothecary of tiny flavors, quiet and patient.
Retrieving a pinch from one felt like borrowing a fragment of summer sunlight.
Steps
- Fill the jar loosely with clean, dry herb sprigs, leaving space at the top.
- Cover the jar mouth with breathable fabric and secure with a rubber band or string.
- Place the jar in a warm, airy spot out of direct sun to allow gentle drying.
- Check periodically until the herbs are crisp, then transfer to a sealed jar for storage.
Floating candle centerpiece for calm dinners

A jar with a water surface and a candle floating gently created a serene, spa-like table accent. The candle’s reflection shimmered and stretched across the glass while the scent barely mingled with warm meal aromas.
Watching the subtle ripples at the candle edge felt like watching a tiny pond, a small moving focus that slowed conversation to softer tones. The jar’s rim caught little highlights of flame, adding to the sense of intimacy.
Bringing one of these to a table felt like offering a quiet breathing space amid the meal’s energy.
Steps
- Fill the jar with clean water to a safe level and drop in a floating candle.
- Place decorative stones or flower petals beneath the candle if desired for visual depth.
- Light the candle carefully and enjoy the gentle reflection on the water surface.
- Monitor the candle while lit and extinguish before leaving unattended.
Rustic bird feeder jar for backyard visitors

A jar transformed into a feeder felt like dropping an invitation into the yard. The scratch of seed against glass and the muted clink when a bird landed nearby became part of a morning routine.
Watching small birds hop and peck around the jar brought quiet, attentive moments where time slowed. The jar’s rim and the scatter of seeds on the platform created a small stage for avian visitors, and each visit felt like a tiny, unscripted performance.
It added a friendly, outdoor rhythm to daily routines.
Steps
- Attach a wooden base or tray to the jar opening to catch spilled seeds.
- Fill the jar with birdseed and invert it so the seeds dispense slowly onto the tray.
- Mount the jar feeder on a stable hook or post in a quiet spot outdoors.
- Refill the jar as needed and clean the tray periodically to maintain hygiene.
Soap dispenser jar with vintage pump

Swapping a plastic bottle for a jar with a vintage pump felt satisfying in a tactile way. The pump’s metallic click and the thicker hand soap moving through clear glass looked pleasingly domestic.
Droplets on the jar neck and a faint citrus scent made handwashing feel like a deliberate, sensory act. The combination of glass clarity and pump mechanics created a small ritualized object that elevated a sink corner.
Seeing a refillable jar day after day made small conservation acts feel gracefully ordinary and quietly intentional.
Steps
- Insert a pump dispenser into a jar lid and tighten to create a stable closure.
- Fill the jar with liquid hand soap and prime the pump until it dispenses smoothly.
- Place the dispenser near the sink and refill from a bulk soap container when low.
- Wipe the jar and pump occasionally to keep the area tidy and hygienic.
Sewn pincushion jar lid keeps sewing organized

A cushion on a jar lid became a perfect little sewing companion that sat snugly on my work table. The soft fabric gave quick relief to sharp pins, and reaching for the jar felt like a small, comforting habit.
Scattered threads and the hint of cotton added to the sensory collage of a crafting session. The jar held buttons and scraps while the lid served as a handy pin rest, marrying utility with a cozy, textile rhythm.
It made small projects feel more contained and delightfully domestic.
Steps
- Sew a small round cushion and secure it to the jar lid using a snug fit or adhesive.
- Fill the jar with sewing supplies like buttons, needles, and thread for storage.
- Place pins gently into the pincushion lid and keep the jar nearby while sewing.
- Replace or refill the cushion stuffing as needed to maintain firmness.
Fairy light jar for a dreamy bedside glow

Tucking tiny lights into a jar changed a bedside into a soft, private constellation. The lights created a delicate glow that felt like a hush rather than a glare, perfect for late reading or unwinding.
Their faint buzzing was replaced by silence, while the glass refracted each point into gentle halos. The jar sat like a night sky in miniature, offering a calming anchor when the room felt busy.
I appreciated how effortless the mood shift was—suddenly the bedside felt more meditative and less utilitarian.
Steps
- Coil a string of battery-powered fairy lights and place them gently into the jar.
- Tuck the battery pack into the bottom or behind the jar for a neat look.
- Close the lid if needed and switch the lights on for a soft ambient glow.
- Replace batteries when the lights dim to maintain the gentle illumination.
Button or bead storage jar with clear view

A jar full of beads and buttons is like a miniature museum of texture and color. Sorting through glass, wood, and plastic pieces meant running my fingers across smooth rounds and tiny facets, a small tactile celebration.
The transparent sides let me spot just the right shade without rummaging, and the clink of small items felt pleasantly domestic. Leaving the jar open while working turned it into an active palette of materials, and returning things to the jar at the end of a session felt satisfying and tidy in an almost quiet way.
Steps
- Sort buttons or beads by color or type and place them neatly into the jar.
- Use smaller jars for tiny pieces to prevent mixing and make retrieval easier.
- Keep the jar nearby while crafting for quick access and visual inspiration.
- Secure the lid when storing the jar to protect its contents from dust.