Disclosure: This post contains affiliate links, which means we may earn a commission if you purchase through our links at no extra cost to you.
I always end up making small handmade things for my mom because those quiet afternoons at the kitchen table feel like a shortcut to contentment. A stack of colored paper, a few jars of paste, the smell of tea and a playlist in the background have led to the kind of Mothers Day Handmade Gift Crafts that carry more memory than polish.
This collection of Mothers Day Handmade Gift Crafts grew from those afternoons.
Each idea brings a different texture, color, or scent and a story I enjoy telling when I hand something over with a sheepish smile.
Pressed flower frame with vintage linen mat

I still have a corner of my desk covered in tiny flattened petals, the kind that keep their fragile translucence after drying. A pressed flower frame feels gentle and quiet, like a paused afternoon in bloom.
The linen mat softens the edges, adding a subtle warm grain under glass that invites close looks. When light hits the petals at certain angles they almost glow, and there is a faint papery scent that takes me back to backyard gardens and slow conversations over lemonade.
Steps
- Gather freshly picked blooms and clean them gently of excess moisture.
- Place flowers between heavy paper and leave them under weight for several days.
- Arrange the dried petals on a backing board and position a linen mat over them within a frame.
- Seal the frame securely and wipe the glass for a clear finish.
- Add a small handwritten label on the back with the flower names and date.
A cozy hand-decorated ceramic mug idea

There is a comforting ritual in reaching for a favorite mug, and a hand-decorated ceramic keepsake makes that ritual feel personal. I love the tiny imperfections that appear when markers meet bisque clay, the gentle wobble of a handmade handle, and the slightly grainy feel under fingertips.
The designs can be simple doodles or a small phrase that warms faster than the drink inside. When steam curls up from the rim, the colors look newly alive, and the mug becomes a quiet companion during slow mornings.
Steps
- Choose a plain bisque mug and select food-safe ceramic paints or markers.
- Sketch a simple design lightly and fill it in with chosen colors.
- Allow the decoration to dry according to product directions and then cure it if required.
- Wipe the mug gently and add a clear food-safe finish when appropriate.
- Package with a strip of kraft paper and a handwritten note.
Memory jar overflowing with tiny handwritten notes

A glass jar filled with folded notes feels like a slow-motion gift of small moments. I remember the afternoon I filled one with scribbled thank-you lines, tiny jokes, and scraps of ticket stubs; each paper had a different weight and a corner worn from folding.
The jar catches light and makes the colors of the slips look like confetti; reaching in is a small ceremony. The scent of old paper mixed with a faint whiff of the ribbon tied around the neck brings back half-forgotten weekend walks and quiet kitchen conversations.
Steps
- Select a clear glass jar and a stack of colorful paper or stationery.
- Write short notes, memories, or prompts on the paper and fold them neatly.
- Fill the jar with the folded slips until it feels full and lively.
- Seal the jar with a cork or lid and tie a ribbon or twine around the neck.
- Attach a small tag explaining that each note is for a different mood or day.
Homemade scented sugar scrub in mason jar
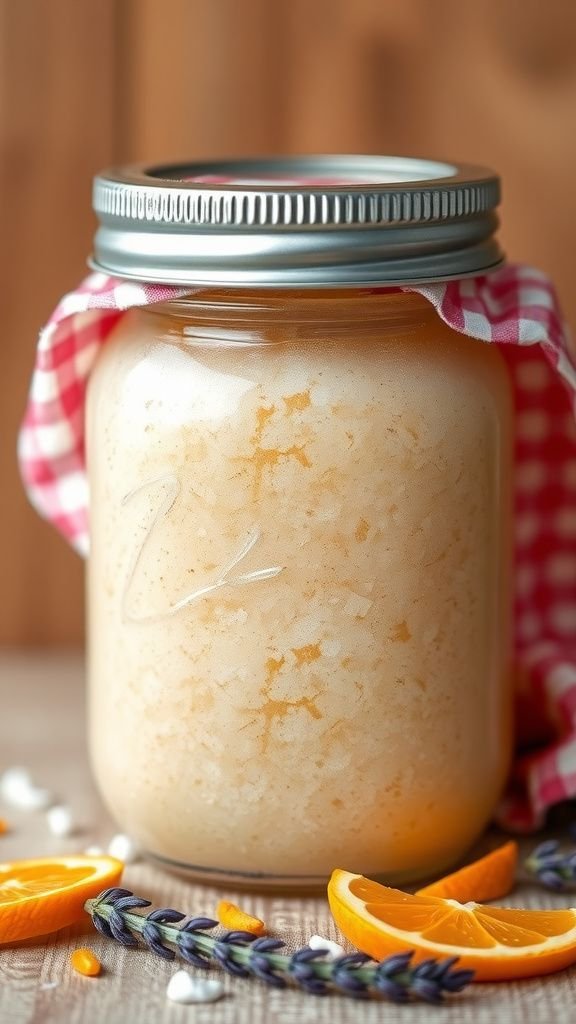
There is something indulgent about a jar of scented sugar scrub resting on a bathroom shelf. The granules catch light like tiny crystals and the scent—citrus or lavender—unfolds immediately when the lid lifts.
I remember the soft graininess against my palm during a late-night self-care moment, followed by the faint oily sheen left behind. The mason jar lid gives a nostalgic touch, and an old spoon tucked under a ribbon invites small, private rituals.
It feels like gifting a moment of calm in a busy week.
Steps
- Combine fine sugar and a carrier oil in a mixing bowl until the texture resembles damp sand.
- Add a few drops of chosen essential oil and stir until the scent blends evenly.
- Spoon the scrub into a sterilized mason jar, packing gently to remove air pockets.
- Seal the jar and decorate the lid with a fabric circle and twine.
- Place a small label noting the scent and gentle usage guidance.
Personalized coupon book for quiet favors

A little booklet of promises feels both playful and tender, like making space for small favors that actually matter. My version had a smudged coffee doodle on the cover and inside, handwriting that wobbled in the best way.
The paper has a pleasant tooth and the ribbon binding gives it a soft clack when flipped. Each coupon carries a tiny scene in my mind—a slow morning walk, a home-cooked meal, an afternoon of uninterrupted reading—so handing the booklet over feels like offering pockets of shared time.
Steps
- Choose several sheets of card stock and cut them to a uniform size for the coupons.
- Write a different promise or favor on each coupon with a decorative pen.
- Stack the coupons and bind them with ribbon, staples, or a small ring.
- Create a decorative cover with a title and a small illustration.
- Place the finished booklet in a simple envelope with a note.
Embroidered linen handkerchief with floral stitch

Holding a hand-stitched handkerchief feels intimate, like a small heirloom in the making. The linen has a cool, crisp touch and the embroidery thread creates a raised path of color that invites fingers to trace it.
I remember stitching a loose garland along one corner while a radio played quietly; the threads shimmered against the neutral fabric. The finished piece moves gently with breath and folds neatly into a pocket or drawer, where it waits to be rediscovered during a rainy afternoon or a candid chat.
Steps
- Select a square of linen and a palette of embroidery thread.
- Transfer a simple floral or garland design lightly onto the fabric surface.
- Stitch the design using basic embroidery stitches suited to the pattern.
- Gently press the finished piece from the wrong side to set the stitches.
- Fold neatly and present wrapped in tissue paper or a small box.
Photo collage wooden block display to treasure

A wooden block photo display has a satisfying heft and warmth that paper prints alone don’t offer. The wood grain peeks through varnish, and each image feels anchored rather than fleeting.
I remember choosing candid snapshots with slightly crooked smiles and the way the sunlight made faces glow when the blocks were lined up on a shelf. The edges have a lived-in soft roundness, and small imperfections in the wood add character.
Passing a hand along the tops of the blocks feels like retracing footsteps through remembered days.
Steps
- Select favorite photographs and resize them to fit the dimensions of the wooden blocks.
- Print the photos on high-quality paper and trim them precisely to size.
- Apply a thin layer of archival adhesive to mount each photo onto a block.
- Seal the surfaces with a protective finish and allow to dry thoroughly.
- Arrange the blocks on a shelf or mantel in a pleasing sequence.
DIY bath bomb trio in pastel color palette

A trio of bath bombs feels like an invitation to linger in warmth and fizz. The pastel colors sit like little moons in a box, and when a finger brushes the surface a soft chalky scent lifts—perhaps almond or bergamot.
I have liked the tiny surprises inside some versions, a sliver of dried lavender or a shimmer of mica. The sound of water meeting the bath bomb is quietly cinematic, and the tub becomes a gentle, fragrant cloud where time softens and quiet thoughts settle at the edges.
Steps
- Mix dry ingredients in a large bowl and blend them until evenly combined.
- Slowly add a scented liquid mixture while stirring until the texture holds together when pressed.
- Pack the mixture into spherical molds and let them set until firm.
- Carefully remove the bath bombs from molds and allow them to dry fully.
- Place the trio in a small box with tissue and label the scents.
Knitted infinity scarf from plush yarn

There is a slow pleasure in wrapping a chunky knitted scarf around your neck and feeling immediate warmth. The stitches create a familiar rhythm under fingertips, and the plush yarn has a pillowy softness that begs for naps and long walks.
I often think about how the thickness muffles sounds a little, making the morning quieter. The color I chose sat between pebble and rose, catching shifting light in a way I enjoy.
It folds into a neat bundle that smells faintly of the wool and the room where it was made.
Steps
- Choose a soft bulky yarn and matching large needles appropriate for the yarn weight.
- Cast on the required number of stitches for the desired width of the scarf.
- Knit in the chosen stitch pattern until the fabric reaches the intended circumference.
- Bind off loosely and sew the ends together to form the infinity loop.
- Weave in any loose tails and lightly block the scarf if needed.
Hand-stamped recipe tea towel with charm

A tea towel printed with a beloved family recipe feels like a kitchen story made tangible. The inked letters have a slightly uneven character that speaks of hands and time, and the cotton fabric has a reassuring weight.
I remember the small thrill of seeing my grandmother’s handwriting reproduced in navy blue across the cloth, the aroma of baking wafting from an oven as I folded it into place. Hanging from a hook, it becomes both practical and decorative, catching drips while carrying a line of memory to the work surface.
Steps
- Choose a natural cotton tea towel and a recipe in a legible font or handwriting.
- Carve or acquire rubber stamps or prepare a transfer method for the text.
- Apply fabric ink to the stamps and press them firmly onto the towel surface.
- Allow the ink to dry and set according to the ink manufacturer’s instructions.
- Wash gently before gifting to soften the fabric and set the design.
Mini herb garden in recycled tin planters

A row of small tin planters on a sunny sill brings the outdoors in. The metallic tins catch a strip of morning sun and the herbs themselves have a lively green that feels like a tiny promise.
I enjoy the scent of basil and mint brushing the air whenever I pass, and the rough edges of the recycled tins give the display a relaxed, slightly industrial charm. The soil is dark and cool to the touch, and the first new shoots always seem like a small, hopeful celebration.
Steps
- Clean and dry a set of small recycled tin cans, drilling drainage holes if necessary.
- Add a layer of small stones and potting mix into each tin to create a planting base.
- Place small herb seedlings or seeds into the soil and cover lightly.
- Water gently until the soil is moist and position the planters in a sunny spot.
- Label each tin with the herb name and care reminders.
Handcrafted soy candle poured in a teacup

A candle poured into a vintage teacup carries both fragrance and story. The soy wax rests smooth and pale against the patterned glaze, and its scent unfurls gently when lit—perhaps a warm vanilla with a touch of citrus.
I enjoy the small ritual of placing the teacup on a saucer and watching the melted wax pool in the shallow center. The china rim gleams in candlelight and the flame throws a tiny theater of shadows, turning a simple object into a soft, private glow.
Steps
- Melt soy wax slowly in a double boiler until fully liquid and smooth.
- Add fragrance oil at the recommended ratio and stir to combine evenly.
- Center a wick in the teacup, pour the wax carefully, and secure the wick.
- Allow the candle to cool and trim the wick to the proper length.
- Place the teacup on a saucer and include a small label with scent details.
Decorative keepsake box with decoupage paper

A small box covered in decoupage paper becomes a treasure chest for little things. The layers of patterned paper create a mosaic of color and texture that feels both joyful and deliberate.
I remember the tactile pleasure of smoothing a sheet over a corner and watching the pattern sit snugly against the wood, then running my thumb along the sealed surface to admire the gloss. The box has a weight to it and a sound when opened, and the inside seems like a private drawer for ticket stubs, buttons, and tiny love notes.
Steps
- Select a plain wooden box and decorative papers or napkins for the exterior.
- Apply a thin layer of decoupage medium to the box surface and lay the paper gently.
- Smooth out air pockets and trim excess paper to fit edges cleanly.
- Brush several coats of sealing medium over the paper, allowing each coat to dry.
- Polish the dry surface lightly and line the interior if desired.
Salt dough heart ornaments with handwriting

Salt dough ornaments have a simple, homey charm that feels like winter afternoons and cookie aroma without the bake. The surface takes impressions cleanly, and I have loved the soft dent of a child’s handwriting pressed in before drying.
Once painted, the ornaments develop a warm matte finish and the slight grain of the dough adds tactile interest. Hung from a twine loop, they sway gently and carry a faint earthy scent that blends with holiday spices if stored nearby.
They feel modest and earnest, like tiny personal talismans.
Steps
- Mix flour, salt, and water into a dough until it holds together smoothly.
- Roll the dough to an even thickness and cut out heart shapes with a cutter.
- Press handwriting or small impressions into the surface before creating a hanging hole.
- Bake the shapes slowly until dry and hard, then allow them to cool.
- Paint and seal the ornaments, adding twine for hanging.
Mosaic tile coaster set with textured grout

A set of mosaic coasters adds a splash of color and a pleasant clink to table life. Tiny tiles catch light at different angles, creating a lively, jewel-like surface that begs to be touched.
The grout between pieces has a sandy texture and a slightly cool feel against the fingertips. I once watched how afternoon light turned the tiles into a miniature stained-glass horizon across my coffee table, and the coasters made every drink feel a little more intentional.
They have a satisfying weight and sit firmly under a warm mug.
Steps
- Choose cork or wooden bases and an assortment of small ceramic or glass tiles.
- Arrange the tiles on each base in a pleasing pattern, leaving small gaps for grout.
- Mix grout and press it into the gaps, removing excess with a damp cloth.
- Allow the grout to set and cure completely before handling.
- Seal the grout surface for added durability if desired.
Custom jewelry dish from air-dry clay with mica

A small jewelry dish molded from air-dry clay feels soothingly private, an everyday altar for rings and small things. The clay surface takes a soft thumbprint if pressed, and mica powder adds a whisper of pearlescent shine that shifts with movement.
I liked the tiny imperfection where my fingernail left a mark; it made the piece feel less manufactured and more like a quiet studio find. Resting on a dresser, the dish catches morning light and cradles a few pieces that click softly when lifted.
Steps
- Knead air-dry clay until pliable and shape a shallow dish by hand or with a mold.
- Smooth the edges gently with a damp finger and add texture or impressions.
- Let the dish dry fully according to the clay’s drying time.
- Apply mica powder or paint to highlight surfaces and seal for protection.
- Present the dish with a small card describing its care.
Paper flower bouquet with layered tissue petals

A paper flower bouquet holds a playful, everlasting bloominess that never droops. The layered tissue petals create a soft translucence and a rustle when brushed, and the stems have a quiet springiness that makes them pleasant to hold.
I once left a bouquet on a windowsill and loved how light moved through the petals, casting colored shadows on the sill. The bouquet feels bright without being fussy, and the tactile crepe or tissue offers a satisfying contrast to smooth ceramic vases.
Steps
- Cut tissue or crepe paper into petal shapes of varying sizes for a layered effect.
- Secure petals around a wire stem, adjusting them to create a full bloom.
- Wrap the stem with floral tape or decorative twine for a finished look.
- Combine several handmade flowers into a bundled bouquet and place in a vase.
- Add a small tag naming the floral types or colors.
Macrame plant hanger in natural cotton cord

A macrame hanger brings a soft, textural geometry to any corner. The cotton cord has a comforting ropey feel and the knotted patterns cast small, playful shadows on walls.
I have a small hanger that once held a trailing pothos and the sway of the leaves paired with the woven loops created a cozy visual rhythm. The neutral color palette blends easily into rooms, while the tactile cords invite hands to explore their twists.
Suspended plants feel elevated, both literally and in spirit, when cradled in such a textile nest.
Steps
- Cut several lengths of cotton cord to the required measurements for the hanger.
- Secure the cords together at the top and begin forming the desired knot patterns.
- Create a cradle portion for the pot and finish the bottom with a gathering knot.
- Trim or style the hanging ends to taste and inspect knot security.
- Hang with a sturdy hook and place a potted plant inside the cradle.
Infused olive oil bottle with fragrant herbs
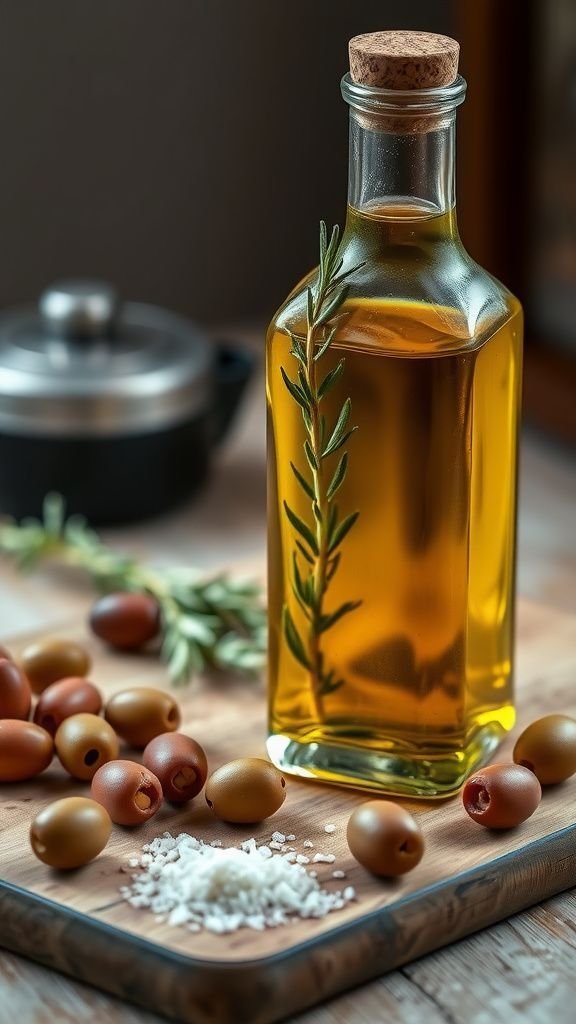
A bottle of herb-infused olive oil feels like sunshine captured in glass. The deep green of olive oil warms against golden light and sprigs of rosemary or chili flakes drift gently within.
I remember the first time I sliced fresh citrus peel and added it to a jar; the scent brightened the whole kitchen. The glass makes the colors seem almost luminous and the oil moves slowly when tipped, leaving a glossy film that catches the eye.
It sits nicely on a counter, ready for drizzling over salads or bread.
Steps
- Choose a high-quality olive oil and sterilize a clear glass bottle or jar.
- Place fresh or dried herbs and flavorings into the bottle carefully.
- Pour the oil over the herbs until they are fully submerged.
- Seal the bottle and allow the flavors to infuse for the recommended time away from direct heat.
- Strain if desired and label the bottle with the infusion date and suggested uses.
Felted wool slippers with embroidered heart accents

Felted wool slippers are quietly luxurious, with a dense, warm texture that hugs the foot. The felt has a soft matte finish and a gentle resilience when pressed.
I remember slipping into a pair after a long day and feeling the cozy insulation that made each step muted and calm. The embroidered heart on the toe added a human touch, a tiny red punctuation on neutral grey.
On cold mornings, the fabric warmed quickly and carried a faint wool scent, comforting in a way that feels almost like a small hug.
Steps
- Felt wool into the shape of slippers by wet felting or purchase pre-felted blanks.
- Cut the felt to fit and assemble the slipper pieces with stitching appropriate for thick fabric.
- Embroider a small heart or decorative detail on the toe area.
- Add a soft sole piece and reinforce seams for durability.
- Finish by trimming loose fibers and gently shaping the slippers to size.
Handwritten family recipe book bound by ribbon

A small handwritten recipe book feels like a lineage in paper form, each page carrying a familiar cadence. The ink varies with mood and time, some lines hurried and some carefully looped.
I treasure the smudges and marginal notes that hint at improvisation, the scent of oils and sugar that seems to cling faintly to certain pages. Binding the sheets with ribbon keeps the book intimate and flexible, easy to open flat on a counter.
When I flip through, I can almost hear a family voice offering measurements and recollections between lines.
Steps
- Gather favorite family recipes by writing them neatly on individual sheets of card stock.
- Organize the pages into a sensible sequence and add small illustrations or notes.
- Punch two holes along the spine edge and thread a ribbon through to bind the book.
- Create a decorative cover with a title and perhaps a family photo clipped inside.
- Tie the ribbon securely and include a small envelope for extra recipe cards.