
Disclosure: This post contains affiliate links, which means we may earn a commission if you purchase through our links at no extra cost to you.
Revamping your home can be an exhilarating project but the significant cost involved often causes many homeowners to think twice. Nonetheless, with a dash of ingenuity and resourcefulness, you can upgrade your residence without causing a dent to your wallet.


There are infinite methods, from basic modifications to significant transformations, to revitalize your space affordably.
Should you desire to rejuvenate one room or revamp your entire house, DIY projects present cost-effective strategies without sacrificing style or quality. Through making considered decisions and undertaking some of the tasks on your own, you can accomplish remarkable outcomes that mirror your individual style.
This compilation delves into some of the most efficient and cost-effective DIY renovation concepts that can assist you in crafting your dream home.
DIY Remodeling Ideas
19. $30 DIY Marble Countertops from Make, Do and DIY

This project transforms plain, hollow-core doors into stylish paneled doors using simple materials like plywood strips, nails, and paint. By cutting and attaching evenly spaced wood strips to a smooth door surface, it adds depth and architectural interest without the cost of replacing the entire door.
The process includes sanding, filling nail holes, caulking edges, and painting to achieve a polished, professional look. Adjustments such as removing door casing ensure the door closes properly after adding thickness, resulting in a custom, updated appearance that complements modern or classic interiors.
18. $12 DIY Paneled Door from Jenna Sue Designs

This project transforms plain, hollow-core doors into stylish paneled doors using simple materials like plywood strips, nails, and paint. The process involves measuring, cutting, and attaching evenly spaced wood strips to both sides of the door, then sanding, filling nail holes, and caulking for a smooth finish.
After assembly, the door is painted in a rich, satin black that enhances the added depth and detail, creating a sophisticated look. Adjustments to the door casing ensure proper closure, making it a budget-friendly way to upgrade interior doors with a custom, high-end appearance.
17. Wire Shelving Faux Floating Shelves from Within the Grove

This item demonstrates how to transform existing wire shelves into stylish faux floating shelves by adding plywood tops and pine front pieces. The process involves measuring, cutting, routing, gluing, and staining wood components to conceal the wire shelves and create a seamless wooden appearance.
The project is designed to be renter-friendly and budget-conscious, requiring basic woodworking tools and materials. It offers a practical way to upgrade closet storage without removing the original shelving, resulting in a cleaner and more polished look.
16. DIY Backsplash using Vinyl Flooring from Re-Fabbed

This item demonstrates how to create an affordable and stylish kitchen backsplash using peel-and-stick vinyl flooring. It highlights a creative way to update a bland space on a tight budget by repurposing materials typically used for flooring.
The process involves measuring, cutting, and adhering vinyl planks to the wall with strong adhesive for a staggered, textured look. The finished backsplash adds character and visual interest without the cost or complexity of traditional tile installations.
15. Kitchen Cabinet Transformation from The Creative Crate

This item highlights a kitchen cabinet transformation that turns ordinary cabinetry into a stylish and functional focal point. It demonstrates how simple updates can refresh a space and add personal charm to a kitchen.
The project encourages creativity and resourcefulness by showing ways to enhance cabinets on a budget. It inspires users to take everyday elements and reimagine them with practical, decorative improvements.
14. DIY Granite Painted Countertops from Happy Clean Living

13. Beadboard Kitchen Island from Our Life in a Click

This item showcases a kitchen island transformation using pine bead board and black paint to create a fresh, textured look. The project involved measuring, cutting, gluing, and painting to upgrade an outdated plywood island into a stylish focal point.
The reveal highlights how adding bead board to the island and cabinet ends enhances the kitchen’s overall design without a large budget. The makeover was completed for under $100, demonstrating an affordable way to refresh kitchen cabinetry with simple materials and a bold color choice.
12. $10 DIY Farmhouse Shutters from Design Dreams by Anne

This item displays the Google Account sign-in page, where users can enter their email or phone number to access their accounts. It offers options for account recovery and encourages secure sign-in practices, such as using a private browsing window if the device is shared.
The page supports multiple languages, allowing users from various regions to navigate the sign-in process comfortably. It also provides links for creating a new account and accessing help, privacy, and terms information.
11. Wire Shelf Update from Focal Point Styling

This item demonstrates a budget-friendly way to update a pantry by covering builder-installed wire shelves with custom-cut molding and painted shrouds. It transforms an ordinary storage space into a cleaner, more cohesive area without requiring major renovations or expensive materials.
The process involves clearing out the pantry, relocating items, and painting shelves separately before installation for a polished finish. Adding felt pads and using baskets and clear totes enhances organization and protects surfaces, resulting in a functional and visually appealing kitchen storage solution.
10. Custom Drawers from Spoon Flower

This project demonstrates how to line the inside of drawers using removable wallpaper, adding a decorative and protective layer to the drawer interiors. It involves measuring the drawer dimensions, cutting the wallpaper to size, and applying it smoothly for a clean, customized finish that enhances the look of your furniture.
The process uses either prepasted removable smooth wallpaper or peel-and-stick wallpaper, making it easy to install without permanent adhesives. This simple update transforms plain drawers into a stylish surprise every time they are opened, while also protecting them from spills and wear.
9. DIY Concrete Countertops from A Beautiful Mess

This item demonstrates how to transform an existing countertop into a sleek concrete surface using multiple layers of a cement-based mixture. It guides through preparing the base, applying and smoothing the concrete, and sanding between coats to achieve a polished finish.
The process also includes tips on protecting surrounding areas and choosing the right tools for spreading and shaping the concrete. Finally, it covers sealing the countertop to protect the surface and restore functionality after installation.
8. Upgraded Kitchen Cabinets on a Budget from Carrie This Home

7. DIY Wood Framed Mirror from Joyfully Growing

This project demonstrates how to transform a plain bathroom mirror by adding a custom wood frame using simple materials and tools. It involves measuring, cutting, sanding, staining, and sealing wooden boards to create a rustic, farmhouse-style frame that enhances the mirror’s appearance.
The frame is attached directly to the wall using construction adhesive, eliminating the need for nails or screws and providing a clean, sturdy finish. This method offers a budget-friendly way to upgrade a builder-grade mirror, adding character and warmth to the bathroom space.
6. Upgrade Toilet Flush Levers from Queen Bee of Honey Do’s

Upgrading toilet flush levers can instantly enhance the look and feel of a bathroom by replacing basic handles with stylish, well-fitting options. The process involves removing the old lever, disconnecting it from the flapper mechanism, and installing a new lever that matches your existing hardware finishes.
This simple DIY task takes just a few minutes and requires minimal tools, making it accessible for most homeowners. Choosing the right universal lever ensures proper fit and function, while adding a washer can help secure the handle snugly against the tank.
5. Easy DIY Window Trim from Bless’er House
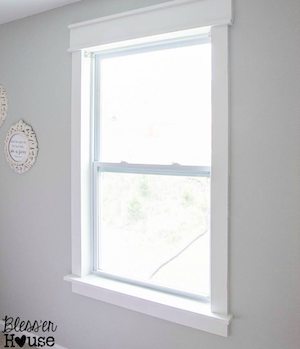
This item demonstrates how to create simple, chunky window trim without the need for complicated miter cuts or specialized tools. It uses straightforward materials like pine boards and basic woodworking techniques to transform plain windows into features with architectural character.
The process involves cutting and assembling wood pieces to form a window sill, sides, and header, then finishing with sanding, priming, and painting. This approach allows users to add a polished, custom look to builder-grade windows, enhancing the overall style of any room.
4. DIY Concrete Overlay Vanity Makeover from Designer Trapped

This item demonstrates how to create a lightweight, budget-friendly concrete vanity top and sink without the need for heavy lifting or building custom forms. It uses a concrete overlay technique applied directly over an existing countertop to achieve the look of real concrete with minimal effort.
The process involves simple tools and materials like a drywall tray, putty knives, and a concrete sealer, making it accessible for DIY enthusiasts. The finished surface is durable and visually appealing, offering a modern update to outdated bathroom vanities in just a few hours.
3. DIY Floor Stickers from The Honeycomb Home

2. Painted Tile from Remington Avenue

This item demonstrates how to transform plain tile surfaces by painting them with durable, specially formulated paints and decorative stencils. It highlights the step-by-step process of preparing, painting, and sealing tiles to create a custom, patterned look without replacing the original tile.
Users will learn how to carefully apply base coats, use painter’s tape for clean edges, and position stencils for precise designs. The method also covers tips for drying times and touch-ups to ensure a long-lasting, visually striking finish on floors or walls.
1. Faux Brick Wall from Sammy on State
