Disclosure: This post contains affiliate links, which means we may earn a commission if you purchase through our links at no extra cost to you.
I still remember the first tin can that survived a kitchen purge and became a little home for my paintbrushes. There was something quietly satisfying about the weight of that metal, the clink when it moved, and the way a strip of patterned paper turned an ordinary can into something I wanted to leave out on the table.
Upcycled Tin Can Organizer Crafts have become a way to turn everyday metal into small, charming helpers around the house.
Each project feels like a tiny rescue mission, and the results often sit on my shelf with a personality of their own.
A cheerful desk caddy from painted tin cans
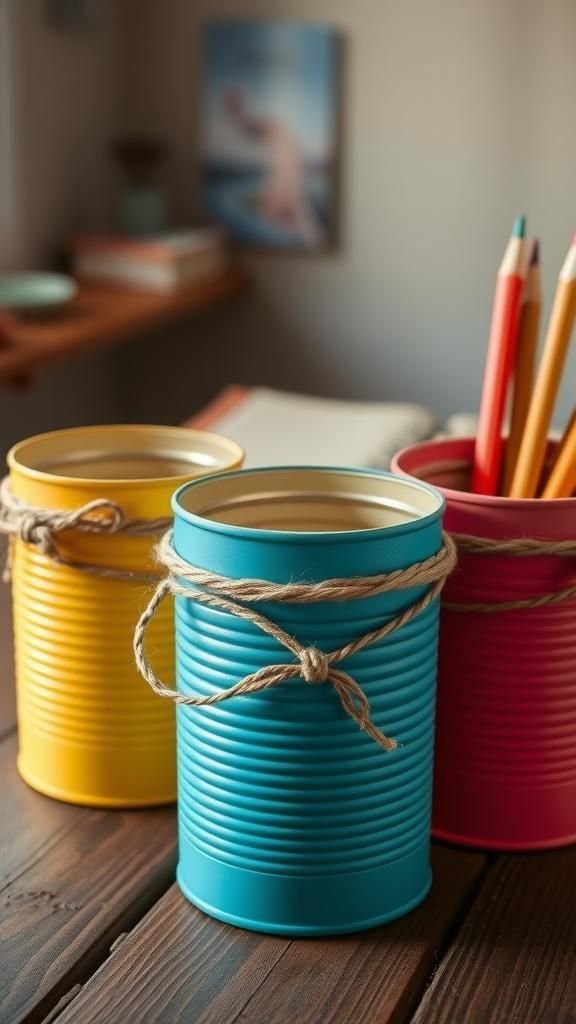
This desk caddy sits where sunlight hits my work table and always seems to smile back. The metal has a pleasant coolness to the touch and a faint metallic tang that reminds me of garage weekends.
I like how a bright, matte finish contrasts with rough twine wrapped around the rim; pencils clink softly when I reach for one. Little flecks of old labels peek through in places, offering a lived-in charm.
It’s the sort of object that makes a cluttered surface feel cared for rather than chaotic.
Steps
- Remove old labels and rinse the can thoroughly.
- Sand any sharp edges and apply a primer coat to the outside.
- Add color with two thin coats of chosen paint, allowing drying time between coats.
- Wrap twine around the upper third and secure the ends.
- Fill with writing tools and place on the desk.
Hanging herb garden with clipped metal rings

I hung a trio of cans by the kitchen window and suddenly my cooking corner felt brighter. The tins catch the breeze and produce a faint metallic chime that I now associate with lunch prep.
Soil dark against the gleaming metal looks unexpectedly elegant, and the herbs scent the air when the sun warms the cans. Morning light bounces off the metal in thin ribbons, and the green leaves create a small, lively contrast.
There’s something comforting about tending to plants housed in containers that once held beans and soup.
Steps
- Empty and clean the cans, then smooth any rough edges around the top.
- Pierce two opposite holes near the rim for suspension points.
- Thread strong cord through the holes and knot securely.
- Add a layer of small stones for drainage, then potting mix and herbs.
- Hang the cans in a sunny window and water gently.
Magnetic spice rack with painted label bands

This magnetic spice rack lives on the fridge and makes cooking feel playful again. Each can rests like a tiny drum against the magnet strip, labeled with hand-written chalkboard tags that I find oddly satisfying to change.
When I tap a can, it sings a hollow note before settling back into place. The painted bands around the middle act like tiny flags, and the colors help me reach for familiar scents without hunting.
The scent of crushed coriander or cumin comes faster when the containers are right where hands expect them.
Steps
- Wash and dry cans thoroughly, removing any adhesive residue.
- Paint a band around the middle of each can and let dry completely.
- Affix strong magnets to the back of each can with heavy-duty adhesive.
- Add chalkboard label stickers to the painted bands and write spice names.
- Arrange the cans on a metal strip or directly on the fridge.
Tiered bathroom organizer with rustic rope accents
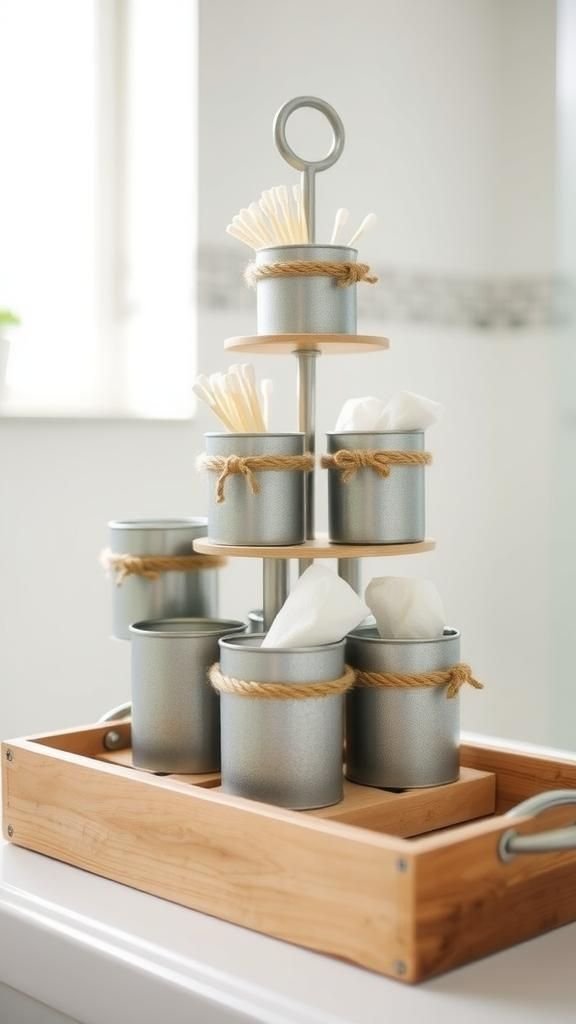
The bathroom organizer sits beside the sink and somehow tames the small chaos of daily rituals. Cold metal next to warm wooden shelves makes for a pleasant contrast, and the slight patina on a few cans reads like a story of past meals.
Cotton pads and q-tips nest within, their softness offset by the can’s crisp rim. Rope trim adds a tactile warmth that’s almost soothing while reaching for a cotton swab.
There’s a rhythm to how things get returned to their can, a small domestic choreography.
Steps
- Clean and dry a set of cans of different heights.
- Stack or group the cans on a small wooden tray for stability.
- Wrap natural rope around rims and fasten it with a strong bond.
- Place cottons, brushes, and small toiletries inside each can.
- Position the tray near the sink for easy access.
Chalkboard-label craft supply sorter
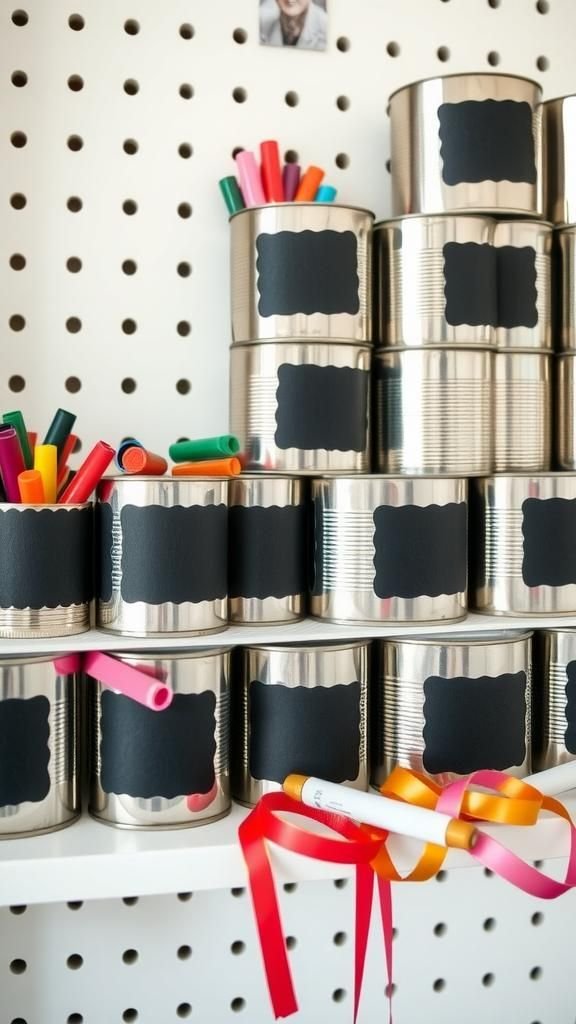
In my craft nook this sorter keeps chaos at bay without feeling sterile. The cans have little chalkboard stickers that I change depending on mood, and the matte black gives a quiet backdrop for bright markers and ribbons.
The clatter of scissors tapping the metal is oddly gratifying, and the ribbon ends create colorful whispers when pulled. I’ve become fond of the tiny smudges of chalk, which add a kind of lived-in authenticity.
Empty jars once, these cans now carry the ongoing saga of weekend projects and late-night tinkering.
Steps
- Rinse cans and remove sharp edges for safety.
- Apply chalkboard sticker labels around each can and smooth out bubbles.
- Fill each can with a category of craft items like markers or ribbons.
- Write the contents on the chalk labels for quick identification.
- Arrange cans on a shelf or under a pegboard in the craft area.
Vintage-inspired candle holders with embossed charm
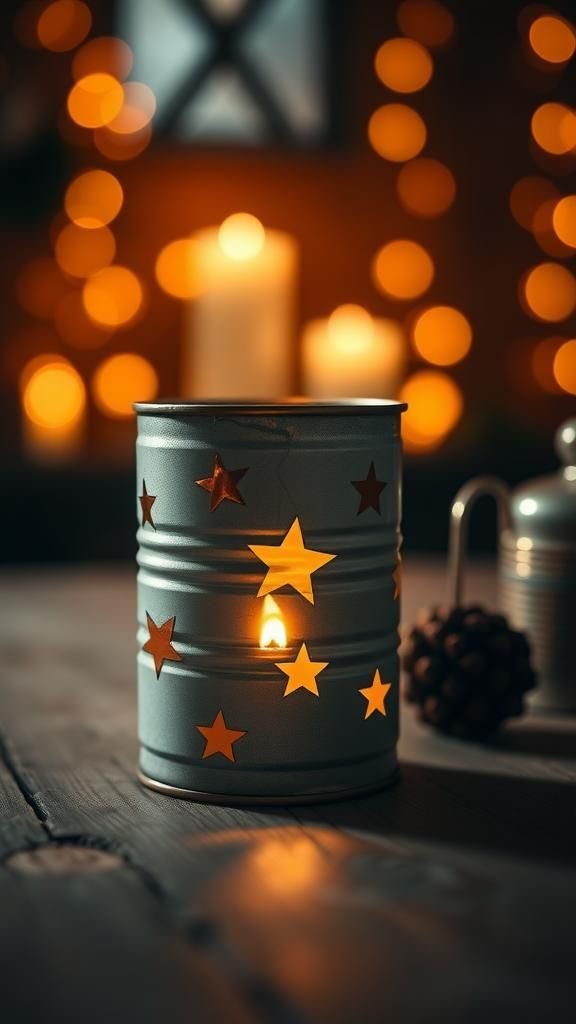
Turning a can into a candle holder gives an ordinary dinner a softer edge. The flicker against the metal produces a warm ring of light, and tiny perforations turn the glow into playful pinpricks on the table.
The exterior keeps a slight coolness while the interior hums with warmth. I like the quiet ritual of dimming lights and watching patterns emerge on the wall.
The cans carry a subtle history when small dents or label remnants remain, adding to the candlelit intimacy rather than detracting from it.
Steps
- Clean and dry the can, then sand any rough edges carefully.
- Create a pattern by marking small perforations around the can surface.
- Use a nail and hammer to make holes following the pattern.
- Place a tea light or LED candle inside the can.
- Light the candle in a safe spot and enjoy the patterned glow.
Bathroom toothbrush holder with ceramic bead flair

This toothbrush holder brightens an otherwise utilitarian sink area with a dash of seaside charm. The can’s cool rim contrasts with the smoothness of ceramic beads strung around the outside, creating a tactile little border.
Water beads form tiny pearls on the inner metal when the morning light catches them. I enjoy the gentle clink when two toothbrushes meet and the way the beads catch stray droplets.
It’s a small object that makes a mundane routine feel a touch more considered.
Steps
- Wash and dry a clean can, smoothing any sharp edges.
- Thread ceramic beads onto a length of beading wire.
- Secure the beaded wire around the can’s exterior with a tight knot.
- Place toothbrushes upright inside an inner liner to keep the metal dry.
- Set the holder beside the sink and replace beads as desired.
Charming wall pocket for mail and small notes

A wall-mounted can turned into a mail pocket has rescued a once-scatty entryway. The can’s cylindrical shape grips envelopes in a satisfying way, preventing that pileup that used to live on the chair.
The sound of sliding a bill into the pocket is small and decisive, and the rim’s coolness contrasts with the textured wall behind it. I’ve grown fond of tucking a pen into a neighboring can, creating a little station that both welcomes and corrals incoming paper.
It’s humble but effective, and it has become part of the daily rhythm.
Steps
- Clean the can and smooth any jagged edges along the opening.
- Attach a sturdy mounting plate or bracket to the back of the can.
- Secure the can to the wall at a convenient height near the door.
- Place envelopes, coupons, and small notes inside the pocket.
- Add a second can for pens if desired.
Paintbrush jar with embossed handle for artists

This jar keeps paintbrushes standing tall and easy to scan when I’m in a flow state. The can’s rim sometimes leaves a faint metallic scent that blends with studio turpentine and oil, making the air feel like work and play simultaneously.
Bristles brush against metal with a soft rasp, and the variety of handles—short, long, wooden—creates a pleasing skyline. A thin band of recycled leather around the body offers a warm counterpoint to the cool metal, and I’ve noticed it catches paint splatters in a way that tells a little story of past paintings.
Steps
- Rinse the can to remove any food residue and dry fully.
- Smooth all edges and, if preferred, add a leather band around the center with adhesive.
- Fill the can with a small amount of sand or pebbles for weight.
- Place paintbrushes bristle-up inside the can.
- Keep the jar on a work table within easy reach.
Mini tool caddy for nails, screws, and bits

On a weekend project, this mini caddy became my trusted bench companion. The cans carry a comforting weight when full of nails, and the metallic clink is oddly reassuring.
I like the way tiny screws nest together like pebbles, and the can’s rim sometimes bears a smudge of old grease that reads like earned character. Placing the caddy nearby makes reaching for a fastener effortless, and the sight of an organized little pile of hardware calms the hurry of a half-finished task.
Steps
- Clean cans thoroughly and dry to remove moisture.
- Label each can for nails, screws, and small hardware pieces.
- Group the cans on a magnetic tray or sturdy wooden base.
- Fill each can with the corresponding hardware items.
- Keep the caddy within arm’s reach on the workbench.
Sewn fabric cozy for a vintage tin planter
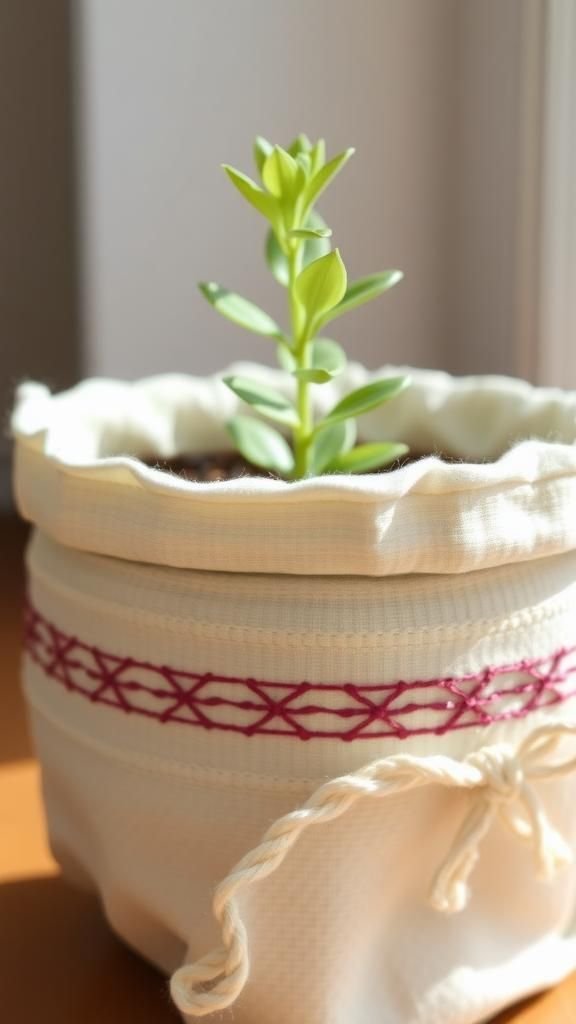
Dressing a can in a stitched cozy makes it feel warm and wearable in a way that metal alone rarely does. The fabric muffles the metallic ring and adds softness to the touch, while embroidered stitches introduce a human mark.
Water droplets beading on the fabric create tiny dark halos, and the juxtaposition of rough weave and smooth metal creates a pleasant visual tension. I often find myself smoothing the fabric when I pass by, a small, quiet habit that seems to keep the planter company.
Steps
- Measure the can’s circumference and cut a rectangle of fabric to fit.
- Sew the short edges together to form a sleeve, leaving the top open.
- Slip the sleeve over the can and adjust the fit.
- Add stitched details or an embroidered motif if desired.
- Slide the planted can into the cozy and display.
Boho jewelry stand with layered metal tins
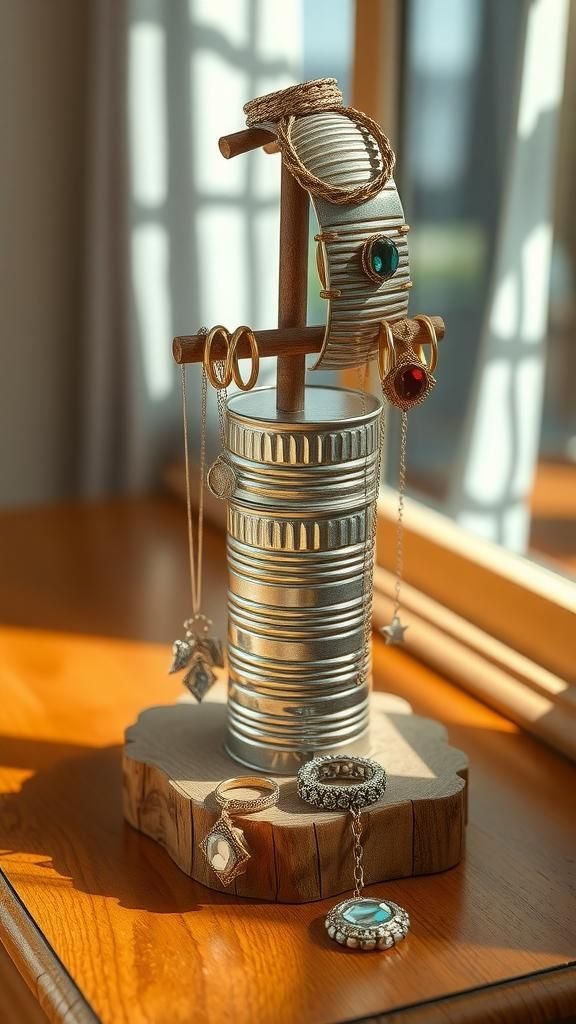
This jewelry stand feels like a tiny festival on the dresser, with rings and chains draped across different can levels. The cans catch glimpses of light, throwing soft highlights onto gemstones and metal quickly.
I enjoy the gentle tangle of delicate chains when I pick a necklace, and the cans’ uneven rims trap small earrings in a pleasantly accidental way. A single splash of patina can make a piece of old metal sing against a polished bracelet, and the overall effect reads casual and collected rather than overly curated.
Steps
- Clean and dry multiple cans and choose a variety of heights.
- Arrange the cans in a tiered layout on a stable base.
- Secure cans to the base with a strong adhesive or fasteners.
- Drape necklaces and place rings and earrings in separate cans.
- Position the stand on a dresser where jewelry is visible and accessible.
Kids’ art supply caddy with colorful stickers

This caddy has become a small ambassador for mess and mischief, and I secretly like that. The cans wear stickers like badges of honor, each one telling a story of a rainy afternoon.
Crayons rest in a crinkly skyline, and the occasional melted stub adds a waxy scent to the nook. The lids sometimes roll under the table, producing an amused hunt that interrupts quiet afternoons in a pleasant way.
I appreciate how the caddy welcomes untidiness while keeping things gathered into a cheerful, reachable cluster.
Steps
- Wash and dry cans, then round off any sharp edges for safety.
- Let children decorate the cans with stickers and washable markers.
- Group the cans on a small tray or carry handle for portability.
- Fill with crayons, markers, glue sticks, and paper scraps.
- Store the caddy within easy reach of the creative area.
Window ledge planter with layered pebble drainage
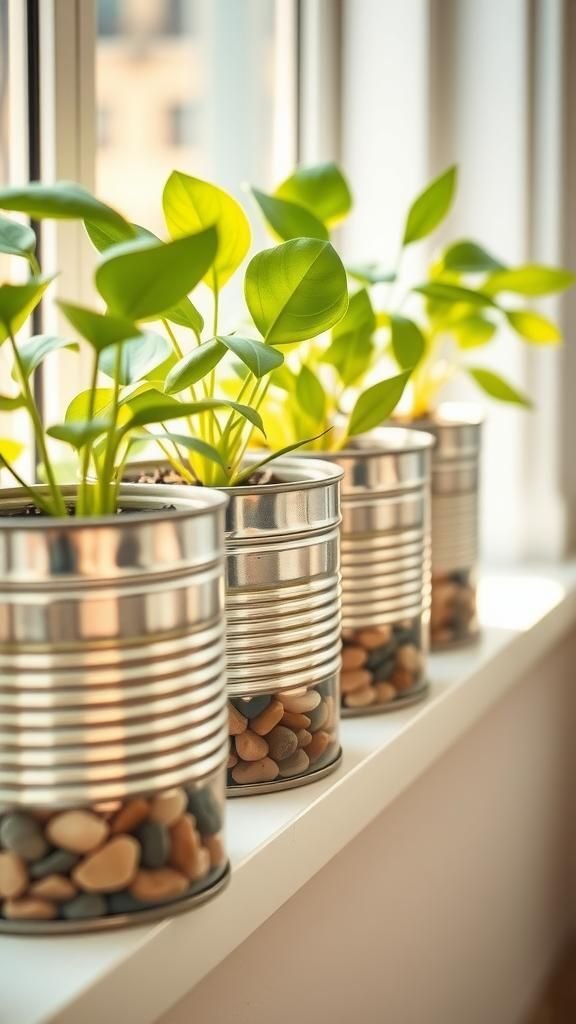
I enjoy the quiet ritual of arranging little pebbles at the bottom of these planters and watching how water settles around them. The cans fit snugly on the window ledge, catching light in a way that makes leaves glow.
There is a satisfying density to the weight when all the pebbles and soil are in place, anchoring the can against the day’s breeze. Tiny droplets collect on the metal rim and sometimes run in delicate lines, creating a miniature weather display that brightens a rainy afternoon.
Steps
- Clean and dry the cans and smooth any rough edges.
- Add a layer of small pebbles or gravel for drainage.
- Fill with potting mix and position plants or seedlings inside.
- Place the cans along a sunny window ledge.
- Water sparingly and enjoy the plants’ growth.
Sculptural desk lamp with perforated tin shade

A perforated tin shade casts playful constellations across my desktop when the lamp is on. The metal warmth contrasts with the bulb’s glow, creating a cozy pool of light that invites evening reading.
The small holes turn light into a soft pattern, and the occasional hum from the lamp feels like a companion in the late hours. I often find myself tracing the dotted silhouette on the wall, a quiet, tactile habit that calms the mind after a long day.
The lamp feels both industrial and unexpectedly intimate.
Steps
- Clean and dry a larger tin can and remove any sharp edges.
- Mark a pattern of small holes around the can surface.
- Carefully pierce the marked spots with a metal punch or nail.
- Fit the can over a lamp kit or secure it to a lamp base.
- Install a low-heat bulb and enjoy the patterned light safely.
Planter chandelier for an eclectic dining corner

Hanging several small planters above the dining table has added a playful overhead garden that changes with the seasons. The cans catch different light angles during meals, throwing tiny gleams onto tableware.
I find that the suspended greenery softens conversation; there’s an approachable intimacy to dining beneath gentle foliage. Occasionally a leaf brushes the edge of a can and leaves a small wet trace that dries into an accidental mark.
The arrangement feels casual and a little theatrical at the same time, like a micro stage for shared moments.
Steps
- Select multiple clean cans of similar size and reinforce rims if needed.
- Punch two opposite holes near each rim for hanging points.
- Attach strong cords to each can and vary the hanging lengths.
- Hang the cans from a ceiling hook or a mounted beam above the table.
- Plant lightweight greenery and rotate for even light exposure.
Portable picnic cutlery caddy with leather handle

This cutlery caddy made for outdoor meals feels sturdy and friendly in hand. The cans hold forks and knives upright, and a leather handle gives the whole thing a confident grip.
The metal hums softly when it catches the breeze, and leftover traces of a past picnic—crumbs tucked into a corner—lend a lived-in warmth. Carrying it across the grass is simple pleasure; it sits on a blanket like a tiny, practical trophy of conviviality.
Setting the caddy down invites plates to gather around and conversation to settle in.
Steps
- Clean and dry several cans, removing sharp edges.
- Secure the cans together on a wooden base and allow to set.
- Attach a leather strap across the top with rivets or strong fasteners.
- Place cutlery upright in the cans for easy access.
- Transport the caddy to a picnic spot and enjoy outdoor meals.
Seed-storage tins with labeled screw-top lids

These small tins feel like little repositories of potential every time I open one. The lids twist with a soft metal click, and the dry scent of seeds is faint and reassuring.
Rows of labeled tins on a shelf create a miniature map of seasons and plans, and the metallic sheen offers a tidy contrast to the organic contents. Handling them is a slow, deliberate ritual that makes a simple task feel ceremonial.
I enjoy lining them up by planting dates and watching a small system take shape on an afternoon.
Steps
- Clean and dry small cans thoroughly to prevent moisture.
- Add screw-top lids or repurpose lids that fit snugly.
- Label each lid with seed type and approximate planting time.
- Store seeds in a cool, dry place away from direct light.
- Rotate stock and add new seeds as seasons change.
Holiday ornament tower from stacked festive cans

Stacking decorated cans into a small tower became a seasonal ritual that always drew a smile. Each can carried a different ornament theme, and the layered colors looked like a tiny parade.
When lights caught the metallic sides, the reflections danced across the room. The scent of evergreen nearby mingled with old metal in a way that felt cozy rather than out of place.
I noticed that guests often reached to lift a can and admire its tiny decoration, which made the whole thing feel interactive and warmly communal.
Steps
- Clean and dry cans, then decorate exteriors with festive motifs.
- Stack cans from largest at the base to smallest at the top for stability.
- Anchor the stack on a stable base with adhesive or a dowel through centers.
- Add small ornaments, lights, or garlands around the stacked cans.
- Place the tower on a mantel or table as a seasonal centerpiece.
Sewing notions holder with pincushion top

This holder keeps pins and threads within cozy reach, and the pincushion on top feels like a little crown. The soft fabric invites the pin’s prick and the can beneath offers steady support.
I appreciate the quiet efficiency of placing a stray needle into the cushion and hearing the faint metallic contact as it drops. Thread colors sit in a gentle array, and the whole piece has a domestic calm that makes odd moments of mending feel surprisingly pleasant.
It is small and unassuming, yet often the one thing I grab first.
Steps
- Prepare a clean can and ensure the rim is smooth.
- Create a small fabric pouch stuffed to form a pincushion and secure it to the top.
- Place spools of thread and small scissors inside the can.
- Keep extra needles and pins in the pincushion for safe storage.
- Store the holder near the sewing machine or craft table.
Portable planter with drainage and carry loop
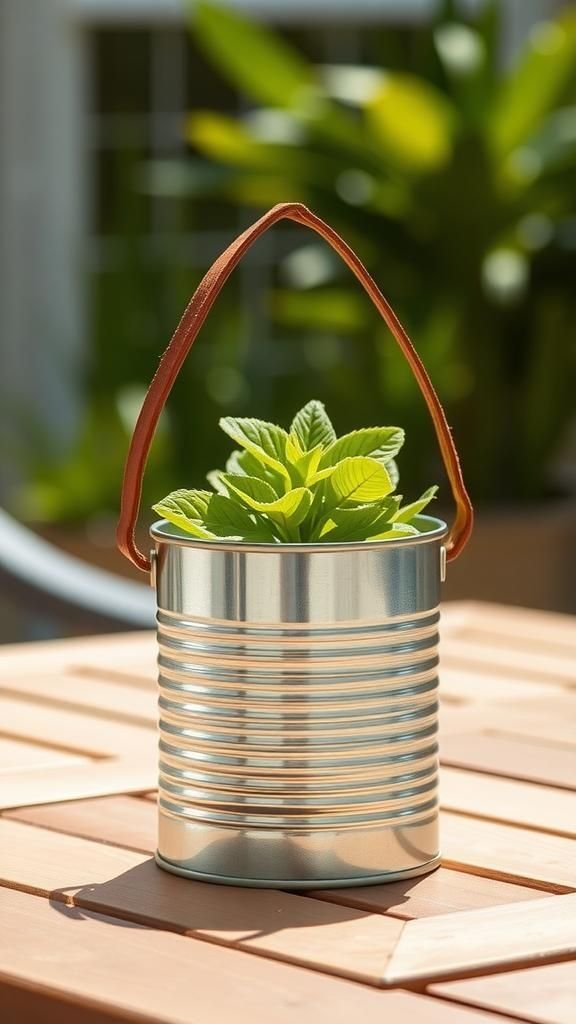
I like how this little planter travels from porch to table without fuss. The carry loop gives the can a personality, like a tiny bucket ready for a short outing.
Soil settles in with a small, satisfying weight and the plant’s leaves bob gently when carried. Tiny drainage holes whisper faint patters when watered, and a ring of sun-faded paint at the rim tells of many afternoons outdoors.
Moving it around changes the light and mood of a room, turning a spot into a transient green pause.
Steps
- Clean and dry the can and create small drainage holes at the base.
- Attach a sturdy metal or leather loop to the side for carrying.
- Add a layer of gravel, then potting mix, and place the plant inside.
- Water carefully and carry to different spots for varied light.
- Inspect the loop and holes regularly for any wear.